
Chapter 4
Exploring Magnets
Reshma lives in a coastal town of
Kerala and is very fond of writing
short stories. Her grandmother
loves listening to her stories, so
Reshma was writing a new story
to share with her grandmother
on her 60th birthday.

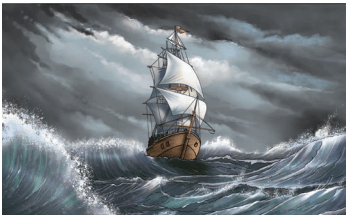
The story was based on a ship
carrying spices from Kerala for
trade in the olden days. Reshma
was aware that in those days,
the sailors used stars to find
directions at night. But in her
story, a situation arose wherein
the sailors got caught in a storm
with an overcast sky and stars
were not visible. Reshma could not take her story forward
as she could not think of a way for sailors to find directions.
She searched for information on the internet and her
school library. She learnt that the travellers used a device,
known as a magnetic compass, for finding
directions.
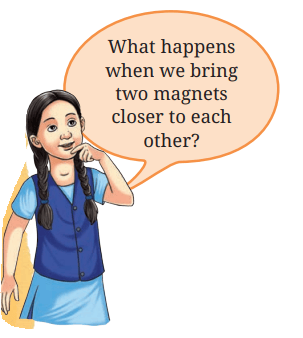
Reshma had seen pencil boxes and
purses which had magnets to keep them
closed.
A writing board in her school
also had a duster with a magnet. But
she had never looked at those carefully.
She now became curious to learn more
about magnets and magnetic compasses.

Fig. 4.1: Some common items that have magnets attached to them
The magnets used by sailors in the olden days were based
on naturally occurring magnets, known as lodestones which
were discovered in ancient times. Later on, people found
out that magnets could also be made from pieces of iron.
Nowadays, we have magnets made of different materials.
The magnets that you find in your school laboratory and
those used in pencil boxes, stickers, toys are all artificial
magnets (Fig. 4.1). The magnets can be of various shapes,
some of which are shown in Fig. 4.2.
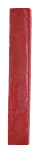
Bar
magnet

U-shaped
magnet
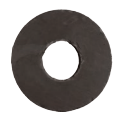
Ring
magnet
Fig. 4.2: Magnets of different shapes
Do magnets
stick to objects
made of certain
materials only?
4.1 Magnetic and Non-magnetic Materials
Activity 4.1: Let us explore
- Collect a few objects made of different materials and also a magnet.
- Predict which of the objects will stick to the magnet. Write your prediction in Table 4.1.
- Now hold a magnet in your hand and bring it near
the objects one by one (Fig. 4.3). Observe which of the
objects stick to the magnet.
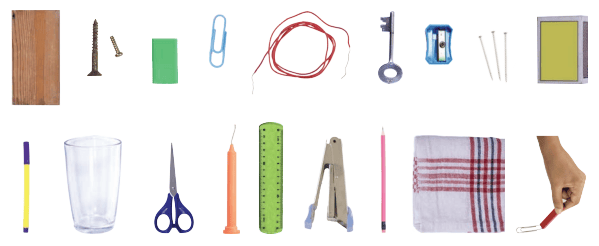
Fig. 4.3: Identifying the materials attracted by a magnet
- Record your observations in Table 4.1.
Table 4.1: Identifying the materials attracted by a magnet
Was your prediction correct for all objects? Which
materials stuck to the magnet? What conclusion can you
draw?
Through this activity, we found out that some of the
objects were attracted to the magnet and stuck to it, while
others were not. The materials which are attracted towards
a magnet are called magnetic materials.
The metal iron is a magnetic material.
Nickel and cobalt are other metals that are
also magnetic. Some of their combinations
with other metals are also attracted
towards magnets. The materials which are
not attracted towards a magnet are called
non-magnetic materials.
Which materials listed in Table 4.1 were
found to be non-magnetic?
Do all parts of a
magnet attract
magnetic
materials
equally?
4.2 Poles of Magnet
Activity 4.2: Let us investigate
- Spread some iron filings (very small pieces of iron) on a sheet of paper.
- Place a bar magnet over them. Tap the paper and
observe carefully what happens to the iron filings.
Do you observe anything special about the way they stick
to the magnet? Do the iron filings stick all over the magnet
uniformly? Or do the iron filings stick more at some places?
We find that maximum iron filings stick near the ends of
the bar magnet, as shown in Fig. 4.4, while a very few iron
filings stick at the remaining part of the magnet.
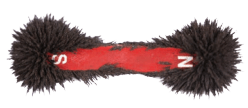
Fig. 4.4: Iron filings sticking
to a bar magnet
These ends of the magnet are called the
two poles of the magnet—the North pole and
the South pole. Most of the iron filings stick
to the poles of a magnet of any shape.
It is not possible to obtain a magnet with
a single pole. If a magnet is broken into
smaller pieces, North and South poles always
exist in pairs even in the smallest piece of the magnet.
A single North pole or a South pole cannot exist.
Can we find
a magnet
with a
single pole?
4.3 Finding Directions
Activity 4.3: Let us experiment
- Suspend a bar magnet with a thread tied to the middle of the magnet as shown in Fig. 4.5. You may need to adjust the position of the string till the magnet is balanced horizontally.
- Now rotate the magnet gently in the horizontal direction and let it come to rest.
- Mark the position corresponding to the ends of the magnet on the ground (or on a piece of paper stuck to the ground). Join these two points on the ground with a line. This line indicates the direction along which the magnet comes to rest.
- Now again rotate the magnet by giving a
gentle push at its one end and wait till it
comes to rest. Does the magnet rest along
the same line?
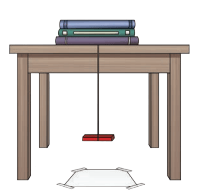
Fig. 4.5: A freely suspended
bar magnet
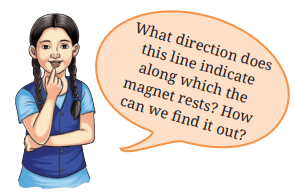
If we have noticed the direction
where the Sun rises or sets, we
have an approximate idea of
where East or West is. Hence, we
can locate the direction along
which the magnet rests
A freely suspended magnet comes to rest along the
north-south direction. The end of the magnet that points
towards north direction is called the North-seeking pole or
the North pole of the magnet. The other end that points
towards the South direction is called the South-seeking
pole or the South pole of the magnet. A freely suspended
magnet rests along the north-south direction because our
Earth itself behaves like a giant magnet.
Repeat this activity with a small iron bar in place of
the bar magnet. What do you observe? Does it always rest
along north-south direction? It does not. It can rest along
any direction. This implies that only magnets rest along
north-south direction. This activity provides us with a way
to test whether a piece of metal is a magnet or not.
The property of a freely suspended magnet to always rest
along the north-south direction is used to find directions.
Based on this, a small device called a magnetic compass was
developed in olden days for finding directions. It
has a magnet in the shape of a needle which can
rotate freely (Fig. 4.6). The needle of a magnetic
compass indicates the north-south direction
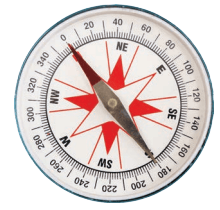
The compass is kept at the place where we
wish to know the directions. After some time, the
needle comes to rest in the north-south direction.
The compass box is then gently rotated until the
north and south marked on the dial are aligned
with the needle. Now all directions at that place
are as indicated on the dial.
More to know!
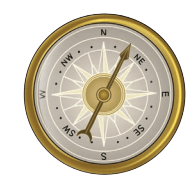
A magnetic compass is usually a small circular box
with a transparent cover on it, as shown in Fig. 4.6.
The magnet, in the shape of a needle, is mounted
on a pin standing on the bottom of the box. This
needle is balanced on the pin in such a
manner that it can move around this point
easily, that is, it can rotate freely. The end of
the needle which rests in the North direction
is usually painted red. Below the needle,
there is a dial with directions marked on it.
Activity 4.4: Let us construct
- Collect a few materials like a cork piece, iron sewing needle, a permanent bar magnet, a glass bowl, and water.
- Place the iron sewing needle on a wooden table. Then
keep any one pole of the magnet at one end of
the needle. Move the magnet over the needle
along its length as shown in Fig. 4.7a. When it
reaches the other end of the needle, lift it up.
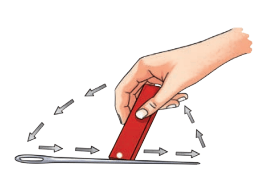
Fig. 4.7(a): Making an iron
needle a magnet
- Bring the same pole of the magnet you started with to the same end of the sewing needle from which you began, and repeat the previous step. Repeat this process at least 30 to 40 times.
- Bring some iron filings or steel pins near the needle. If the pins or iron filings get attracted to the needle, then that means that the needle has become a magnet.
- Pass this needle through the cork horizontally. Float the cork in a glass bowl filled with water, such that the needle always remains above the level of water as shown in Fig. 4.7b.
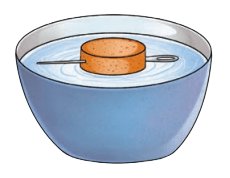
Fig. 4.7(b): A compass needle in a bowl of water
- When the needle comes to rest, your magnetic compass is ready for use. Note the direction in which either side of the needle points.
- Rotate the cork gently and wait till it stops rotating. Repeat this a few more times. Do the ends of the needle always point in the same direction?
Do you know!
Much before the widespread use of the modern
magnetic compass (Fig. 4.6), a device similar to
the compass needle made by you (Fig. 4.7b) was
used by Indians for navigation at
sea. It consisted of a magnetised
fish-shaped iron piece, kept
in a vessel of oil. It was called
matsya-yantra (or machchhyantra).
4.4 Attraction and Repulsion between Magnets
Activity 4.5: Let us experiment
- Take a pair of bar magnets on which North and South poles have been marked. Mark the two bar magnets as A and B.
- Place the longer side of magnet A over 5–6 round shaped pencils as shown in Fig. 4.8a.
- Now bring one end of magnet B near the end of magnet A placed on the pencils. Make sure that the two magnets do not touch each other. Observe what happens.
- Next, bring the other end of magnet B near the same end
of magnet A (Fig. 4.8b). Does the magnet A on the pencils
begin to move? Does it always move in the direction of
the approaching magnet? What do these observations
suggest?
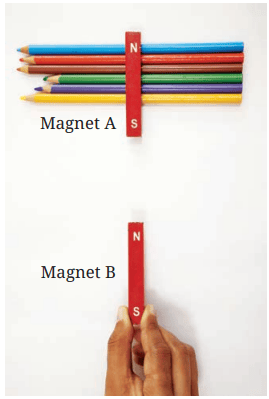
(a)
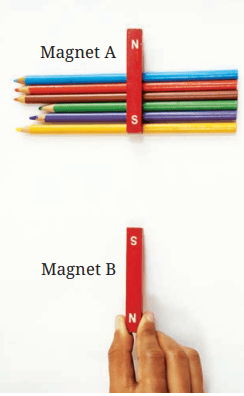
(b)
Fig. 4.8: Interaction between two bar magnets
You will see that unlike poles of two magnets, that is, the
North pole of one magnet and the South pole of another
magnet, attract each other. The like poles, that is, either
the North poles or the South poles of both magnets, repel
each other.
- Repeat the activity by using an iron bar in place of one of the magnets. What do you observe this time? You will find that both the ends of the iron bar will be attracted by both the North and South poles of the magnet. From this activity, we find that a magnet can be identified by its property of repulsion.
Activity 4.6: Let us experiment
- Take a magnetic compass and a bar magnet.
- Place the magnetic compass over a horizontal surface and wait for its needle to come to rest.
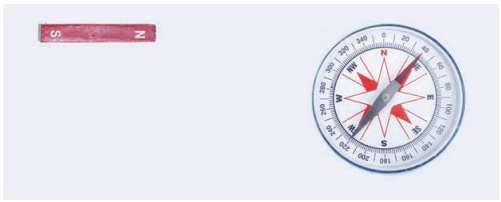
- Now slowly bring North pole of the bar magnet close to the North pole of the compass needle as shown in Fig. 4.9a. Observe the compass needle carefully. What do you observe? Does the needle deflect? If yes, in which direction?
- Now repeat the above step with the South pole of the
bar magnet. Do you observe any difference this time?
 (a)
(a)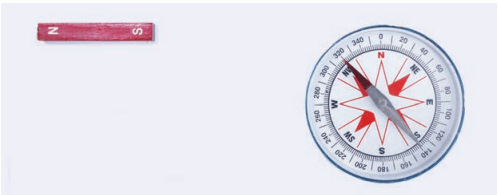 (b)
(b)Fig. 4.9: A compass needle and a magnet
When the North pole of a magnet is brought closer to the
North pole of the compass needle, it moves away as shown
in Fig. 4.9a. When the South pole of the magnet is brought
closer to the North pole of the compass needle, it moves
closer (Fig. 4.9b).
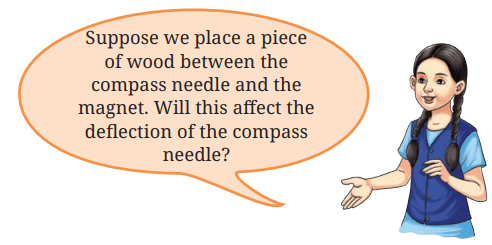
Activity 4.7: Let us investigate
- Repeat the first or second part of Activity 4.6.
- Without
disturbing the
bar magnet
and magnetic
compass, place
a piece of wood
between them,
perpendicular
to the table as
shown in Fig.
4.10. Observe the
compass needle
carefully.
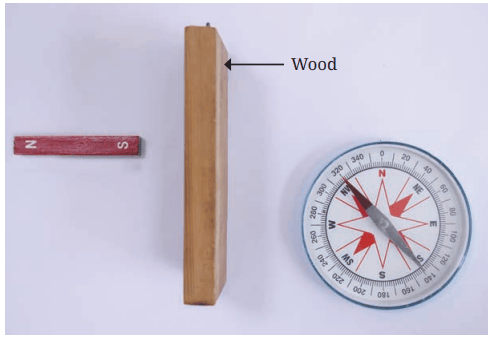
Fig. 4.10: Compass needle and a magnet
with a piece of wood in between
- Is there any effect on the deflection of compass needle due to the piece of wood? Record your observation in Table 4.2.
- Repeat the process by replacing the piece of wood by a cardboard sheet, thin plastic sheet, and a thin glass sheet.
Table 4.2: Observing the effect of magnet through
non-magnetic materials
You would observe that there is no appreciable change in
the deflection of the needle when a sheet of any of the above
material is placed between the magnet and the compass
needle. So, we can conclude that the magnetic effect can act
through non-magnetic materials
4.5 Fun with Magnets
After learning about magnets, Reshma was very excited and
decided to set up some fun activities using magnets at her
school fair. You may try making these yourself and may also
think of some more fun ideas.
Can we make a garland? (Fig. 4.11)
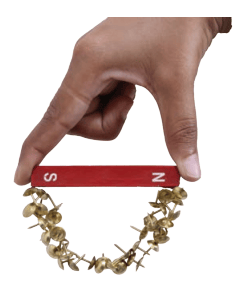
Fig. 4.11: Magnetic garland
Can we take the steel balls out of the maze by moving a
magnet below the cardboard tray? (Fig. 4.12)
Can we pick out a steel
paper clip fallen in water using
a magnet, without making our
fingers or the magnet wet?
(Fig. 4.13)
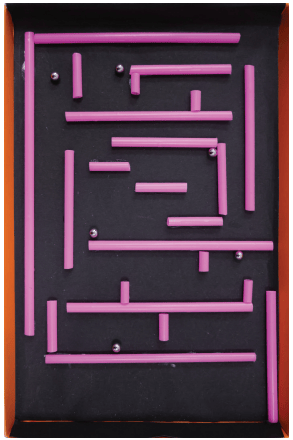
Fig. 4.12: Steel balls in a maze
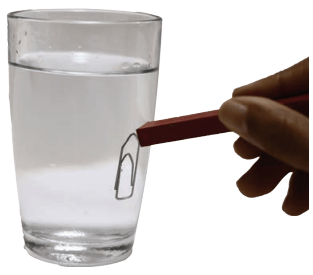
Fig. 4.13: Steel paperclip in water
Will the two cars speed towards each other or run away
from each other when brought closer? (Fig. 4.14)
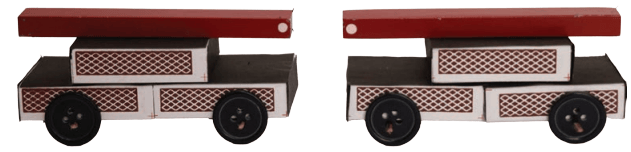
Fig. 4.14: Two matchbox-magnet cars with
like poles of the magnets facing each other
More to know!
In some magnets, the North and South poles are
marked as N and S. In some other magnets, the
North pole is indicated by a white dot. Sometimes,
the North pole of a magnet is painted red and
South pole is painted blue.
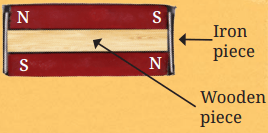
How to keep the magnets safe?

Magnet says,
“Store me properly. Keep
me in pairs with unlike
poles on the same side.
Keep a piece of wood
in between. Place two
pieces of soft iron across
the ends.”
Caution
Have fun,
but treat
magnets
with care
Keywords
Summary
- A magnet has two poles—the North pole and the South pole.
- The poles of a magnet always exist in pairs. A single North pole or a single South pole cannot exist.
- Magnetic materials are the materials that are attracted towards a magnet.
- Non-magnetic materials are the materials that are not attracted towards a magnet.
- A freely suspended magnet rests along the north-south direction.
- The needle of a magnetic compass indicates the north-south direction.
- When two magnets are brought close to each other, like poles
(North-North, South-South) repel each other while unlike
poles (North-South) attract each other
Let us enhance our learning
1. Fill in the blanks
(i) Unlike poles of two magnets each other, whereas like poles each other.
(ii) The materials that are attracted towards a magnet are called .
(iii) The needle of a magnetic compass rests along the direction.
(iv) A magnet always has poles.
2. State whether the following statements are True (T) or False (F).
(i) A magnet can be broken into pieces to obtain a single pole. [ ]
(ii) Similar poles of a magnet repel each other. [ ]
(iii) Iron filings mostly stick in the middle of a barmagnet when it is brought near them. [ ]
(iv) A freely suspended bar magnet always aligns with the north-south direction. [ ]
3. Column I shows different positions in which one pole of a magnet is placed near that of the other. Column II indicates the resulting interaction between them for different situations. Fill in the blanks.
4. Atharv performed an experiment inwhich he took a bar magnet and rolled it over a heap of steel U-clips (Fig. 4.15).
According to you, which of the options given in Table 4.3 is likely to be his observation?
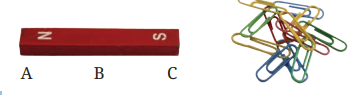
Fig. 4.15: Bar magnet and heap
of steel U-clips
5. Reshma bought three identical metal bars from the market. Out of these bars, two were magnets and one was just a piece of iron. How will she identify which two amongst the three could be magnets (without using any other material)?
6. You are given a magnet which does not have the poles marked. How can you find its poles with the help of another magnet which has its poles marked?
7. A bar magnet has no markings to indicate its poles. How would
you find out near which end its North pole is located without
using another magnet?
8. If the earth is itself a magnet, can you guess the poles of earth’s
magnet by looking at the direction of the magnetic compass?
9. While a mechanic was repairing a
gadget using a screw driver, the steel
screws kept falling down. Suggest a way
to solve the problem of the mechanic on
the basis of what you have learnt in this
chapter.
10. Two ring magnets X and Y are arranged as
shown in Fig. 4.16. It is observed that the
magnet X does not move down further.
What could be the possible reason?
Suggest a way to bring the magnet X in
contact with magnet Y, without pushing
either of the magnets.
11. Three magnets are arranged on
a table in the form of the shape
shown in Fig. 4.17. What is the
polarity, N or S, at the ends 1, 2, 3,
4 and 6 of the magnets? Polarity
of one end (5) is given for you.
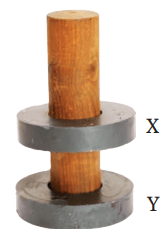
Fig. 4.16: Two ring magnets
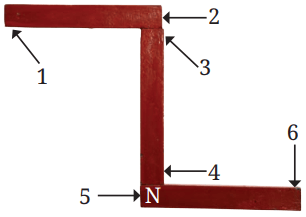
Fig. 4.17: Three bar magnets
Learning further
- Using 3–4 different magnets, try to lift steel pins or U-clips and check which magnet picks up the largest number of pins. Discuss with your friends why different magnets might have picked up different numbers of pins.
- Make a toy ‘Hopping Frog’ as a combined class activity
with the help of your teacher. For constructing the toy, fix
ring magnets in an alternate North-South fashion along the
length of a scale using glue (Fig. 4.18a). Paint a frog on
paper, cut along the outline and glue a ring magnet
at its base. Take a transparent, flexible plastic strip
(Fig. 4.18a) of a smaller size and glue it to the ring magnet
which is attached to the frog.
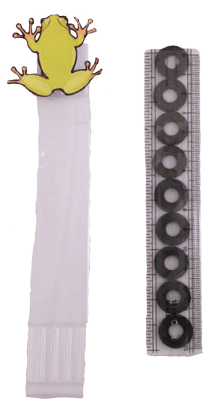 (a)
(a)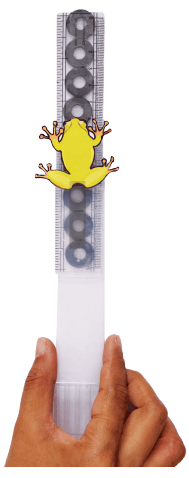 (b)
(b)Fig. 4.18: My hopping frog
When you slide the plastic strip (with frog) over the
scale (Fig. 4.18b), you can observe the frog hopping.
- Find out about the Maglev Train and try to make its model.
- Try to find out why there is a need to make magnets of different shapes.
- Collect information related to the use of magnets in the field of medicine.