
2
Lines and Angles
In this chapter, we will explore some of the most basic ideas of
geometry including points, lines, rays, line segments and angles.
These ideas form the building blocks of ‘plane geometry’, and will
help us in understanding more advanced topics in geometry such as
the construction and analysis of different shapes.
2.1 Point
Mark a dot on the paper with a sharp tip of a pencil. The sharper the
tip, the thinner will be the dot. This tiny dot will give you an idea of
a point. A point determines a precise location, but it has no length,
breadth or height. Some models for a point are given below.
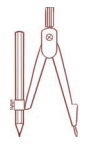 The tip of a compass |
 The sharpened end of a pencil |
 The pointed end of a needle |
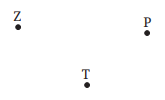
If you mark three points on a piece of paper,
you may be required to distinguish these three
points. For this purpose, each of the three points
may be denoted by a single capital letter such as Z, P and T. These points are read as ‘Point Z’, ‘Point P’ and ‘Point T’. Of
course, the dots represent precise locations and must be imagined to be
invisibly thin.
2.2 Line Segment
Fold a piece of paper and unfold it. Do you
see a crease? This gives the idea of a line
segment. It has two end points, A and B.
Mark any two points A and B on a sheet of
paper. Try to connect A to B by various
routes (Fig. 2.1).
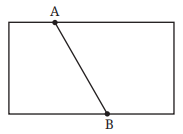
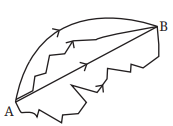
Fig. 2.1
What is the shortest route from A to B?
This shortest path from point A to Point B
(including A and B) as shown here is called
the line segment from A to B. It is denoted by
either AB or BA. The points A and B are called
the end points of the line segment AB.
2.3 Line
Imagine that the line segment from A to B (i.e.,
AB) is extended beyond A in one direction and
beyond B in the other direction without any
end (see Fig 2.2). This is a model for a line. Do
you think you can draw a complete picture of
a line? No. Why?
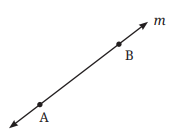
Fig. 2.2
A line through two points A and B is written as AB. It extends
forever in both directions. Sometimes a line is denoted by a letter like
l or m.
Observe that any two points determine a unique line that passes
through both of them.
2.4 Ray
A ray is a portion of a line that starts at one point (called the starting
point or initial point of the ray) and goes on endlessly in a direction.
The following are some models for a ray:
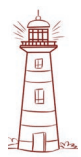 Beam of light from a lighthouse |
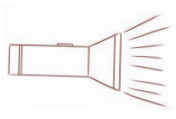 Ray of light from a torch |
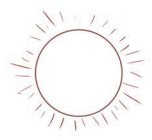 Sun rays |
Look at the diagram (Fig. 2.3) of a ray. Two points are
marked on it. One is the starting point A and the other
is a point P on the path of the ray. We then denote the
ray by AP.
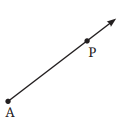
Fig. 2.3
 Figure it Out
1
Rihan marked a point
on a piece of paper.
How many lines can he
draw that pass through
the point?
Sheetal marked two points
on a piece of paper. How
many different lines can
she draw that pass through
both of the points?
Can you help Rihan and Sheetal find their answers?
2. Name the line segments in Fig. 2.4. Which of the five marked
points are on exactly one of the line segments? Which are on two
of the line segments?
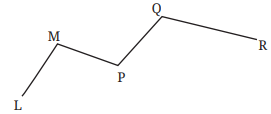
Fig. 2.4
3. Name the rays shown in Fig. 2.5. Is T the starting point of each of
these rays?
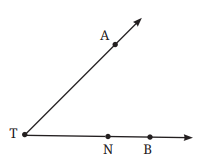
Fig. 2.5
4. Draw a rough figure and write labels appropriately to illustrate
each of the following:
a. OP and OQ meet at O.
b. XY and PQ intersect at point M.
c. Line l contains points E and F but not point D.
d. Point P lies on AB.
5. In Fig. 2.6, name:
a. Five points
b. A line
c. Four rays
d. Five line segments
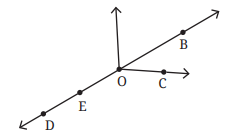
Fig. 2.6
6. Here is a ray OA (Fig. 2.7). It starts at O and
passes through the point A. It also passes
through the point B.
a. Can you also name it as OB ? Why?
b. Can we write OA as AO? Why or why not?
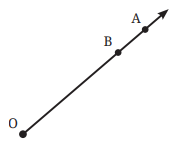
Fig. 2.7
2.5 Angle
An angle is formed by two rays having a
common starting point. Here is an angle
formed by rays BD and BE where B is
the common starting point (Fig. 2.8).
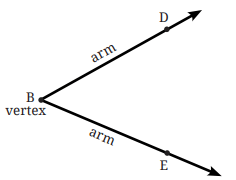
Fig. 2.8
The point B is called the vertex of the
angle, and the rays BD and BE are called
the arms of the angle. How can we name
this angle? We can simply use the vertex and say that it is the Angle
B. To be clearer, we use a point on each of the arms together with the
vertex to name the angle. In this case, we name the angle as Angle DBE
or Angle EBD. The word angle can be replaced by the symbol ‘∠’, i.e.,
∠DBE or ∠EBD. Note that in specifying the angle, the vertex is always
written as the middle letter.
To indicate an angle, we use a small curve at the vertex (refer to
Fig. 2.9).
Vidya has just opened her book. Let us observe her opening the
cover of the book in different scenarios.
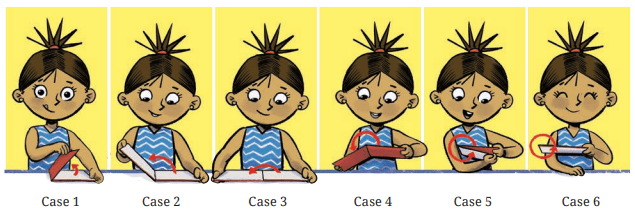 Do you see angles being made in each of these cases? Can you mark
their arms and vertex?
Do you see angles being made in each of these cases? Can you mark
their arms and vertex? Which angle is greater—the angle in Case 1 or the angle in Case 2?
Just as we talk about the size of a line based on its length, we also
talk about the size of an angle based on its amount of rotation.
So, the angle in Case 2 is greater as in this case she needs to rotate
the cover more. Similarly, the angle in Case 3 is even larger than that
of Case 2, because there is even more rotation, and Cases 4, 5, and 6
are successively larger angles with more and more rotation.
The size of an angle is the amount of rotation or turn that is needed
about the vertex to move the first ray to the second ray.
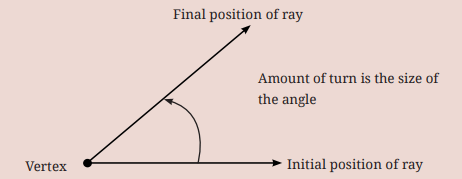
Fig. 2.9
Let’s look at some other examples where angles arise in real life
by rotation or turn:
- In a compass or divider, we turn the arms to form an angle. The vertex is the point where the two arms are joined. Identify the arms and vertex of the angle.
- A pair of scissors has two blades. When we open
them (or ‘turn them’) to cut something, the blades
form an angle. Identify the arms and the vertex of
the angle.
- Look at the pictures of spectacles, wallet and other common
objects. Identify the angles in them by marking out their arms
and vertices.

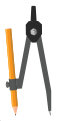
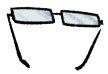
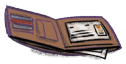
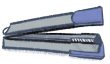


Do you see how these angles are formed by turning one arm with
respect to the other?
Teacher’s Note
Teacher needs to organise various activities with the students to
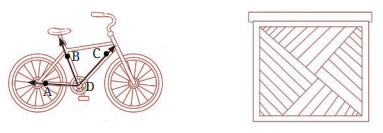
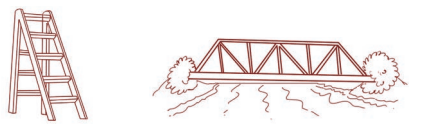
recognise the size of an angle as a measure of rotation. Figure it Out1. Can you find the angles in the given pictures? Draw the rays
forming any one of the angles and name the vertex of the angle.
2. Draw and label an angle with arms ST and SR.
3. Explain why ∠APC cannot be labelled as ∠P.
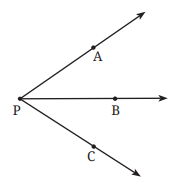
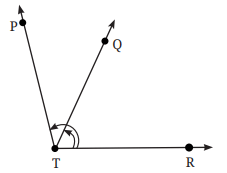
4. Name the angles marked in the given figure.
5. Mark any three points on your paper that are not on one line. Label
them A, B, C. Draw all possible lines going through pairs of these
points. How many lines do you get? Name them. How many angles
can you name using A, B, C? Write them down, and mark each of
them with a curve as in Fig. 2.9.
6. Now mark any four points on your paper so that no three of them
are on one line. Label them A, B, C, D. Draw all possible lines going
through pairs of these points. How many lines do you get? Name
them. How many angles can you name using A, B, C, D? Write them
all down, and mark each of them with a curve as in Fig. 2.9.
2.6 Comparing Angles
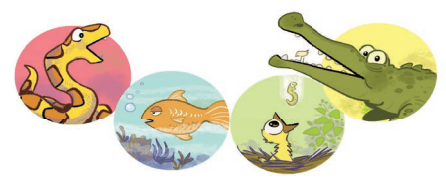
Look at these animals opening their mouths. Do you see any angles here?
If yes, mark the arms and vertex of each one. Some mouths are open
wider than others; the more the turning of the jaws, the larger the angle!
Can you arrange the angles in this picture from smallest to largest?
 Is it always easy to compare two angles?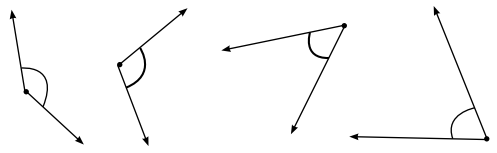
Here are some angles. Label each of the angles. How will you
compare them?
Draw a few more angles; label them and compare.
Comparing angles by superimposition
Any two angles can be compared by placing them one over the other,
i.e., by superimposition. While superimposing, the vertices of the
angles must overlap.
After superimposition, it becomes clear which angle is smaller
and which is larger.
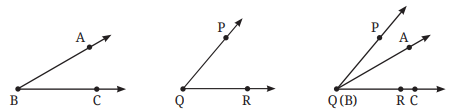
The picture shows the two angles superimposed. It is now clear
that ∠PQR is larger than ∠ABC.
Equal angles. Now consider ∠AOB and ∠XOY in the figure. Which
is greater?
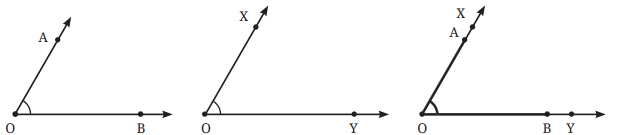
The corners of both of these angles match and the arms overlap with
each other, i.e., OA ↔ OX and OB ↔ OY. So, the angles are equal in size.
The reason these angles are considered to be equal in size is
because when we visualise each of these angles as being formed out
of rotation, we can see that there is an equal amount of rotation
needed to move OB to OA and OY to OX .
From the point of view of superimposition, when two angles
are superimposed, and the common vertex and the two rays of
both angles lie on top of each other, then the sizes of the angles
are equal.
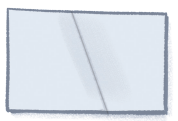
Where else do we use superimposition to compare? Figure it Out1. Fold a rectangular sheet of paper, then draw a line along the fold
created. Name and compare the angles
formed between the fold and the sides
of the paper. Make different angles by
folding a rectangular sheet of paper and
compare the angles. Which is the largest
and smallest angle you made?
2. In each case, determine which angle is
greater and why.
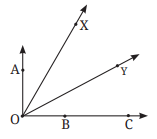
a. ∠AOB or ∠XOY
b. ∠AOB or ∠XOB
c. ∠XOB or ∠XOC
Discuss with your friends on how
you decided which one is greater.
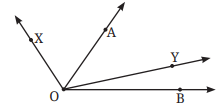
3. Which angle is greater: ∠XOY or ∠AOB? Give reasons.
Comparing angles without superimposition
Two cranes are arguing
about who can open their
mouth wider, i.e., who is
making a bigger angle.
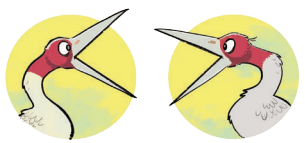
Fig. 2.10
Let us first draw their
angles. How do we know
which one is bigger? As seen before, one could trace these angles, superimpose them and then
check. But can we do it without superimposition?
Suppose we have a transparent circle which can be moved and
placed on figures. Can we use this for comparison?
Let us place the circular paper on the angle made by the first
crane. The circle is placed in such a way that its centre is on the
vertex of the angle. Let us mark the points A and B on the edge circle
at the points where the arms of the angle pass through the circle.
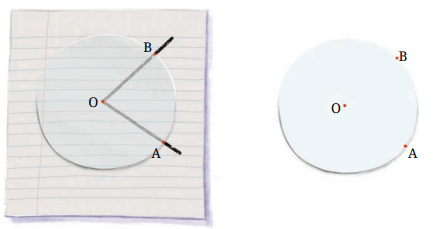
Can we use this to find out if this angle is greater than, or equal to
or smaller than the angle made by the second crane?
Let us place it on the angle made by the second crane so that the
vertex coincides with the centre of the circle and one of the arms
passes through OA.
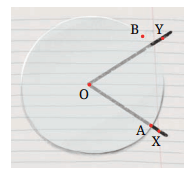
Can you now tell
which angle is bigger?
Which crane was making the bigger angle?
If you can make a circular piece of transparent paper, try this method
to compare the angles in Fig. 2.10 with each other.
Teacher’s Note
A teacher needs to check the understanding of the students
around the notion of an angle. Sometimes students might think
that increasing the length of the arms of the angle increases
the angle. For this, various situations should be posed to the
students to check their understanding on the same.2.7 Making Rotating Arms
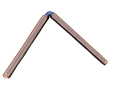
Let us make ‘rotating arms’ using two paper straws and a paper clip
by following these steps:
- Take two paper straws and a paper clip.

- Insert the straws into the arms of the paper
clip.
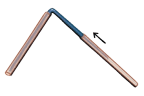
- Your rotating arm is ready!
Passing through a slit: Collect a number of rotating arms with different
angles; do not rotate any of the rotating arms during this activity.
Take a cardboard and make an angle-shaped slit as shown below
by tracing and cutting out the shape of one of the rotating arms.
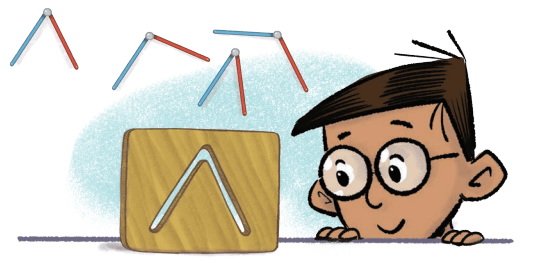
Now, shuffle and mix up all the rotating arms. Can you identify
which of the rotating arms will pass through the slit?
The correct one can be found by placing each of the rotating arms
over the slit. Let us do this for some of the rotating arms:
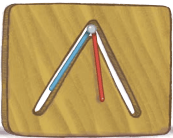 Slit angle is greater than the arms’ angle. The arms will not go through the slit. |
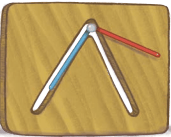 Slit angle is less than the arms’ angle. The arms will not go through the slit. |
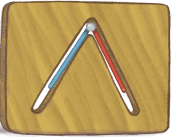 Slit angle is equal to the arms’ angle. The arms will go through the slit. |
Only the pair of rotating arms where the angle is equal to that of the
slit passes through the slit. Note that the possibility of passing through
the slit depends only on the angle between the rotating arms and not
on their lengths (as long as they are shorter than the length of the slit).
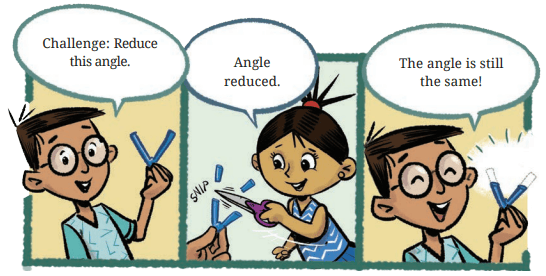
Challenge: Reduce
this angle.
Angle
reduced.
The angle is still
the same!
2.8 Special Types of Angles
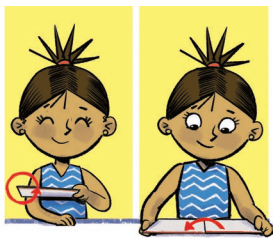
Let us go back to Vidya’s
notebook and observe her
opening the cover of the book
in different scenarios.
She makes a full turn of the
cover when she has to write
while holding the book in
her hand.
She makes a half turn of the
cover when she has to open
it on her table. In this case,
observe the arms of the angle formed. They lie in a straight line.
Such an angle is called a straight angle.

Let us consider a straight angle ∠AOB. Observe that any ray OC
divides it into two angles, ∠AOC and ∠COB.
Is it possible to draw OC such that the two angles are
equal to each other in size?Let’s Explore
We can try to solve this problem using a piece of paper. Recall that when
a fold is made, it creates a crease which is straight.
Take a rectangular piece of paper and on one of its sides, mark
the straight angle AOB. By folding, try to get a line (crease) passing
through O that divides ∠AOB into two equal angles.
How can it be done?
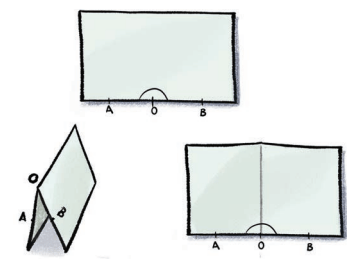
Fold the paper such that OB overlaps with OA. Observe the crease
and the two angles formed.
Justify why the two angles are equal. Is there a way to
superimpose and check? Can this superimposition be done by
folding?
Each of these equal angles formed are called right angles. So, a
straight angle contains two right angles.
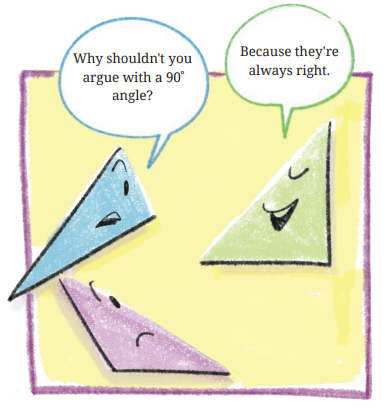
Why shouldn't you
argue with a 90̊
angle?
Because they're
always right
If a straight angle is formed by half of a full turn, how much of a
full turn will form a right angle? Observe that a right angle resembles the shape of an ‘L’. An angle
is a right angle only if it is exactly half of a straight angle. Two lines
that meet at right angles are called perpendicular lines.
Figure it Out- How many right angles do the windows of your classroom
contain? Do you see other right angles in your classroom?
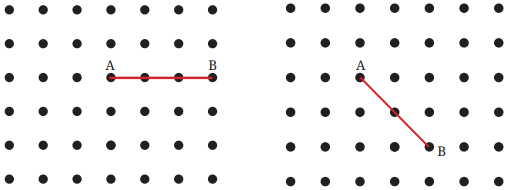
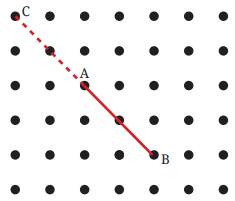
- Join A to other grid points in the figure by a straight line to get a
straight angle. What are all the different ways of doing it?
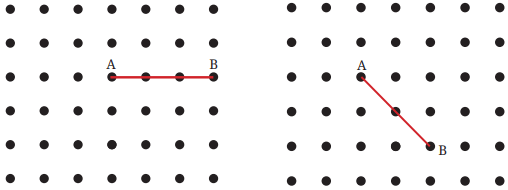
- Now join A to other grid points in the figure by a straight line to
get a right angle. What are all the different ways of doing it?
4. Get a slanting crease on the paper. Now, try to get another crease
that is perpendicular to the slanting crease.
a. How many right angles do you have now? Justify why the
angles are exact right angles.
b. Describe how you folded the paper so that any other person
who doesn’t know the process can simply follow your
description to get the right angle.
Classifying Angles
Angles are classified in three groups as shown below. Right angles
are shown in the second group. What could be the common feature
of the other two groups?
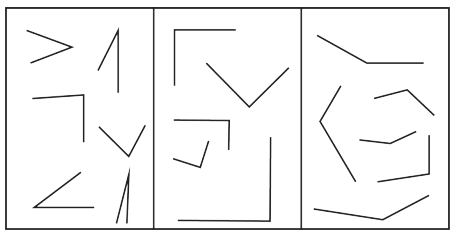
In the first group, all angles are less than a right angle or in other
words, less than a quarter turn. Such angles are called acute angles.
In the third group, all angles are greater than a right angle but
less than a straight angle. The turning is more than a quarter turn
and less than a half turn. Such angles are called obtuse angles.
Figure it Out- Identify acute, right, obtuse and straight angles in the previous figures.
- Make a few acute angles and a few obtuse angles. Draw them in
different orientations.
- Do you know what the words acute and obtuse mean? Acute means sharp and obtuse means blunt. Why do you think these words have been chosen?
- Find out the number of acute angles in each of the figures below.
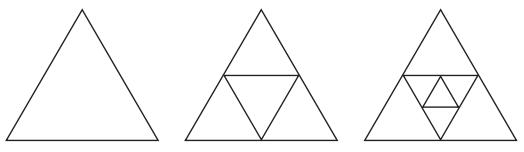
What will be the next figure and how many acute angles will it have?
Do you notice any pattern in the numbers?
2.9 Measuring Angles
We have seen how to compare two angles. But can we actually
quantify how big an angle is using a number without having to
compare it to another angle?
We saw how various angles can be compared using a circle.
Perhaps a circle could be used to assign measures for angles?
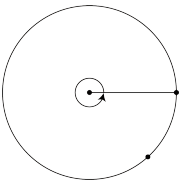
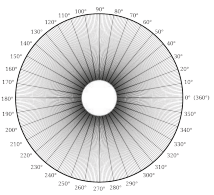
To assign precise measures to angles, mathematicians came up
with an idea. They divided the angle in the centre of the circle into 360 equal angles or parts. The angle measure of each of these unit
parts is 1 degree, which is written as 1°.
This unit part is used to assign measure to any angle: the measure
of an angle is the number of 1° unit parts it contains inside it. For
example, see this figure:
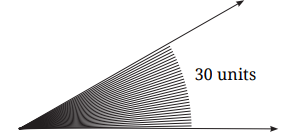
It contains 30 units of 1° angle and so we say that its angle measure is 30°.
Measures of different angles: What is the measure of a full turn in
degrees? As we have taken it to contain 360 degrees, its measure is 360°.
What is the measure of a straight angle in degrees? A straight
angle is half of a full turn. As a full-turn is 360°, a half turn is 180°.
What is the measure of a right angle in degrees? Two right angles
together form a straight angle. As a straight angle measures 180°, a
right angle measures 90°.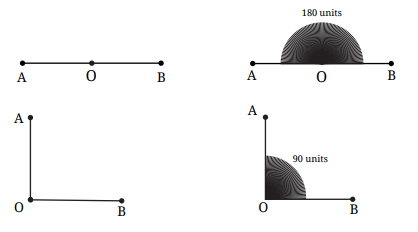
A pinch of history
A full turn has been divided into 360°. Why 360? The reason why we
use 360° today is not fully known. The division of a circle into 360 parts goes back to ancient times. The Rigveda, one of the very oldest
texts of humanity going back thousands of years, speaks of a wheel
with 360 spokes (Verse 1.164.48). Many ancient calendars, also going
back over 3000 years—such as calendars of India, Persia, Babylonia
and Egypt—were based on having 360 days in a year. In addition,
Babylonian mathematicians frequently used divisions of 60 and 360
due to their use of sexagesimal numbers and counting by 60s.
Perhaps the most important and practical answer for why
mathematicians over the years have liked and continued to use 360
degrees is that 360 is the smallest number that can be evenly divided
by all numbers up to 10, aside from 7. Thus, one can break up the
circle into 1, 2, 3, 4, 5, 6, 8, 9 or 10 equal parts, and still have a whole
number of degrees in each part! Note that 360 is also evenly divisible
by 12, the number of months in a year, and by 24, the number of
hours in a day. These facts all make the number 360 very useful.
The circle has been divided into 1, 2, 3, 4, 5, 6, 8, 9 10 and 12 parts
below. What are the degree measures of the resulting angles? Write the
degree measures down near the indicated angles.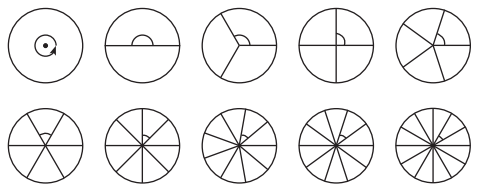
Degree measures of different angles
How can we measure other angles in degrees? It is for this purpose
that we have a tool called a protractor that is either a circle divided
into 360 equal parts as shown in Fig. 2.12 (on page 32), or a half
circle divided into 180 equal parts.
Unlabelled protractor
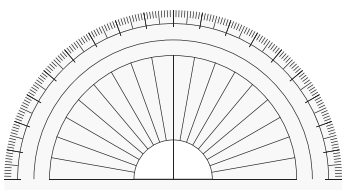
Here is a protractor. Do you see the straight angle at the center
divided into 180 units of 1
degree? Only part of the
lines dividing the straight
angle are visible, though!
Starting from the
marking on the rightmost
point of the base, there
is a long mark for every
10°. From every such long
mark, there is a medium
sized mark after 5°.
Figure it Out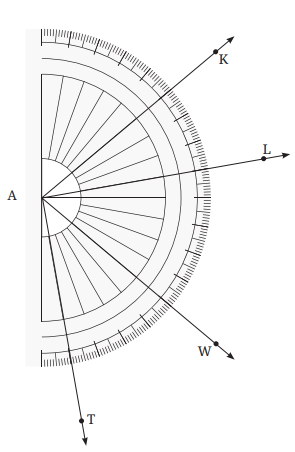
1. Write the measures of the
following angles:
a. ∠ KAL
Notice that the vertex of this
angle coincides with the centre of
the protractor. So the number of
units of 1 degree angle between KA
and AL gives the measure of ∠KAL.
By counting, we get
∠KAL = 30°.
Making use of the medium sized
and large sized marks, is it possible
to count the number of units in 5s
or 10s?
b. ∠WAL
c. ∠TAK
Labelled protractor
This is a protractor that you find in your geometry box. It would
appear similar to the protractor above except that there are numbers
written on it. Will these make it easier to read the angles?
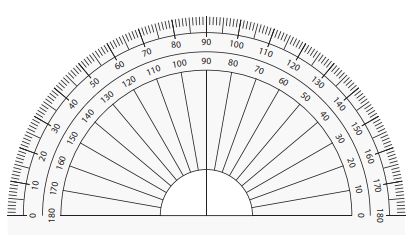
There are two sets of numbers on the protractor: one increasing
from right to left and the other increasing from left to right. Why
does it include two sets of numbers?
Name the different angles in the figure and write their measures.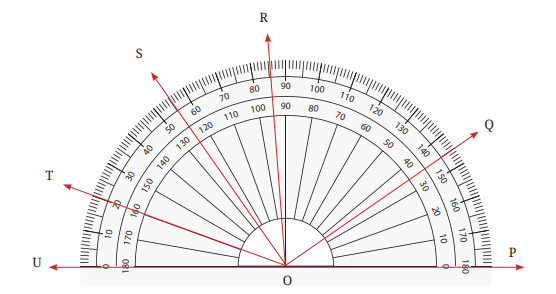
Did you include angles such as ∠TOQ?
Which set of markings did you use - inner or outer?
What is the measure of ∠TOS?
Can you use the numbers marked to find the angle without
counting the number of markings?
Here, OT and OS pass through the numbers 20 and 55 on the outer
scale. How many units of 1 degree are contained between these
two arms?
Can subtraction be used here?
How can we measure angles directly without having to subtract?
Place the protractor so the center is on the vertex of the angle.
Align the protractor so that one the arms passes through the 0º
mark as in the picture below.
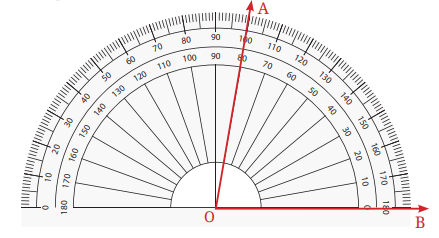
What is the degree measure of ∠AOB?
Make your own Protractor!
You may have wondered how the different equally spaced markings are
made on a protractor. We will now see how we can make some of them!
- Draw a circle of a convenient radius on a sheet of paper. Cut out the circle (Fig. 2.13). A circle or one full turn is 360°.
- Fold the circle to get two equal halves and cut it through the
crease to get a semicircle. Write ‘0°’ in the bottom right corner
of the semi-circle.
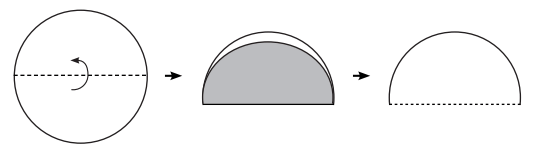
Fig. 2.13
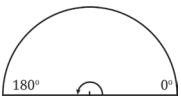 Fig. 2.14 |
The measure of half
a circle is 1/2 of a full
turn. (Fig. 2.14)
So, the measure of
half a turn = 1/2
of
____ = 180°.
Thus, write 180°
in the left bottom
corner of the
semicircle.
|
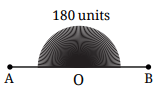 |
3. Fold the semi-circular sheet in half as shown in Fig. 2.15 to form
a quarter circle.
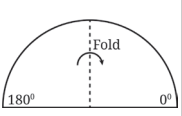 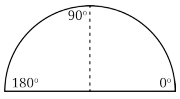 Fig. 2.15 |
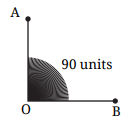
The measure of
a
quarter circle is 1/4 of
a full turn.
The measure of a
1/4 turn = 1/4 of 360° =
________.
Or, the measure of
a 1/4 turn = 1/2 of a half
turn = 1/2 of 180° =
______.
Thus, mark 90° at the
top of the semicircle.
|
 |
4. Fold the sheet again as shown in Figs. 2.16 and 2.17:
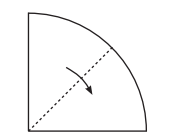
Fig. 2.16
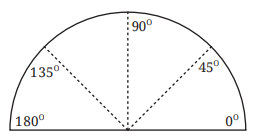
Fig. 2.17
When folded, this is 1
8 of the circle, or 1
8 of a turn, or 1
8 of 360°,
or 1
4 of 180° or 1
2 of 90° = ________________________.
The new creases formed give us measures of 45° and
180°− 45° = 135° as shown. Write 45° and 135° at the correct
places on the new creases along the edge of the semicircle.
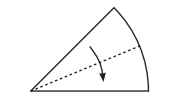
Fig. 2.18
6. Unfold and mark the creases as OB, OC, ..., etc., as shown in
Fig. 2.19 and Fig. 2.20.
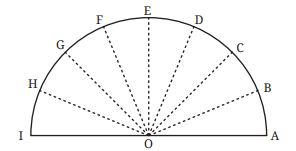
Fig. 2.19
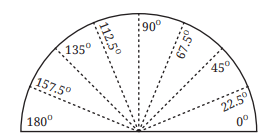
Fig. 2.20
Think !In Fig. 2.20, we have ∠AOB = ∠BOC = ∠COD = ∠DOE = ∠EOF = ∠FOG =
∠GOH = ∠HOI=_____. Why?
Angle Bisector
At each step, we folded in halves. This process of getting half of a
given angle is called bisecting the angle. The line that bisects a given
angle is called the angle bisector of the angle.
Identify the angle bisectors in your handmade protractor. Try to make
different angles using the concept of angle bisector through paper folding.
Figure it Out1. Find the degree measures of the following angles using your
protractor.
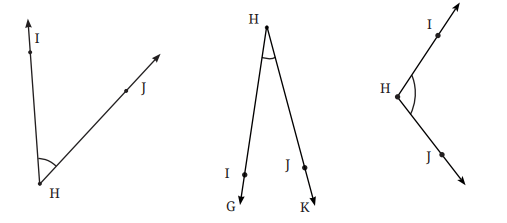
2. Find the degree measures of different angles in your classroom
using your protractor.
Teacher’s Note
It is important that students make their own protractor and use it to
measure different angles before using the standard protractor so that
they know the concept behind the marking of the standard protractor.
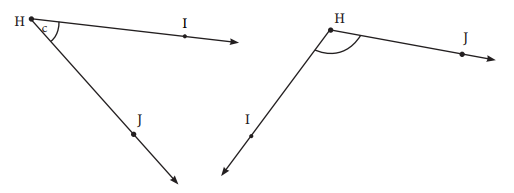
3. Find the degree measures for the angles given below. Check if
your paper protractor can be used here!
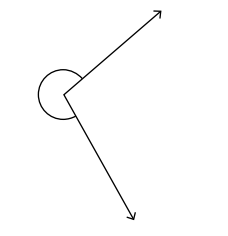
4. How can you find the degree measure of the angle given below
using a protractor?
5. Measure and write the degree measures for each of the following
angles:
a.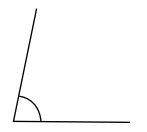
b.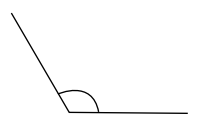
c.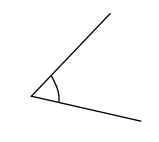
d.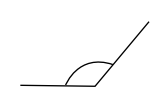
e.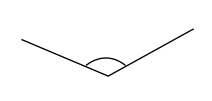
f.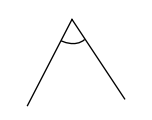
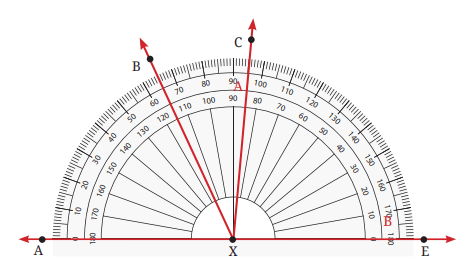
6. Find the degree measures of ∠BXE, ∠CXE, ∠AXB and ∠BXC.
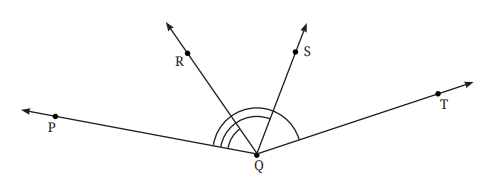
7. Find the degree measures of ∠PQR, ∠PQS and ∠PQT
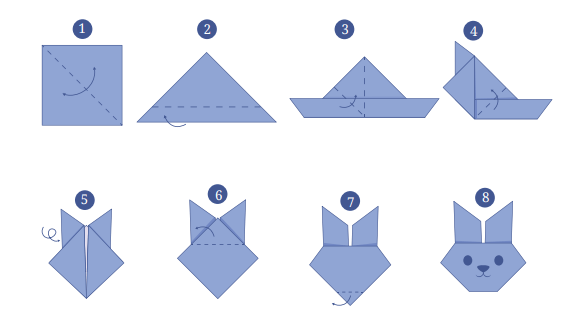
8. Make the paper craft as per the given instructions. Then, unfold
and open the paper fully. Draw lines on the creases made and
measure the angles formed.
9. Measure all three angles of the triangle shown in Fig. 2.21 (a), and
write the measures down near the respective angles. Now add up
the three measures. What do you get? Do the same for the triangles
in Fig. 2.21 (b) and (c). Try it for other triangles as well, and then
make a conjecture for what happens in general! We will come back
to why this happens in a later year.
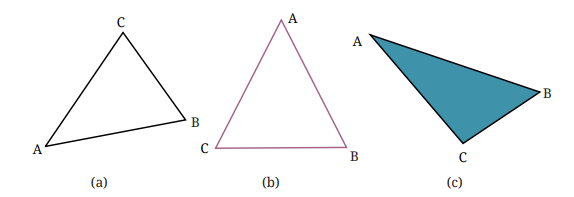
Fig. 2.21
Mind the Mistake, Mend the Mistake!
A student used a protractor to measure the angles as shown below.
In each figure, identify the incorrect usage(s) of the protractor and
discuss how the reading could have been made and think how it can
be corrected.
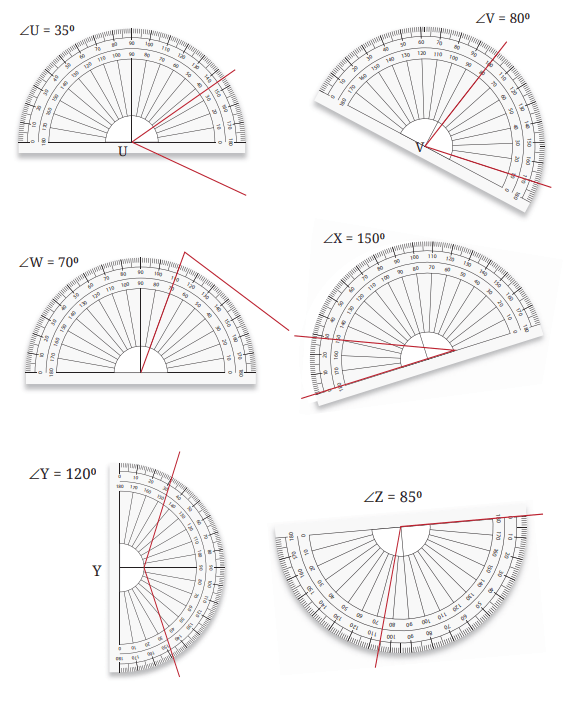 Figure it Out
Where are the angles?
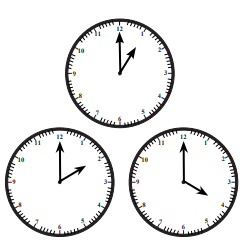
1. Angles in a clock:
a. The hands of a clock make different
angles at different times. At 1 o’clock,
the angle between the hands is 30°.
Why?
b. What will be the angle at 2
o’clock? And at 4 o’clock? 6
o’clock?
c. Explore other angles made by
the hands of a clock.
2. The angle of a door:
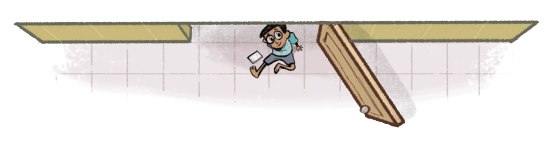
Is it possible to express the amount by which a door is opened
using an angle? What will be the vertex of the angle and what will
be the arms of the angle?
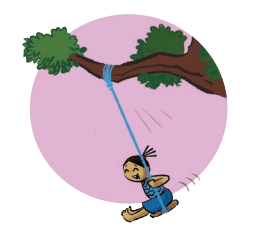
3. Vidya is enjoying her time
on the swing. She notices
that the greater the angle
with which she starts the
swinging, the greater is
the speed she achieves on
her swing. But where is the
angle? Are you able to see
any angle?
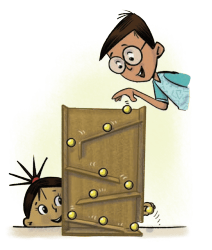
4. Here is a toy with slanting slabs attached to
its sides; the greater the angles or slopes of
the slabs, the faster the balls roll. Can angles
be used to describe the slopes of the slabs?
What are the arms of each angle? Which
arm is visible and which is not?
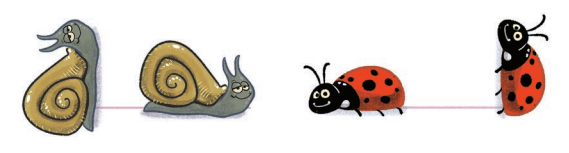
5. Observe the images below where there is
an insect and its rotated version. Can angles
be used to describe the amount of rotation?
How? What will be the arms of the angle and
the vertex?
Hint: Observe the horizontal line touching the insects.
Teacher’s Note
It is important that students see the application of each mathematical
concept in their daily lives. Teacher can organise some activities where
students can appreciate the practical applications of angles in real-life
situations, e.g., clocks, doors, swings, concepts of uphill and downhill,
location of the sun, the giving of directions, etc.
2.10 Drawing Angles
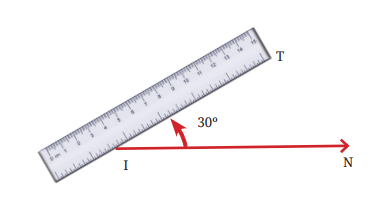
Vidya wants to draw a 30° angle and name it ∠TIN using a protractor.
In ∠TIN, I will be the vertex, IT and IN will be the arms of the angle.
Keeping one arm, say IN, as the reference (base), the other arm IT shoul take a turn of 30°.
Step 1: We begin with the base and draw :

Step 2: We will place the centre point of the protractor on I and align
IN to the 0 line.
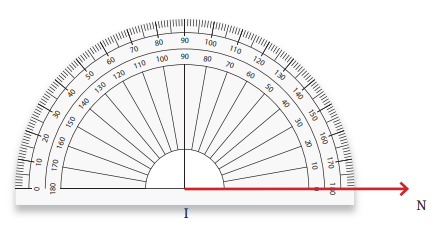
Step 3: Now, starting from 0, count your degrees (0, 10, 30) up to 30
on the protractor. Mark point T at the label 30°.
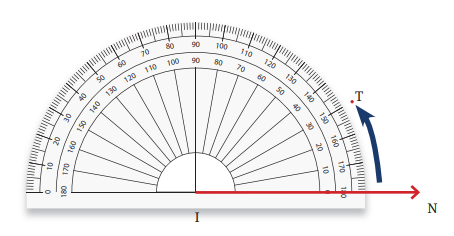
Step 4: Using a ruler join the point I and T.
∠TIN = 30° is the required angle.
 Let’s Play a Game #1
This is an angle guessing game! Play this game with your classmates
by making two teams, Team 1 and Team 2. Here are the instructions
and rules for the game:
- Team 1 secretly choose an angle measure, for example, 49° and makes an angle with that measure using a protractor without Team 2 being able to see it.
- Team 2 now gets to look at the angle. They have to quickly discuss and guess the number of degrees in the angle (without using a protractor!).
- Team 1 now demonstrates the true measure of the angle with a protractor.
- Team 2 scores the number of points that is the absolute difference in degrees between their guess and the correct measure. For example, if Team 2 guesses 39°, then they score 10 points (49°–39°).
- Each team gets five turns. The winner is the team with the
lowest score!
Let’s Play a Game #2We now change the rules of the game a bit. Play this game with your
classmates by again making two teams, Team 1 and Team 2. Here
are the instructions and rules:
- Team 1 announces to all, an angle measure, e.g., 34°.
- A player from Team 2 must draw that angle on the board without using a protractor. Other members of Team 2 can help the player by speaking words like ‘Make it bigger!’ or ‘Make it smaller!’.
- A player from Team 1 measures the angle with a protractor for all to see.
- Team 2 scores the number of points that is the absolute difference in degrees between Team 2’s angle size and the intended angle size. For example, if player’s angle from Team 2 is measured to be 25°, then Team 2 scores 9 points (34°–25°).
- Each team gets five turns. The winner is again the team with the
lowest score.
Teacher’s Note
These games are important to play to build intuition about angles
and their measures. Return to this game at least once or twice on
different days to build practice in estimating angles. Note that
these games can also be played between pairs of students.
Figure it Out1. In Fig. 2.23, list all the angles possible. Did you find them all? Now,
guess the measures of all the angles. Then, measure the angles
with a protractor. Record all your numbers in a table. See how
close your guesses are to the actual measures.
2. Use a protractor to draw angles having the following degree
measures:
a. 110°
b. 40°
c. 75°
d. 112°
e. 134°
3. Draw an angle whose degree measure is the same as the angle
given below:
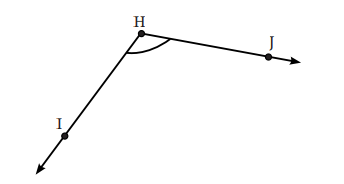
Also, write down the steps you followed to draw the angle.
2.11 Types of Angles and their Measures
We have read about different types of angles in this chapter. We
have seen that a straight angle is 180° and a right angle is 90°. How
can other types of angles—acute and obtuse—be described in terms
of their degree measures?
Acute Angle: Angles that are smaller than the right angle, i.e., less
than 90° and are greater than 0°, are called acute angles.
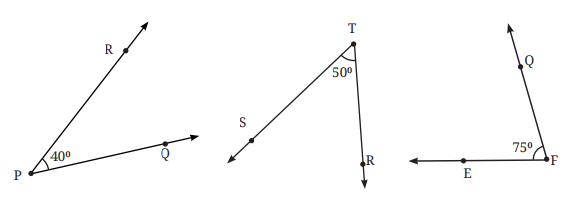
Examples of acute angles
Obtuse Angle: Angles that are greater than the right angle and less
than the straight angle, i.e., greater than 90° and less than 180°, are
called obtuse angles.
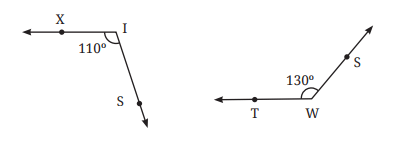
Examples of obtuse angles
Have we covered all the possible measures that an angle can take?
Here is another type of angle.
Reflex angle: Angles that are greater than the straight angle and less
than the whole angle, i.e., greater than 180° and less than 360°, are
called reflex angles.
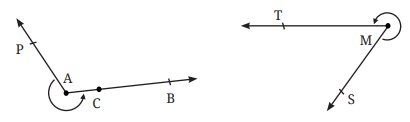
Examples of reflex angles
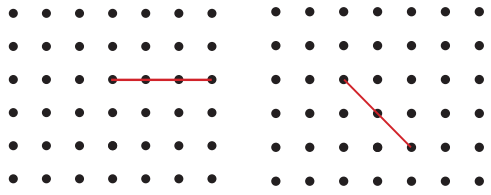
Figure it Out1. In each of the below grids, join A to other grid points in the figure
by a straight line to get:
a. An acute angle
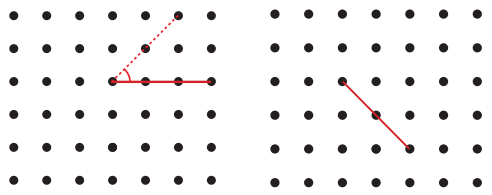
b. An obtuse angle
c. A reflex angle
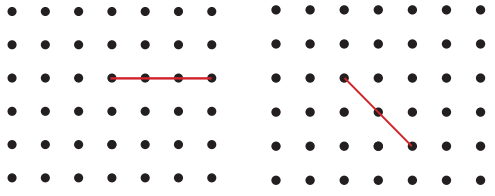
Mark the intended angles with curves to specify the angles. One
has been done for you.
2. Use a protractor to find the measure of each angle. Then classify
each angle as acute, obtuse, right, or reflex.
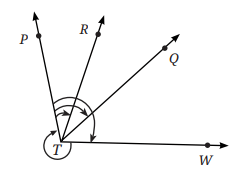
a. ∠PTR
b. ∠PTQ
c. ∠PTW
d. ∠WTP
 Let’s Explore:
 In this figure, ∠TER = 80°. What is
the measure of ∠BET? What is the
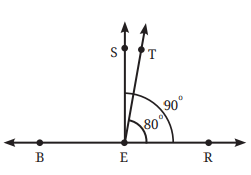
measure of ∠SET?
Hint: Observe that ∠REB is a straight angle. Hence the degree measure of
∠REB = 180° of which 80° is covered by ∠TER. A similar argument
can be applied to find the measure of ∠SET.
Figure it Out1. Draw angles with the following degree measures:
a. 140°
b. 82°
c. 195°
d. 70°
e. 35°
2. Estimate the size of each angle and then measure it with a
protractor:
a. 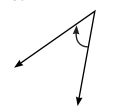
b. 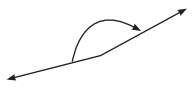
c. 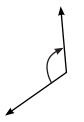
d. 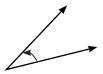
e. 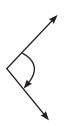
f. 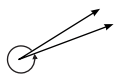
Classify these angles as acute, right, obtuse or reflex angles.
3. Make any figure with three acute angles, one right angle and two
obtuse angles.
4. Draw the letter ‘M’ such that the angles on the sides are 40° each
and the angle in the middle is 60°.
5. Draw the letter ‘Y’ such that the three angles formed are 150°, 60°
and 150°.
6. The Ashoka Chakra has 24 spokes. What is the
degree measure of the angle between two spokes
next to each other? What is the largest acute angle
formed between two spokes?
7. Puzzle: I am an acute angle. If you double my
measure, you get an acute angle. If you triple my measure, you
will get an acute angle again. If you quadruple (four times) my
measure, you will get an acute angle yet again! But if you multiply
my measure by 5, you will get an obtuse angle measure. What are
the possibilities for my measure?
Summary
- A point determines a location. It is denoted by a capital letter.
- A line segment corresponds to the shortest distance between two
points. The line segment joining points S and T is denoted by ST.
- A line is obtained when a line segment like ST is extended on both
sides indefinitely; it is denoted by ST or sometimes by a single small
letter like m.
- A ray is a portion of a line starting at a point D and going in one direction
indefinitely. It is denoted by DP where P is another point on the ray.
- An angle can be visualised as two rays starting from a common starting
point. Two rays OP and OM form the angle ∠POM (also called ∠MOP);
here, O is called the vertex of the angle, and the rays OP and OM are
called the arms of the angle.
- The size of an angle is the amount of rotation or turn needed about the vertex to rotate one ray of the angle onto the other ray of the angle.
- The sizes of angles can be measured in degrees. One full rotation or
turn is considered as 360 degrees and denoted as 360°.
- Degree measures of angles can be measured using a protractor.
- Angles can be straight (180°), right (90°), acute (more than 0° and less than 90°), obtuse (more than 90° and less than 180°), and reflex (more than 180° and less than 360°).