
Part 2
Work with Machines and Material
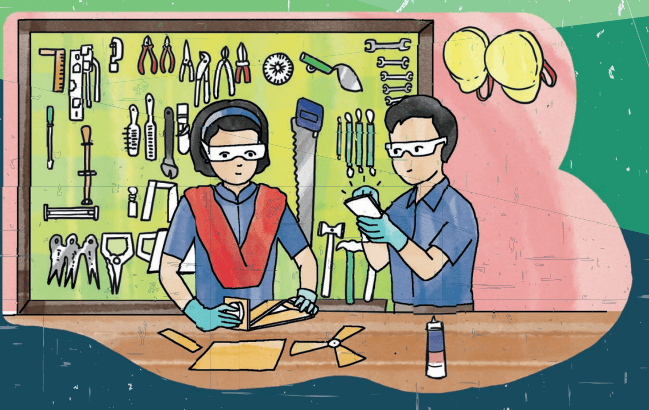
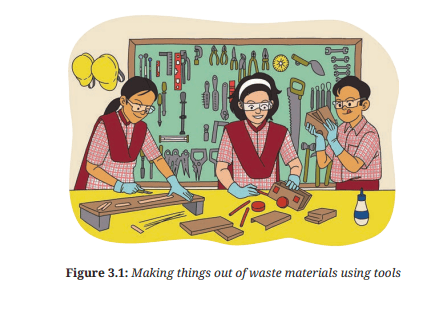
Machines make our lives easy, and materials are all around us. Projects on Work with Machines and Materials will help you work with different machines and tools to create new things with different kinds of materials, and to repair and maintain things. You can take up projects related to making electronic toys, carpentry products from wood and bamboo, and pottery products (with and without using a wheel), sewing clothes, decorating fabrics, using computers and smartphones to make games and animations, and using waste materials to make toys or even instruments for a school band. It is up to you to imagine all that you can do with your peers.
Two examples of projects are given in this
section. You must take up only one project. You
can either choose one of these projects or you
can design a project of your own choice with
the help of your teacher.
Project 3
Maker Skills
This project will help you learn about simple machines that make work easier. You will develop skills to create toys from waste using simple machines and then explore the various simple machines used in a bicycle. You will also learn how to maintain and repair these machines to keep your bicycle in a good working condition
As part of the project, you will be able to:
- Learn about
simple machines
- Make toys
from waste
using simple
machines
- Learn to
maintain
and repair a
bicycle
- Learn about
simple
machines in
a bicycle
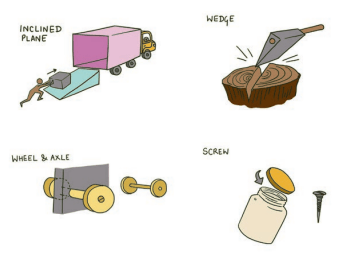
- inclined plane
- wedge
- levernbvnjkjkjk
- wheel & Axle
- Scren
- Pulley
What will I be able to do?
At the end of the project, you will be able to:
1. Make toys from various materials using simple machines. You can make catapult, robotic arms, elastic band propeller boat, balloon car, rubber band car, and windmill; Makers Skill.indd_July 11.indd 59 20-Jul-24 4:35:54 PM 60 Kaushal Bodh— Grade 6
2. Identify the various simple machines that make up a complex machine, like a bicycle;
3. Identify the main parts of a bicycle and their functions. and
4. Identify common problems with bicycles, such as flat tyres, and misaligned brakes and perform necessary maintenance and repair.
What will I need?
For making toys from trash using simple machines
• Materials required: Cardboard, plastic pipe, empty plastic bottles, cardboard, plastic spoon, drinking straws, plastic bottle caps, paper, ice cream sticks, thread, rubber bands, glue, tape, glue gun, cellophane tape, clothes clips, all pin, balloon, colour box, chopsticks (these could be of wood, plastic or metal)
. • Tools required: Scissors, metre scale, and cutter.
For learning about simple machines in a bicycle
You will need atleast 5–6 bicycles.
Materials required: Oil/grease.
Tools required: Spanner set, wrenches, chain brush, tyre levers and air pump.
You will also have to visit a bicycle shop or request someone who can repair a bicycle to come to the school to teach you.
How do I keep myself and others safe?
• Be careful with cutting tools and other sharp edges.
• Ensure that you clean the area after you finish an activity, and store materials and tools as per the instructions of your teacher.
• While using the toys, ensure that you do not hurt yourself
or others.
What do I need to know before I start?
Can you identify simple machines in your surroundings? Look
around, see what you can find.
Activity 1: Simple machines in our surroundings
Identify everything around you that helps you do something. Find
out if it is a simple machine or if it is made up of simple machines.
You can ask your teacher or your friends and family for help.
Write your observations in table 3.1.
Table 3.1: Simple machines around us
What do I have to do?
First, you will make toys using simple machines and then identify the simple machines in a bicycle. Next, you will learn how to maintain a bicycle.
Learning on the Internet
You can look up the steps to make the toys given in the Activity Book by searching on the Internet with the search keywords: ‘DIY + XX (name of toy)’ (DIY means ‘Do It Yourself’).
If you want to see videos, you can add the word ‘video’ to the search keywords.
Internet safety
Ask your teacher for help while using the Internet, be careful not to
upload or download anything, and do not share personal information
anywhere
Activity 2: Using levers to make toys
A lever is a fixed bar or handle that moves around a fixed point, called the hinge/fulcrum. A simple example of using a lever is when you use a spoon to open the lid of a tin. The tip of the spoon is fixed under the lid, and you apply force at the other end. Another example is that of a seesaw in the playground.
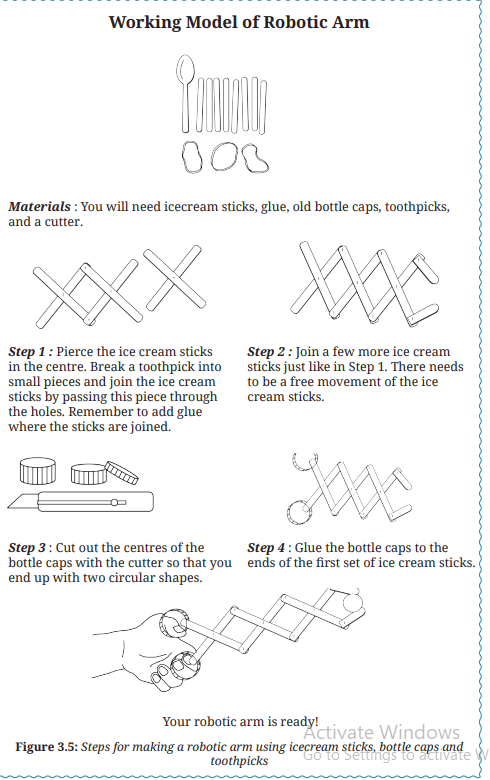
Some toys you can make using a lever are catapult, lazy tongs
and robotic arm scissors. The simple catapult you will make has a
single lever while the lazy tongs and robotic arms have multiple
levers. Figures 3.4 and 3.5 show the steps for making a catapult
and robotic arm, respectively, using waste materials
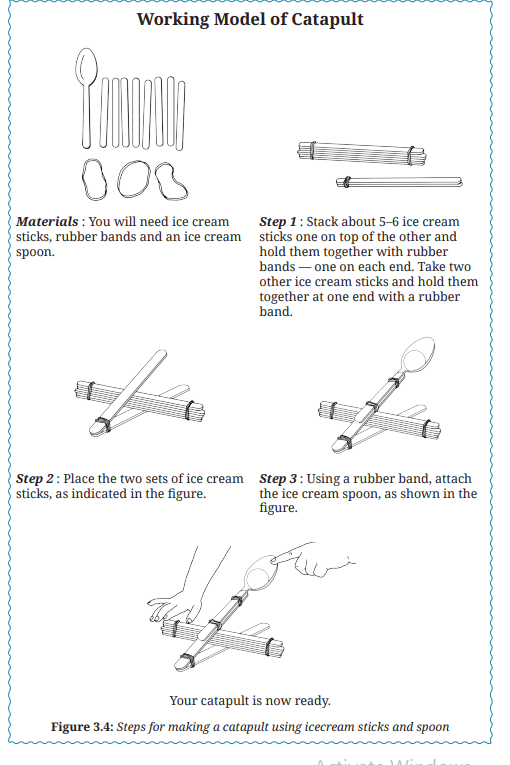
Materials : You will need ice cream sticks, rubber bands and an ice cream spoon.
Step 1 : Stack about 5–6 ice cream
sticks one on top of the other and
hold them together with rubber
bands — one on each end. Take two
other ice cream sticks and hold them
together at one end with a rubber
band
Step 2 : Place the two sets of ice cream sticks, as indicated in the figure.
Step 3 : Using a rubber band, attach
the ice cream spoon, as shown in the
figure
Your catapult is now ready
Working Model of Robotic Arm
Materials : You will need icecream sticks, glue, old bottle caps, toothpicks, and a cutter.
Step 1 : Pierce the ice cream sticks in the centre. Break a toothpick into small pieces and join the ice cream sticks by passing this piece through the holes. Remember to add glue where the sticks are joined.
Step 2 : Join a few more ice cream sticks just like in Step 1. There needs to be a free movement of the ice cream sticks.
Step 3 : Cut out the centres of the bottle caps with the cutter so that you end up with two circular shapes.
Step 4 : Glue the bottle caps to the
ends of the first set of ice cream stick
Your robotic arm is ready!
1. Draw a sketch of the toy, giving accurate measurements where different parts are connected. You can paste a photograph of the toy in the space given below
2. Write down instructions for someone who is using robotic arm for the first time.
......................................................
......................................................
Activity 3: Using a propeller to make toys
A propeller is a wheel with blades. As the wheel moves, the blades help movement by pushing through water or air.
You can make an elastic band boat using a propeller. Figure
3.6 shows the steps for making an elastic band boat using waste
materials.
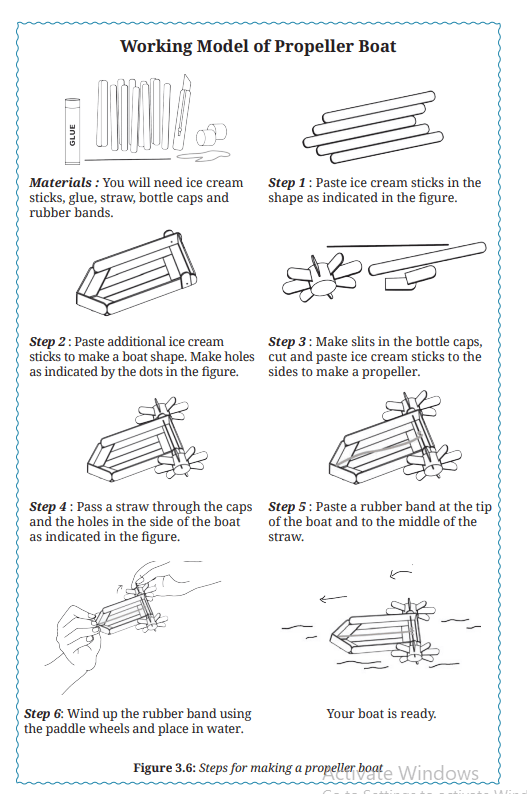
Working Model of Propeller Boat
Materials : You will need ice cream sticks, glue, straw, bottle caps and rubber bands.
Step 1 : Paste ice cream sticks in the
shape as indicated in the figure.
Step 2 : Paste additional ice cream sticks to make a boat shape. Make holes as indicated by the dots in the figure.
Step 3 : Make slits in the bottle caps,
cut and paste ice cream sticks to the
sides to make a propeller.
Step 4 : Pass a straw through the caps and the holes in the side of the boat as indicated in the figure.
Step 5 : Paste a rubber band at the tip
of the boat and to the middle of the
straw.
Step 6: Wind up the rubber band using
the paddle wheels and place in water.
Your boat is ready
3. Draw a sketch of the toy giving accurate measurements
where different parts are connected. You can paste a
photograph of the toy in the space given below.
4. Write down instructions for someone who is using propeller boat for the first time.
....................................................
....................................................
Activity 4: Using a wheel and axle to make toys
Wheel and axle is a simple machine that is made up of wheels held together by a rod so that they move together. In this way, if you have two wheels and axles, they balance each other and can move loads of any sort of shape placed above them. Car wheels are an example of wheel and axle.
Some toys, you can make using two sets of wheel and axle are
rubber band car and air balloon car. Figure 3.7 shows the steps for
making a rubber band car. Follow the steps to make your rubber
band car.
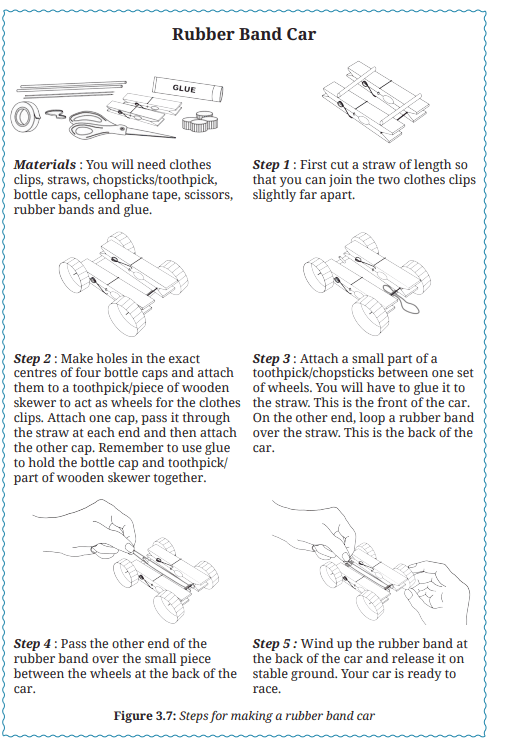
Materials : You will need clothes clips, straws, chopsticks/toothpick, bottle caps, cellophane tape, scissors, rubber bands and glue.
Step 1 : First cut a straw of length so
that you can join the two clothes clips
slightly far apart.
Step 2 : Make holes in the exact
centres of four bottle caps and attach
them to a toothpick/piece of wooden
skewer to act as wheels for the clothes
clips. Attach one cap, pass it through
the straw at each end and then attach
the other cap. Remember to use glue
to hold the bottle cap and toothpick/
part of wooden skewer together.
Step 3 : Attach a small part of a
toothpick/chopsticks between one set
of wheels. You will have to glue it to
the straw. This is the front of the car.
On the other end, loop a rubber band
over the straw. This is the back of the
car
Step 4 : Pass the other end of the rubber band over the small piece between the wheels at the back of the car.
Step 5 : Wind up the rubber band at
the back of the car and release it on
stable ground. Your car is ready to
race
Air Balloon Car
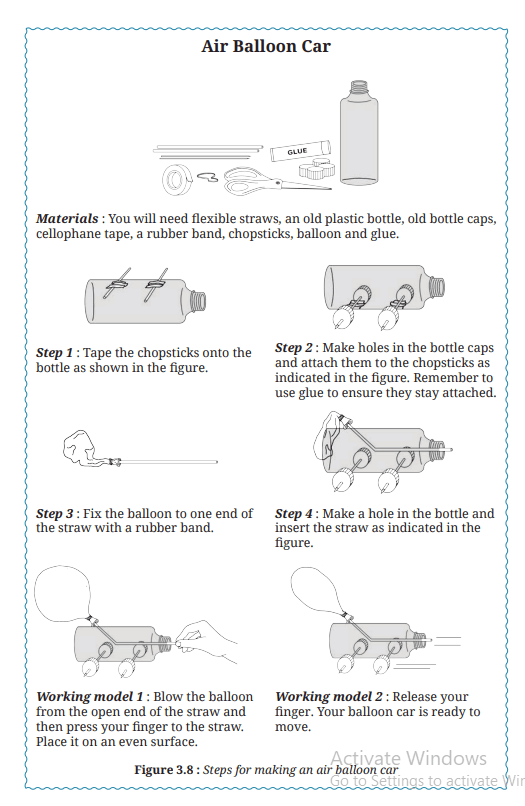
1. Paste a photograph of the toy that you created in the space
given below.
2. Write down instructions for someone who is using air balloon car for the first time.
................................
.................................
..................................
Activity 5: Using more than one simple machine to make toys
A windmill is a machine that generates energy from wind. A real
windmill is made up of many parts. But your working model of
windmill can be made by using a combination of simple machines
like propeller and wheel and axle, along with other parts to make
these machines work together. Figure 3.9 shows the steps for
making a windmill using various materials.
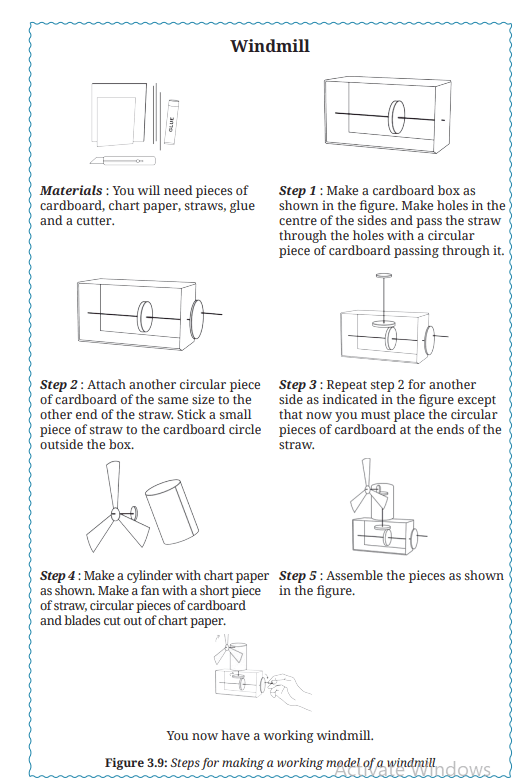
Windmill
Materials : You will need pieces of cardboard, chart paper, straws, glue and a cutter.
Step 1 : Make a cardboard box as
shown in the figure. Make holes in the
centre of the sides and pass the straw
through the holes with a circular
piece of cardboard passing through it.
Step 2 : Attach another circular piece
of cardboard of the same size to the
other end of the straw. Stick a small
piece of straw to the cardboard circle
outside the box.
Step 3 : Repeat step 2 for another
side as indicated in the figure except
that now you must place the circular
pieces of cardboard at the ends of the
straw.
Step 4 : Make a cylinder with chart paper as shown. Make a fan with a short piece of straw, circular pieces of cardboard and blades cut out of chart paper.
Step 5 : Assemble the pieces as shown
in the figure
You now have a working windmill.
1. Draw a sketch of the windmill, with accurate measurements
of different parts. You can paste a photograph of the toy in
the space given below
2. Write down instructions for someone who is using the working model of windmill for the first time.
.................................................
...................................................
Using ChatGPT for ideas
ChatGPT is an AI ‘chatbot’, a smart Intelligent Assistant. This AI tool uses information available on the Internet to answer your questions.
Ask ChatGPT for ideas on using waste material to make fun things. You may be surprised by what it comes up with !
Activity 6: Simple machines in a bicycle
So far, you have learnt about different forms of simple machines.
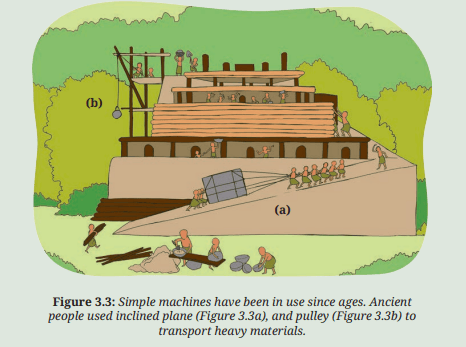
You will now explore how simple machines are used to create a bigger machine. A bicycle is made using different simple machines, such as wheels, wheels and axles, levers and pulleys (Figure 3.10). In this activity, you will learn about the parts of a bicycle and how to keep them functioning.
Bicycles have many moving parts that work together to
accomplish a task (Table 3.2). All the parts (wheels, gears, pedal,
etc.) of a bicycle work together to transform the effort of a rider
into motion.
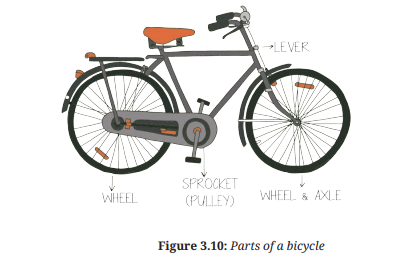
Table 3.2: Parts of a bicycle and their function
Some common problems and solutions related to bicycles are:
1. Rusting of parts: You can clean the parts using sandpaper and apply oil or paint, as appropriate.
2. Loose parts: You can fix them using the appropriate tools. Ask your teacher which tools are used and write them here
. ............................................
..............................................
3. Wheels not moving freely: Oiling of moving parts will
help.
4. Flat tyres: Air pressure in tyres should be checked
regularly to avoid flat tyres.
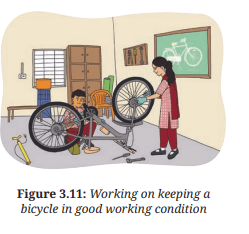
Now let us look at each
part of the bicycle more
closely. As mentioned earlier,
the bicycle is made up of
different kinds of simple
machines. To ensure that
it keeps running smoothly,
you need to check its parts
and maintain them regularly
(Figure 3.11). If needed, you
can seek help from experts
in the bicycle repair shop.
Fill table 3.3 with the help of
your peers and teacher
Activity 7: Visit to a bicycle repair shop You must visit a bicycle repair shop to learn from the experts. You can also request your teacher to invite a bicycle mechanic to the school to teach you all about maintaining and repairing a bicycle.
Some questions you can ask the mechanic are given below:
1. Is there anything that should be regularly checked before riding?
.....................................
.....................................
2. Can the saddle height be adjusted? How?
.........................................
........................................
3. What is the best way to clean a bicycle?
......................................
......................................
4. How do you know that the tyres need to be inflated?
.................................
...................................
5. How is a punctured tyre repaired? .
.................................
.................................
6. How often should a bicycle chain be oiled?
.................................
..................................
7. How can the squeaking brakes of a bicycle be fixed?
................................
................................
. 8. How are the wheels of a bicycle aligned? .
...............................
...............................
Activity 8: Organise an exhibition of the toys
Planning an exhibition of toys made by you and your peers in a school can be an exciting and enriching experience for all students and visitors. Take the help of your teacher to plan and organise the exhibition. The following are some tips to guide you to organise such an event.
1. Define the purpose of the exhibition. Is it to raise awareness about the toys, showcase creativity, or teach how to make toys using waste materials? For example, during the exhibition, you can demonstrate the skills of making toys.
2. Decide on a theme for the exhibition (e.g., eco-friendly toys, historical toys, and futuristic toys).
3. Ensure that the toys made by you all align with the chosen theme.
4. Decide on the exhibition space within the school.
5. Plan the layout of the exhibition, ensuring there is enough space for each toy and for visitors to move around. Decorate the venue in line with the theme to create an engaging atmosphere.
6. Send invitations to parents, local artists, and community members.
7. Arrange the toys attractively, ensuring each has a label with the creator’s name and a brief description. Ensure all toys are safe to handle and the venue is child-friendly.
8. Have volunteers supervise the exhibition to assist visitors and manage any issues.
9. Collect feedback from visitors, students, and teachers to understand what went well and what could be improved.
10. Take photos and videos to document the event and share
highlights through the school’s newsletter or website
What did I learn from others?
Name any three things you learnt from your friends while making toys or working models.
..............................................
...............................................
Name any three things you learnt from the expert.
...............................................
................................................
What did I do and how long did it take?
You translate your ideas into actions.
It is important to understand how much time is required for
an activity to be completed. Calculate the approximate number
of periods you spent on each activity. Mark them on the timeline
below. If you did more than the activities suggested in the book,
please add the number and time taken.
Activity 1 2 3 4 5 6 7 8
—————————————————————>
Time --- --- --- --- --- --- --- --- — — —
taken
(Periods)
What else can I do?
Make a chain reaction machine using different kinds of simple
machines made from trash.
You can search on the Internet for ideas using the following search keywords: Simple machine + Chain reaction toy.
Think and Answer
1. What did you enjoy doing?
2. What were the challenges you faced?
3. What would you like to do differently?
4. Design a toy that you can use to help a peer understand a
concept related to Mathematics or Science.
5. Can you estimate the number of times the wheel will rotate when covering a distance of 10 metres? Hint: You can either use the circumference of the rim of the bicycle tyre or observe the movement of the bicycle tyre.
6. Can using a bicycle make a difference to our health and the environment? If yes, how?
7. What jobs are related to the project? Look around, speak
to people and write your answer. A few examples of jobs
related to the work, you just did, are bicycle mechanic, toy
maker, and engineer.