In the Western Ghat region of Maharashtra, Keshav spends part of his summer vacation at his friend Jatin’s grandparents’ village. Having lived in a big city, he finds the forests, fresh air, sounds of gushing streams, and chirping birds a novel experience.
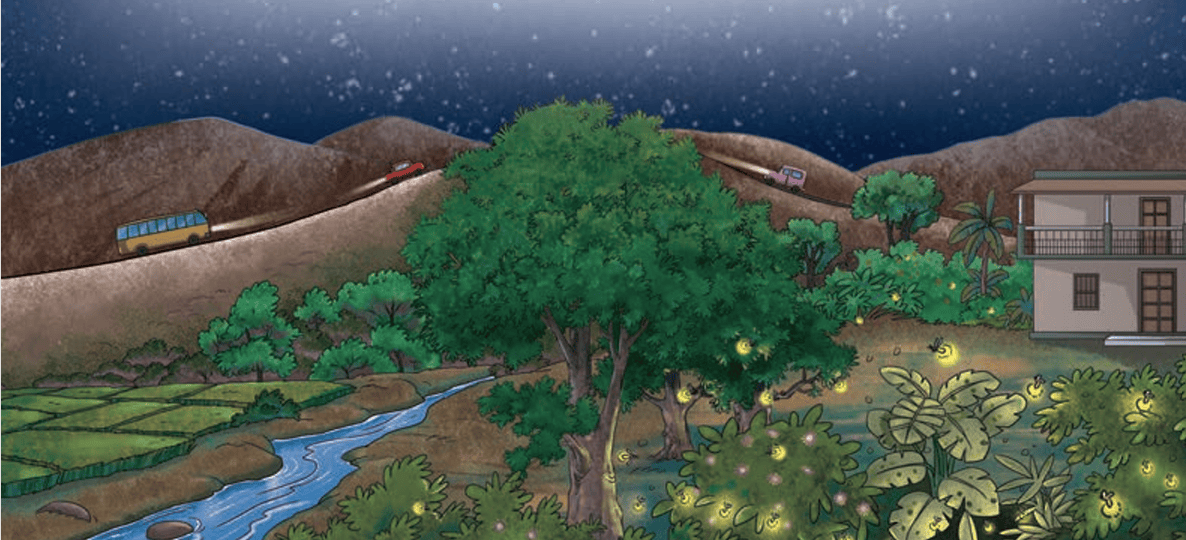
However, for Keshav, the most fascinating sight is the dance of hundreds of fireflies at night, flashing their lights in a wonderful performance. Jatin’s grandparents explain that fireflies are seasonal insects and they use light to communicate. Unfortunately, Keshav also learns the number of fireflies is decreasing due to light pollution, reduced forest cover, and excessive tourism.
At the end of their vacation, Keshav and Jatin board an evening bus back to their city. As the bus winds through the hilly roads, Keshav watches the moonlit landscape and the beams from the headlights of passing vehicles flashing by. He is reminded of the many poems and songs about moonlight, and wonders — does the Moon actually produce its own light? Did we not learn in the chapter ‘Beyond Earth’ in the Grade 6 Science textbook Curiosity that all other objects in our solar system shine only by refl ecting the light of the Sun? Is moonlight just reflected sunlight? Which objects give off their own light? While thinking, he notices something strange — light seems to move in a straight line!
11.1 Sources of Light
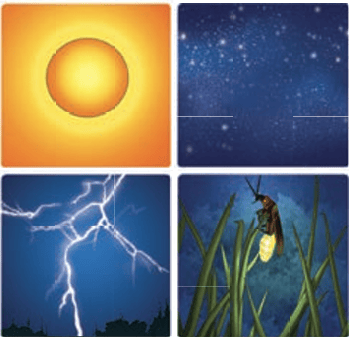
The Sun gives out or emits its own light and is the main source of natural light on the Earth. Stars, lightning, natural fire, and certain animals also emit their own light (Fig. 11.1).
Fig. 11.1: Some natural sources of light
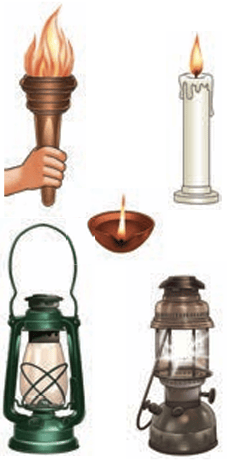
In ancient times, humans learnt to create fire — the earliest form of artificial lighting. With time, they learnt to create fire using different fuels, such as animal fat, oil, wax, and gas (Fig. 11.2).
Fig. 11.2: Fire as a source of artificial light
With the invention of electricity and different kinds of electric light sources, most of the lighting needs of humans are now met by electric lighting (Fig. 11.3).
Fig. 11.3: Some sources of electric light
Objects that emit their own light are called luminous objects. Objects that do not emit their own light are called non-luminous objects. The Moon is a non-luminous object. It does not emit its own light. It just reflects the light emitted by the Sun that falls on it.
SCIENCE AND SOCIETY
Light Emitting Diode (LED) lamps are modern light sources that consume much less power, are brighter and last longer than traditional lamps. This not only reduces electricity bills but is also better for environment. Recognising their advantages, the Indian government has made substantial efforts to promote the use of LED lamps nationwide. At their end of life, LED lamps must be appropriately disposed or recycled, and not thrown in the garbage.
11.2 Does Light Travel in a Straight Line?
Let us do an activity to try to find out.
Activity 11.1: Let us investigate
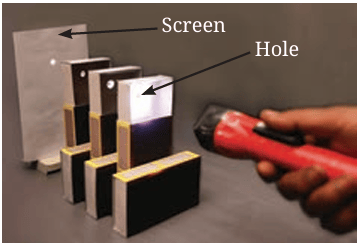
Take three matchboxes and make a hole in the inner tray of each matchbox, exactly at the same position.
Arrange these three matchboxes in a straight line. Make sure that all three holes are exactly at the same height and are in a line as shown in Fig. 11.4.
Fig. 11.4: Matchbox activity—light through holes
Place a torch light on one side of the matchboxes, ensuring
that its lamp is at the height of the holes.
Place a cardboard (screen) on the other side of the matchboxes
and obtain a bright spot on it. (You may need to slightly adjust
the heights of boxes.)
Move one of the matchboxes slightly to a side or up and down.
Are you able to obtain the light spot on the screen now?
When all the three holes are not in the same line, we could not
obtain the light spot on the screen. These observations suggest that
light travels in a straight line.
Can we somehow check it in some other way?
I have an idea. Let us try to see the candle flame through a bent pipe!
Should we also try out this idea?
Activity 11.2: Let us explore
Caution — Use a lighted candle under adult supervision only.
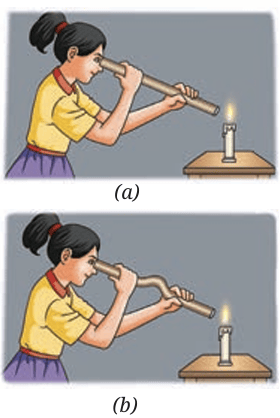
Take a long hollow pipe of some flexible material and align it so that you can see the candle flame as shown in Fig. 11.5a.
Now, bend the pipe and try to see the candle flame again (Fig. 11.5b). Can you still see it?
Fig. 11.5: Viewing candle flame through
(a) a straight pipe (b) a bent pipe
You could see the candle flame through a straight pipe but not through a bent pipe. This shows that light travels in a straight line.
DIVE DEEPER
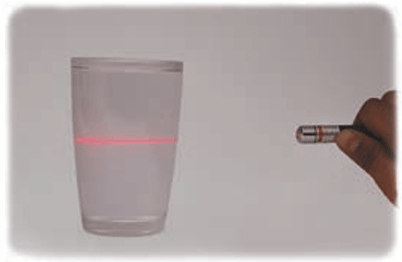
Caution — Use a laser only under teachers’ supervision. Avoid using high-power lasers for this activity; a low-power laser pointer is sufficient. Never point the laser beam directly at anyone’s eyes, as it can cause serious eye damage.
Pass a laser beam through a beaker filled with water in which a drop of milk is added to make the laser beam easily visible. What do you observe? Do you see that the beam of laser light inside water follows a straight path?
However, light can sometimes even bend around corners! This is something you will learn in the higher grades.
11.3 Light through Transparent, Translucent, and Opaque Materials
Let us place objects made of different materials in the path of
light and find out.
What happens when an object comes in the path of light?
Activity 11.3: Let us experiment
Collect objects made of different materials. Also, you will
need a torch.
Table 11.1: Light through different materials
Material
Transparent/ Translucent/ Opaque
Light will pass fully/partially/not at all
My prediction
My observation
Cardboard
Paper
Glass
Tracing paper
Thick cloth
...
...
List the materials of the objects in Table 11.1 and classify them
into transparent, translucent, and opaque (In the chapter ‘Materials Around Us’ in the Grade 6 Science textbook Curiosity you learnt to classify materials into transparent, translucent, and opaque, depending on how you could see through them).
Go to a dark room, turn on the torch, and place it at such a position that you get a spot of light from the torch on a wall. Or you may place a cardboard screen as shown in Fig. 11.6 and get the spot of light on it.
Fig. 11.6: Passing light through different materials
We will now conduct this activity in two parts — prediction and observation.
Predict what will happen if you hold an object in front of
the light coming out of the torch. Would you continue to see the spot of light on the screen? Note your prediction in Table 11.1.
Now, actually place the object between the torch and the screen. Does light pass through the object? Note your observation in Table 11.1.
Repeat this for all the objects.
Was your observation the same as your prediction? What conclusions could you draw? Light passes almost completely through transparent materials. Light passes partially through
translucent materials. Light does not pass through opaque materials.
What happens when an opaque object blocks the path of light?
11.4 Shadow Formation
What did you see on the screen in Activity 11.3 when an opaque object was placed in the path of light? Did you see a dark patch on the wall? Why was this dark patch formed?
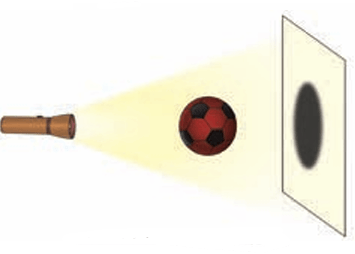
We now know that light travels in a straight line. So, when an opaque object is placed in its path, light is blocked. The dark patch, where light does not reach, is the shadow.
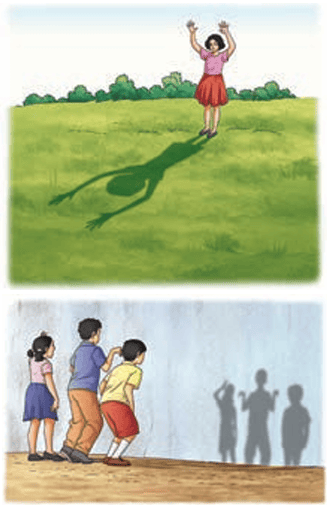
We have noticed shadows of ourselves and other objects around us when we are in the Sun or under a light (Fig. 11.7). Also, you might have had fun making different shapes with shadows sometime.
Fig. 11.7: Shadows around us
Do translucent and transparent objects create shadows or not? Did you notice that in Activity 11.3? Opaque objects form darker shadows. Translucent objects make lighter shadows. Even some transparent objects can create faint shadows!
Let us learn more about shadows.
Activity 11.4: Let us explore
Collect some opaque objects of different shapes and sizes.
Repeat Activity 11.3, but this time, carry out the actions
mentioned in the first column of Table 11.2.
Observe the shape and size of the shadow on the screen for
each of the actions.
Did the shadow form in all cases? Was the shape and size of the
shadow the same as the object?
Record your observations in the second column of Table 11.2.
Table 11.2: Observation of shadows
Action
Observations regarding shadow
The screen is removed.
The object is removed.
The torch is switched off .
The object is moved closer to the screen, keeping the torch and the screen fixed.
The object is moved closer to the torch, keeping the torch and the screen fixed.
The object is tilted, keeping the torch and the screen fixed.
The colour of the object is changed.
What conclusions do you draw from this activity? What do we need to observe a shadow? Does the colour of the shadow change when the colour of the object is changed?
Shadows are formed when an object blocks light from falling on
a screen. We need a source of light, an opaque object, and a screen
to observe a shadow. The walls, floor, ground, or any other surface
acts as a screen for observing shadows in our daily life.
The shape, size, and sharpness of the shadow depend on the position of the object relative to the light source and the screen. The shadows may give information about the object or we may not be able to guess the object at all. Changing the colour of opaque objects does not change the colour of the shadows.
FASCINATING FACTS
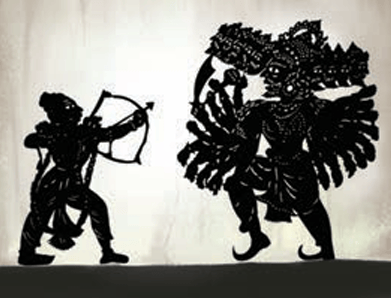
Shadow play, or shadow puppetry, has been a part of our cultural
heritage for centuries. In this art form, flat cut-out figures called shadow puppets are placed between a light source and a screen. By
moving the puppets and the light, puppeteers can create life-like
movements, bringing the characters to life. Diff erent regions have their own unique styles, like the Charma Bahuli Natya in Maharashtra, Keelu Bomme and Tholu Bommalata of Andhra Pradesh, Togalu Gombeyaata
in Karnataka, Ravana Chhaya in Odisha, Tholpavakoothu in Kerala, and
Bommalattam in Tamil Nadu. These are used not only for entertainment
but also communicate important messages to the community.
11.5 Reflection of Light
When the opaque object was a shiny object like a polished steel plate, I got a shadow on the screen, but I also saw that there was a bright spot of light on the wall on the opposite side. Why was it so?
Activity 11.5: Let us investigate
Find a shiny flat steel plate or a plane mirror, that is, a mirror
that is flat and not curved.
Take it outside and let the sunlight fall on the shiny surface.
What can you do to redirect light on the wall on which the
sunlight is not falling directly?
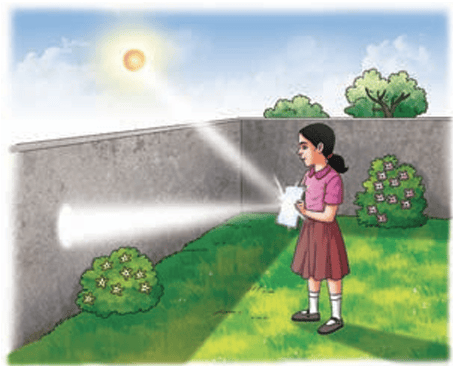
Turn the shiny plate or mirror in different directions to redirect the light onto a wall or a nearby surface (Fig. 11.8). Do you see a spot of light on the wall? Does it mean that the shiny plate or mirror has changed the direction of light?
Now, tilt the shiny plate or mirror in different ways and observe
the light spot on the wall. Does it change position? Notice how light
always travels in straight lines and changes direction when it falls on the shiny plate or mirror.
Fig. 11.8: Using mirror to redirect sunlight on a wall
What conclusion do you draw from your observations? This
activity suggests that a shiny surface or a mirror changes the
direction of light that falls upon it. This change in direction of
light by a mirror is called the reflection of light. Let us try to understand the reflection of light by a mirror.
Activity 11.6: Let us experiment
Take a plane mirror with stand, a torch, a comb, a sheet of white paper, and a strip of black paper.
Using the black paper, close all openings of the comb, except for one to make a thin slit.
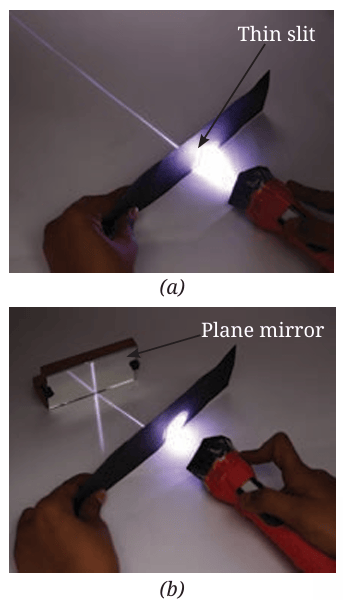
Spread a white paper on a table, hold the comb perpendicular to the sheet of paper and shine the torch light on the slit. Adjust the comb and torch slightly till you see a thin beam of light along the paper which has passed through the slit (Fig. 11.9a).
Now, place the mirror in the path of the light beam while keeping the comb steady (Fig. 11.9b). What do you observe?
Fig. 11.9: (a) A light beam (b) Reflection of light in a plane mirror
The path of the light beam is changed after falling on the mirror. The reflection of light occurs at the mirror.
In a mirror, I can also see my face. Is that also due to the
reflection of light?
11.6 Images Formed in a Plane Mirror
Look into the mirror. Do you see your face in it? What you see is a reflection of your face in the mirror. We also see reflections of
other objects that are in front of the mirror. Let us try to find out
more about this.
Activity 11.7: Let us experiment
Take a plane mirror and a pen or some other object.
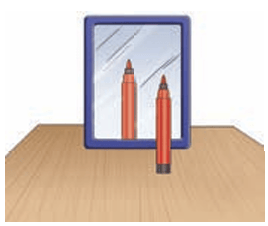
Place the pen in front of the mirror as shown in Fig. 11.10.
Fig. 11.10: Image of a pen in a plane mirror
What do you see in the mirror? It appears as if a similar pen is placed behind the mirror. The pen which appears behind the mirror is the image of the pen formed by the mirror. The pen itself is the object.
Now, move the pen to different positions in front of the mirror and compare the sizes of the images of the pen at each position.
Are the two sizes the same? The image formed by a plane mirror is of the same size as the object.
Again, move the pen to different positions in front of the
mirror and observe if the image is upright at each position.
Does the tip of the pen appear on top at each position? An upright image is called erect. An image formed by a plane mirror is erect.
Now, place a screen vertically behind the mirror. Move it around. Do you get the image on the screen? Repeat this by placing the screen in front of the mirror.
The image formed by a plane mirror cannot be obtained on a screen.
Activity 11.8: Let us experiment
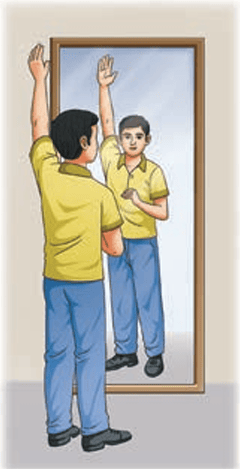
Stand in front of a plane mirror and look at your image (Fig. 11.11). Notice how far it appears to be from the mirror.
Now, stand close to the mirror. Is the image also closer to the
mirror?
Stand at different distances from the mirror and notice how far the image appears to be from the mirror in each case. Do you fi nd any relation between your distance from the mirror and the distance of your image from the mirror?
Fig. 11.11: Observing one’s own image in a mirror
You might have noticed that when you stand close to the plane mirror, the image also appears to be close to the mirror. The image appears to be far from the mirror when you stand far from the plane mirror.
Raise your left arm. Which arm does your image raise?
Touch your right ear. Which ear does your image touch?
You find that your left appears right in your image and your right appears left in your image. This type of perceived left-right
reversal is called lateral inversion. There is lateral inversion in the images formed by a plane mirror.
Oh! Now I realise why is written on an ambulance. It reads ‘AMBULANCE ̓ when viewed from the rear-view mirrors of the vehicle ahead of the ambulance.
FASCINATING FACTS
When mirrors were invented is not known. Earlier, mirrors were made by polishing stone or metal. When glass mirrors started being made, the art of making metal mirrors got lost gradually. However, it still survives, for example, in Kerala, where Aranmula Kannadi, a unique metal surface mirror has been made for centuries.
Can we see an image of an object only in a mirror or are there some other ways as well?
11.7 Pinhole Camera
A pinhole camera is a device in which the light rays from an object pass through a tiny hole (a pinhole) and form an image on a screen.
Activity 11.9: Let us explore
Caution — Use a lighted candle under adult supervision only.
Take a piece of cardboard and a candle. Make a small hole in the cardboard.
In a dimly lit room, position the cardboard at a short distance from a screen.
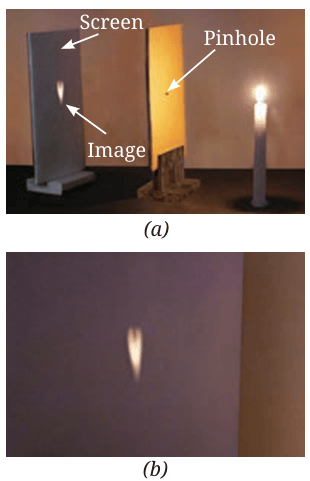
Place a lighted candle in front of it as shown in Fig. 11.12a.
Fig. 11.12: (a) A simple pinhole camera (b) Image of a candle flame
on screen
What do you see on the screen? Light coming from the flame passes through the hole on the cardboard and forms an image of the candle flame on the screen. Do you notice anything surprising? The image of the candle flame is upside down, that is, inverted.
Let us now make a pinhole camera, which you can use outdoors.
Activity 11.10: Let us construct
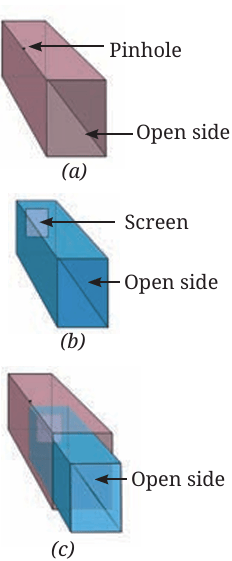
Take two boxes of cardboard such that one can slide into another with very little gap in between them. Cut open one side of each box.
On the opposite face of the larger box, make a small hole in the middle (Fig. 11.13a).
On the opposite face of the smaller box, cut out a square from the middle with a side of about 5–6 cm. Cover this opening with a thin translucent paper (like a tracing paper) to form a screen (Fig. 11.13b).
Slide the smaller box inside the larger one in such a way that the side with the tracing paper is inside (Fig. 11.13c).
Fig. 11.13: A sliding pinhole camera
Hold the pinhole camera with the pinhole facing the object and look through the open side of the smaller box. Cover your head and the camera with a dark cloth. Look at a distant object, like a tree or building, in bright sunlight and move the smaller box forward or backward until an image appears on the tracing paper.
Do the images seen in the camera show the colours of the objects on the other side? Are the images erect or upside down?
DIVE DEEPER
A pinhole camera gives an upside down image. On the other hand, there is lateral inversion in the image formed by a mirror but it is not upside down. We will learn more about this in higher grades.
11.8 Making Some Useful Items
After having learnt that light travels in a straight line and is
reflected by mirrors, it is time to create some useful items based on this learning.
11.8.1 Periscope
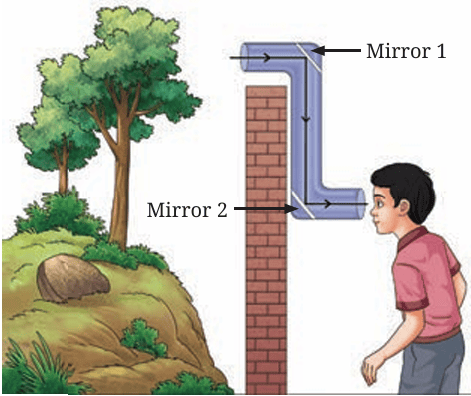
We can make a simple periscope by placing two plane mirrors in a Z-shaped box as shown in Fig. 11.14.
Reflection from two mirrors enables us to see objects that are not
visible directly. Periscopes are used in submarines, tanks, or by soldiers to see outside their bunkers. You may use it to look ahead when standing behind taller friends.
Fig. 11.14: A periscope
11.8.2 Kaleidoscope
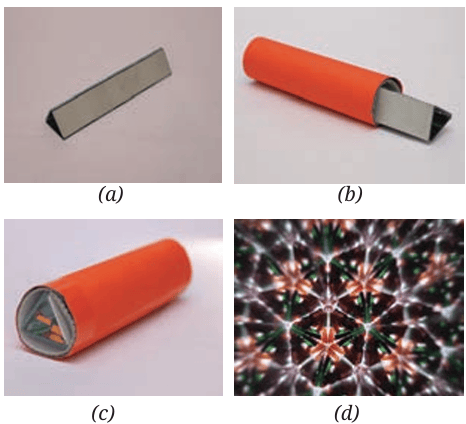
Get three rectangular plane mirror strips of equal width and join them
together in a triangular manner as shown in Fig. 11.15a. You may use three strips of thick reflective paper instead of mirrors. Fix these in a circular tube of thick chart paper (Fig. 11.15b). On one end of the tube, fix a transparent plastic sheet using a rubber band or
an adhesive tape. Place several broken pieces of coloured bangles or beads on this (Fig. 11.15c), and cover it with a tracing paper using a rubber band or an adhesive tape.
Fig. 11.15: A kaleidoscope
When you peep through the open side, you view a beautiful pattern
(Fig. 11.15d). Even if you leave both sides of the kaleidoscope open and point it towards a tree or other objects, you see beautiful patterns. An interesting feature of the kaleidoscope is that one always gets to see a different pattern every time the kaleidoscope is turned about. Since there are 3 mirrors, and multiple images (due to
reflections of reflections), many interesting patterns are formed.
Designers and artists often use kaleidoscopes to get ideas for new
patterns.
In a Nutshell
Objects that emit their own light are called luminous objects.
Light travels in a straight line.
Light passes almost completely through transparent materials. Light passes partially through translucent materials. Light does not pass through opaque materials.
A shadow is formed when light is blocked by an object. Opaque objects form darker shadows. Translucent objects make lighter shadows. Some transparent objects can create faint shadows.
The change in the direction of light by a mirror is called
reflection of light.
The image formed by a plane mirror is of the same size as
the object, is erect, cannot be obtained on a screen, and is
laterally inverted.
A pinhole camera creates an inverted image of an object on
a screen.
Let Us Enhance Our Learning
1. Which of the following are luminous objects?
Mars, Moon, Pole Star, Sun, Venus, Mirror
2. Match the items in Column A with those in Column B.
Column A
Column B
Pinhole camera
Blocks light completely
Opaque object
The dark region formed behind the object
Transparent object
Forms an inverted image
Shadow
Light passes almost completely through it
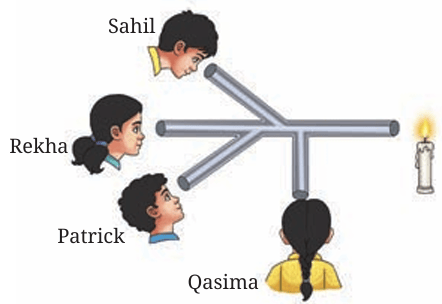
3. Sahil, Rekha, Patrick, and Qasima are trying to observe the candle
flame through the pipe as shown in Fig. 11.16. Who can see the flame?
Fig. 11.16
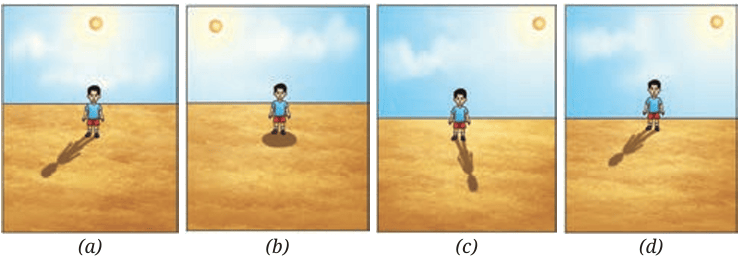
4. Look at the images shown in Fig. 11.17 and select the correct
image showing the shadow formation of the boy.
Fig. 11.17
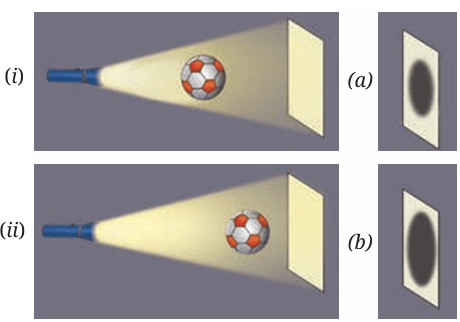
5. The shadow of a ball is formed on a wall by placing the ball in front of a fixed torch as shown in Fig. 11.18. In scenario (i) the ball is closer to the torch, while in scenario (ii) the ball is closer to the wall. Choose the most accurate representation of the shadows formed in both scenarios from the options provided (a and b).
6. Based on Fig. 11.18, match the position of the torch in Column A with the characteristics of the ball’s shadow in Column B.
Fig. 11.18
Column A
Column B
If the torch is close to the ball
The shadow would be smaller
If the torch is far away
The shadow would be larger
If the ball is removed from the set-up
Two shadows would appear on the screen
If two torches are present in the set-up on the left side of the ball
A bright spot would appear on the screen
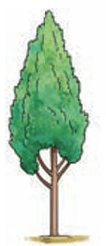
7. Suppose you view the tree shown in Fig. 11.19 through a pinhole camera. Sketch the outline of the image of the tree formed in the pinhole camera.
Fig. 11.19
8. Write your name on a piece of paper and hold it in front of a plane mirror such that the paper is parallel to the mirror. Sketch the image. What difference do you notice? Explain the reason for the difference.
9. Measure the length of your shadow at 9 AM, 12 PM, and 4 PM with the help of your friend. Write down your observations:
(i) At which of the given times is your shadow the shortest?
(ii) Why do you think this happens?
10. On the basis of following statements, choose the correctoption. Statement A: Image formed by a plane mirror is laterally
inverted. Statement B: Images of alphabets T and O appear identical
to themselves in a plane mirror.
(i) Both statements are true
(ii) Both statements are false
(iii) Statement A is true, but statement B is false
(iv) Statement A is false, but statement B is true
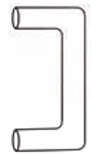
11. Suppose you are given a tube of the shape shown in the Fig. 11.20 and two plane mirrors smaller than the diameter of the tube. Can this tube be used to make a periscope? If yes, mark where you will fix the plane mirrors.
Fig. 11.20
12. We do not see the shadow on the ground of a bird flying high in the sky. However, the shadow is seen on the ground when the bird swoops near the ground. Think and explain why it is so.
Exploratory Projects
Have you ever seen a firefly where you live? If no, ask your
elders if fireflies were seen earlier in your region. If yes, find
out the reasons for their not being seen anymore. Develop a story about it.
Repeat Activity 11.4, but this time cover the face of the torch
with a coloured transparent paper and observe the colour of the shadow. Repeat this using transparent paper of different colours. Report your conclusions.
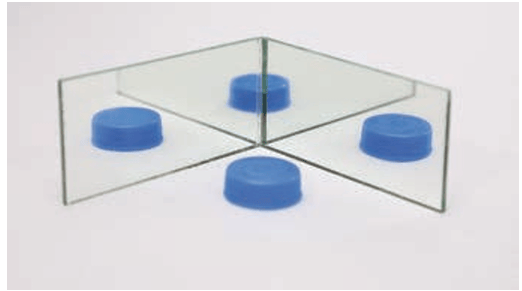
A plane mirror forms only a single image of an object. But
what will happen if two or more mirrors are kept at an angle with each other or parallel to each other? Find out by placing two mirrors as shown in Fig. 11.21.
Fig. 11.21: Observing images in two mirrors
You are given a small piece of a plane mirror. Can this piece
form an image of an object much larger than the mirror, like a large tree? Think and predict. Then carry out the activity.
FASCINATING FACTS
Light emitted by the Sun takes about 8 minutes and 20 seconds to reach
the Earth. Hence, if the Sun were to suddenly stop emitting light, we
would not know that for another 8 minutes 20 seconds.







 is written on an ambulance. It reads ‘AMBULANCE ̓ when viewed from the rear-view mirrors of the vehicle ahead of the ambulance.