
06
CONSTRUCTIONS AND TILINGS
6.1 Geometric Constructions
Eyes
Do you recall the ‘Eyes’ construction we did in Grade 6?
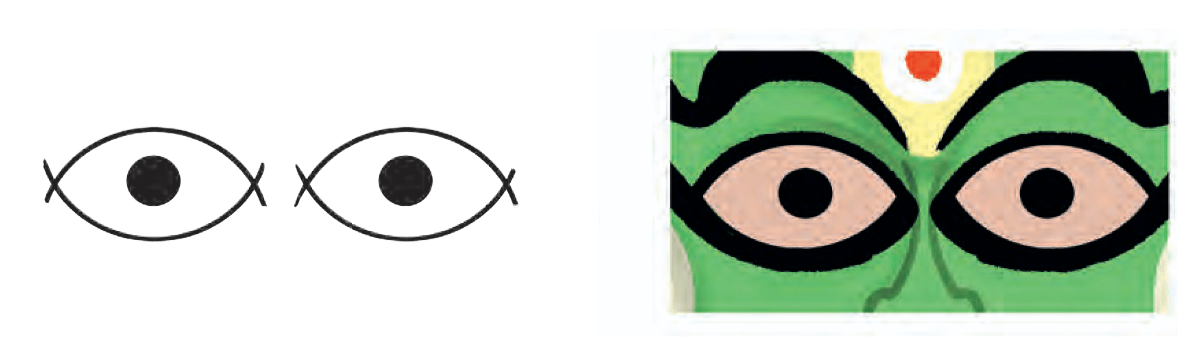
Of course, eyes can be drawn freehand, but we wanted to construct them so that the lower arc and upper arc of each eye look symmetrical.
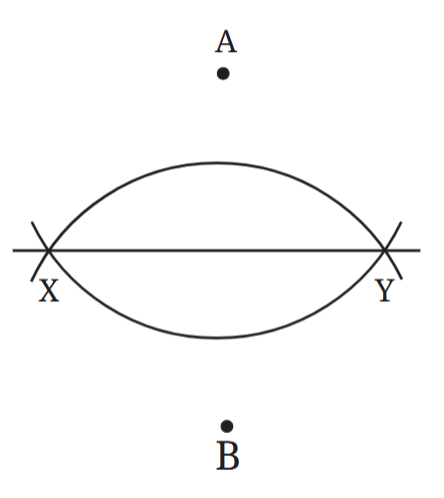
We relied on our spatial estimation to determine the two centres, A and B (see the figure), from which we drew the lower arc and upper arc respectively.
The arcs define a line XY that ‘supports’ the drawing though it is not part of the final figure. We can start with this supporting line and systematically find the centres A and B.
For the eye to be symmetrical, or for the supporting line to be the line of symmetry, the upper and lower arcs should have the same radius. In other words, we must have AX = BX. Since AX = AY and BX = BY, this means
AX = AY = BX = BY
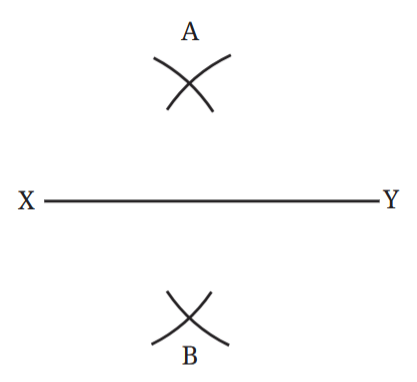
How do we find such A and B?
From X and Y, draw arcs above and below XY, with the same radii.
The two points at which the arcs meet, above and below XY, give us A and B, respectively.
Use this to construct an eye.
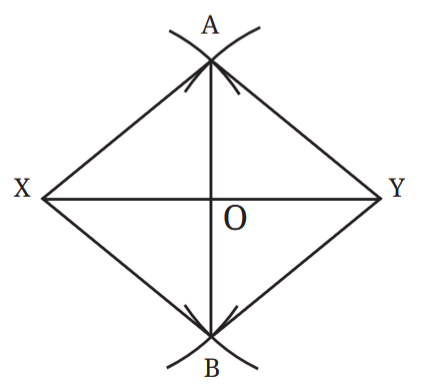
In Fig. 6.1, join A and B with a line. Where does AB intersect XY, and what is the angle formed between them?
We observe that AB passes through the midpoint of XY, and is also perpendicular to it.
A division of a line, or any geometrical object, into two identical parts is called bisection. A line that bisects a given line and is perpendicular to it, is called the perpendicular bisector.
Will the line joining the two points at which the arcs meet, above and below XY, always be the perpendicular bisector of XY, i.e., when XY is of any length, and the arcs are drawn using a radius of any length?
This can be answered through congruence. Let us consider a line segment XY. Find points A and B such that AX = AY = BX = BY. Draw the lines AB, AX, AY, BX and BY. Let O be the point of intersection between AB and XY.
Which two triangles should be congruent for AB to be the perpendicular bisector of XY (that is, O is the midpoint of XY and AB is perpendicular to XY)?
If we show that ∆AOX ≅ ∆AOY, then OX = OY, and ∠AOX = ∠AOY because they are corresponding parts of congruent triangles.
Since ∠AOX and ∠AOY together form a straight angle, we have ∠AOX + ∠AOY = 180°.
Thus, ∠AOX = ∠AOY = 90°. This establishes that O is the midpoint of XY and AB is perpendicular to XY.
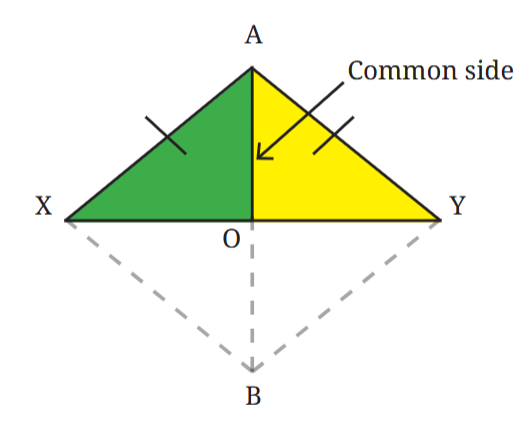
In ∆AOX and ∆AOY, we already know that AX = AY, and AO is common to both triangles.
If we can show that ∠XAO = ∠YAO then, by the SAS congruence condition, we can conclude that the triangles are congruent.
To show this, we observe that ∆ABX ≅ ∆ABY.
This is so because AX = AY, BX = BY, and AB is common to both the triangles.
Thus, we have ∠XAB = ∠YAB, or ∠XAO = ∠YAO because they are corresponding parts of congruent triangles.
Hence, AB is the perpendicular bisector of XY.
We can have eyes of different shapes.
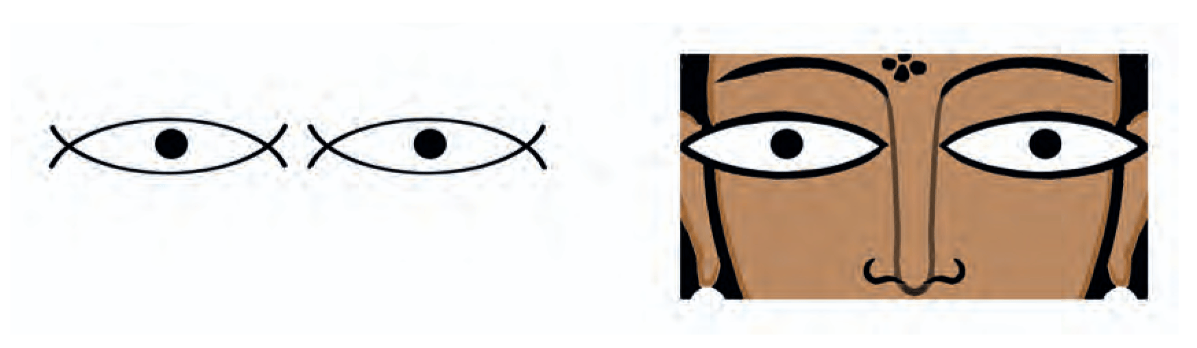

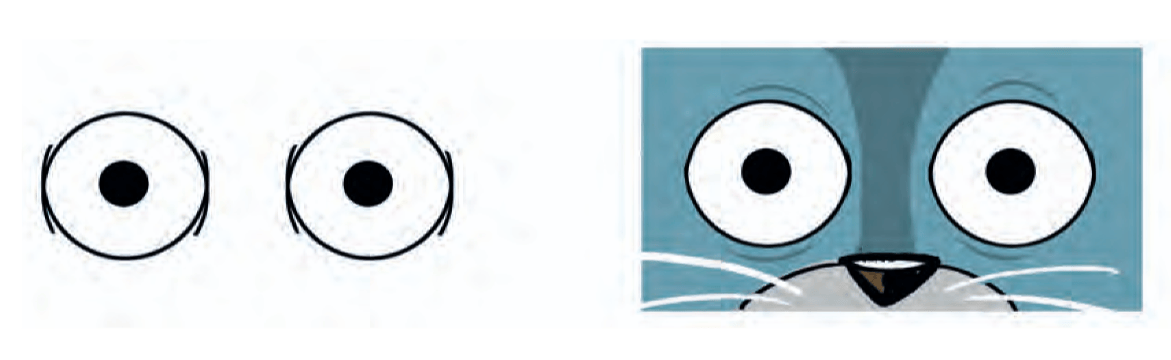
How do we get these different shapes? Try!
One way is to choose two other points C and D such that CX = CY = DX = DY. An eye of a different shape can be drawn using these points.
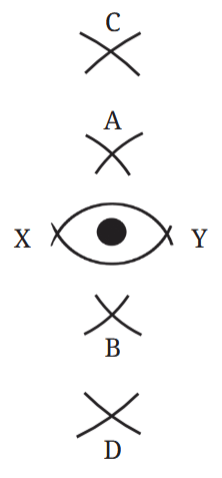
Will C and D lie on the perpendicular bisector AB?
The points C and D are at the same distance from both X and Y. We have just seen that joining any two such points gives the perpendicular bisector of XY. Since XY has only one perpendicular bisector, which is the line AB, the points C and D must lie on the line AB.
Justify the following statement using the facts that we have established.
Any point that has the same distance from X and Y lies on the perpendicular bisector of XY.
Thus, eyes of different shapes can be drawn by suitably choosing different pairs of points on the perpendicular bisector as centres to construct the upper and lower arcs of the eyes.
Construction of Perpendicular Bisector
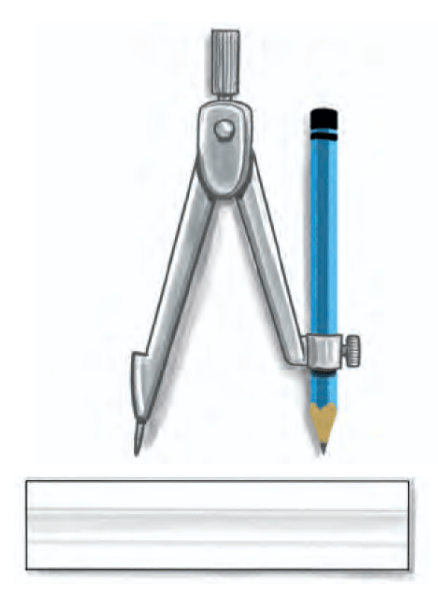
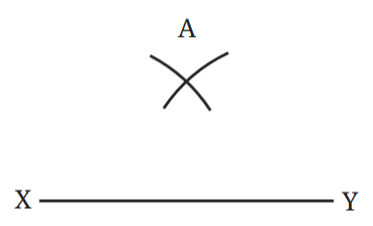
Given a line segment XY, how do we draw its perpendicular bisector using only an unmarked ruler and a compass?
We have seen that joining any two points — one above XY and one below — that are at equal distances from X and Y, gives the perpendicular bisector of XY. This gives a method to construct the perpendicular bisector.
1. Taking some fixed radius, from X and then Y, construct two sufficiently long arcs above XY. Name the point where the arcs meet as A.
2. Using the same radius, from X and then Y, construct two sufficiently long arcs below XY. Name the point where the arcs meet as B.
3. AB is the required perpendicular bisector.
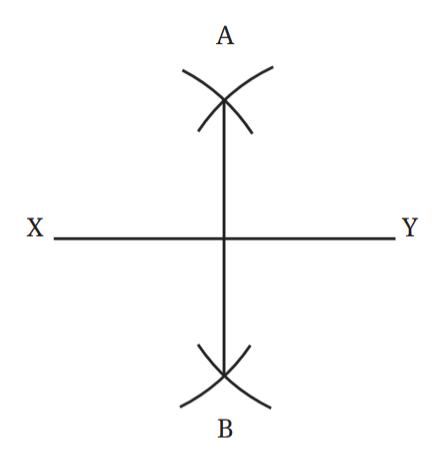
Thus, the perpendicular bisector can be constructed using the simplest geometric tools — an unmarked ruler and a compass. We will use only these two tools for all the other geometric constructions in this chapter, unless there is a need for drawing lines of specific lengths in standard units.
Figure it Out
1. When constructing the perpendicular bisector, is it necessary to have the same radius for the arcs above and below XY? Explore this through construction, and then justify your answer.
[Hint 1: Any point that is of the same distance from X and Y lies on the perpendicular bisector.
Hint 2: We can draw the whole line if any two of its points are known.]
2. Is it necessary to construct the pairs of arcs above and below XY? Instead, can we construct both the pairs of arcs on the same side of XY? Explore this through construction, and then justify your answer.
3. While constructing one pair of intersecting arcs, is it necessary that we use the same radii for both of them ? Explore this through construction, and then justify your answer.
4. Recreate this design using only a ruler and compass —
This method of constructing the perpendicular bisector is not only geometrically exact but also a practical way to construct it accurately.
This method to find the midpoint of a line segment is more accurate than measuring the length using a marked scale.
Construction of a 90° Angle at a Given Point
Can we extend the method of constructing the perpendicular bisector to construct a 90° angle at any point on a line? Draw a line and mark a point O on it. Construct a 90° angle at point O.
Find a segment of this line for which O is the midpoint.
Extend the line on either side of O.
Using a compass, mark two points X and Y at equal distance from O, so that O is the midpoint of XY.
The perpendicular bisector of XY will pass through O and is perpendicular to the given line.
In this case, do we need to draw two pairs of intersecting arcs to get the perpendicular bisector of XY?
No, we don’t. We already have one point, O, lying on the perpendicular bisector.
Figures 6.2 and 6.3 describe the steps to construct a 90° angle at a given point on a line.
Construction Methods in Śulba-Sūtras
Ancient mathematicians from different civilizations, including India, knew exact procedures to construct perpendiculars and perpendicular bisectors.
In India, the earliest known texts containing these methods are the Śulba-Sūtras. These are geometric texts of Vedic period dealing with the construction of fire altars for rituals. The Śulba-Sūtras are part of one of the six Vedāṅgas (a term that literally means ‘limbs of the Vedas’).
The Śulbas contain the methods that we developed earlier to construct a perpendicular and the perpendicular bisector. All the construction methods in the Śulba-Sūtras make use of a different kind of compass from what you would have used — a rope. A rope can be used to draw circles or arcs. It can also be stretched to form a straight line.
In addition, the Śulba-Sūtras also contain other methods to construct perpendicular lines. Here is an interesting construction of the perpendicular bisector using a rope (Kātyāyana-Śulbasūtra 1.2).
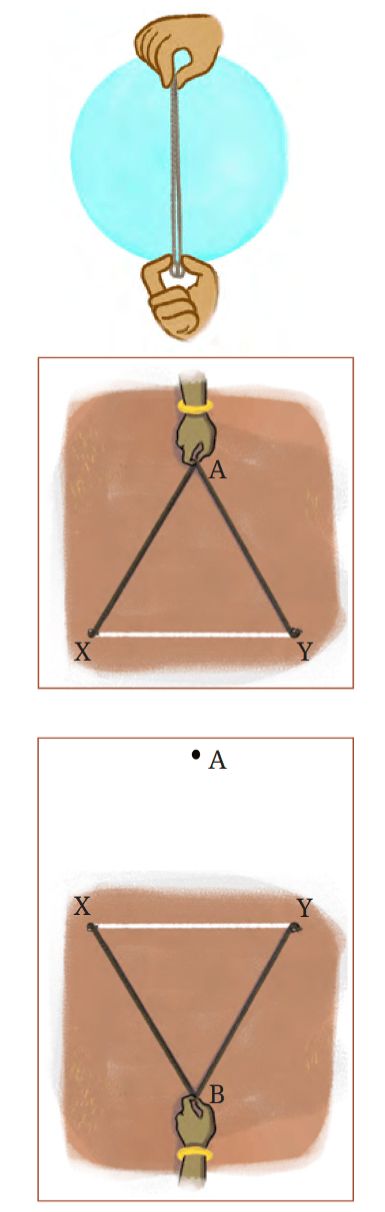
Let XY be the given line segment, drawn on the ground, for which we need to construct a perpendicular bisector. Fix a small pole or peg vertically into the ground at each point X and Y.
Take a sufficiently long rope. Make two loops at its ends. Without taking into account the parts of the rope that has gone into the loops, fold the rope into half to find and mark its midpoint.
Fasten the two loops at the ends of the rope to the poles at X and Y.
Pull the midpoint of the rope above XY, as shown in the figure, such that the two parts of the rope on either side are fully stretched. Mark this position of the midpoint as A.
Now similarly pull the midpoint of the rope below XY, as shown in the figure, such that the two parts of the rope on either side are fully stretched. Mark this position of the midpoint as B.
AB is the required perpendicular bisector.
Figure it Out
1. Justify why AB in Fig. 6.4 is the perpendicular bisector.
2. Can you think of different methods to construct a 90° angle at a given point on a line using a rope?
Angle Bisection for a Design
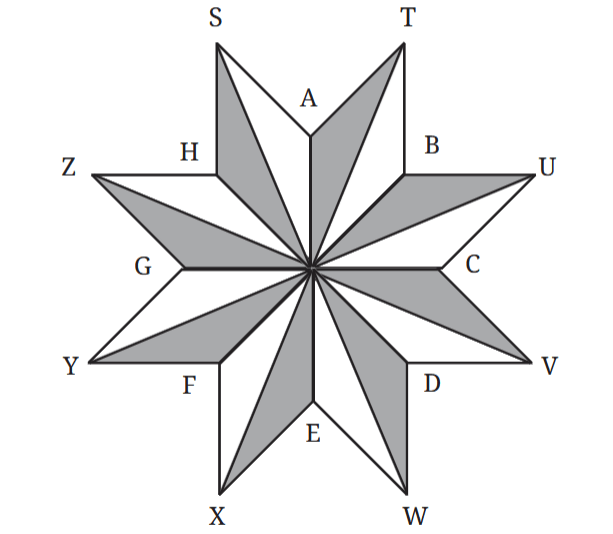
How do we construct this figure?
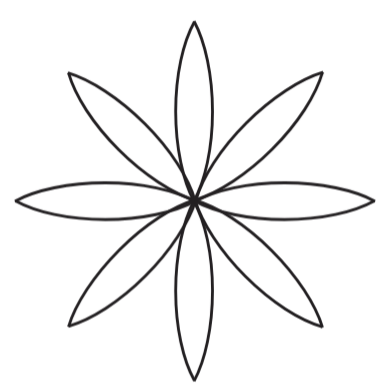
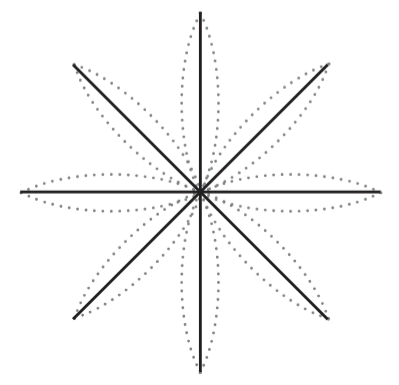
The supporting lines for this figure will look like this.
What is the angle between two adjacent lines?
We need the angle between every pair of adjacent lines to be equal.
Since 360° is equally divided into 8 parts, every angle is 45°.
How do we construct a 45° angle using only a ruler and a compass?
We know how to construct a 90° angle. If we can divide it into two equal parts, or bisect it, then we get a 45° angle.
We will now develop a general method to bisect any angle. Consider an angle ∠XOY.
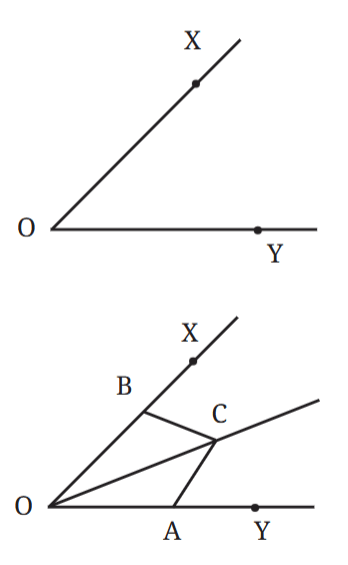
We can bisect it if we can draw two congruent triangles ∆OBC and ∆OAC as shown in the figure. Then ∠BOC = ∠AOC.
How do we construct these congruent triangles, given the angle?
If A and B are marked such that OA = OB, and if C is chosen such that BC = AC, then by the SSS congruence condition, ∆OBC ≅ ∆OAC. So we can bisect an angle as follows.
Steps for Angle Bisection1. Mark points A and B such that OA = OB.
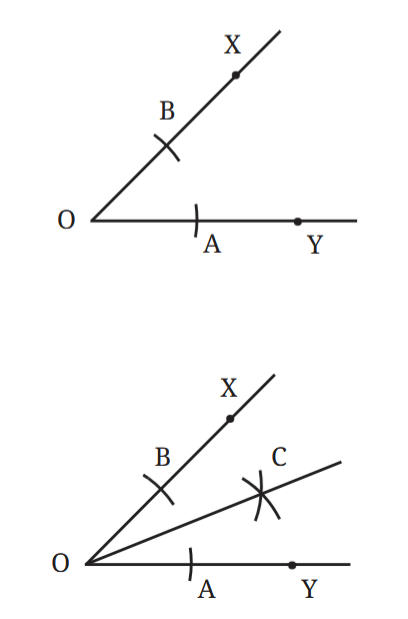
2. Choosing any sufficiently long radius, cut arcs from A and B, keeping the radius same. Mark the point of intersection as C.
3. OC bisects ∠AOB.
So, a 45° angle can be constructed by first constructing a 90° angle and then bisecting it.
Figure it Out1. Construct at least 4 different angles. Draw their bisectors.
2. Construct the 8-petalled figure shown in Fig. 6.5.
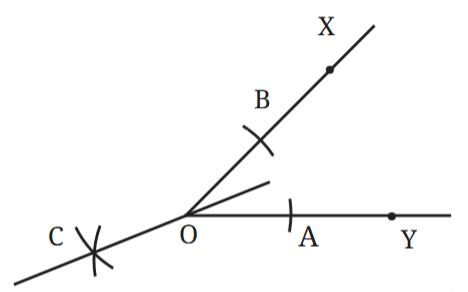
3. In Step 2 of angle bisection, if arcs of equal radius are drawn on the other side, as shown in the figure, will the line OC still be an angle bisector?
Explore this through construction, and then justify your answer.
4. What are the other angles that can be constructed using angle bisection? Can you construct 65.5° angle?
5. Come up with a method to construct the angle bisector using a rope.
6. Construct the following figure.
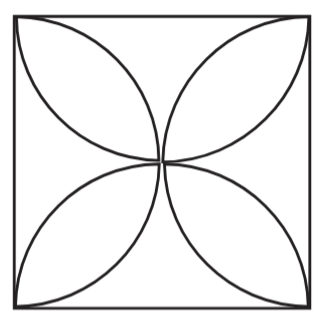
How do we construct the petals so that they are of the maximum possible size within a given square?
Repeating Units and Repeating Angles
Construct the following figure.
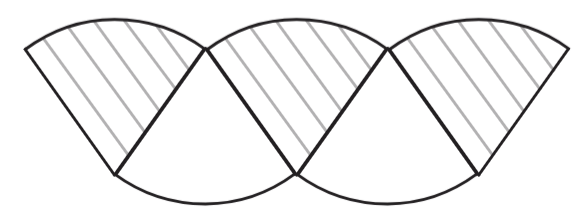
In this figure, there is a single unit repeating itself. To construct this figure, we need to make exact copies of this unit in two different orientations.
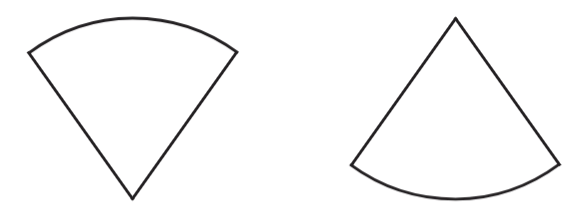
In order to make exact copies, all the units must have the same arm lengths and the same angle between the arms. We can ensure equal arm lengths using a compass, but how do we ensure equal angles?
Let us develop a method to create an exact copy of a given angle.
Draw an angle. Create a copy of this angle using only a ruler and compass.
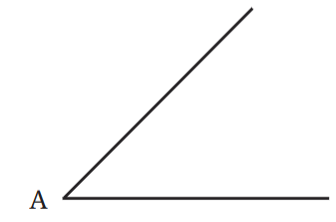
You might have developed your own method. Here is one simple approach.
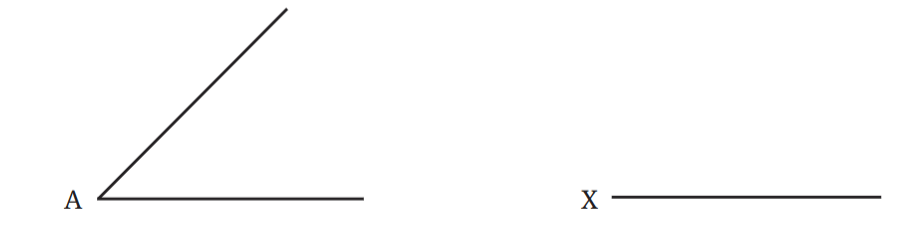
Steps of Construction to Copy an Angle
1. 
2. 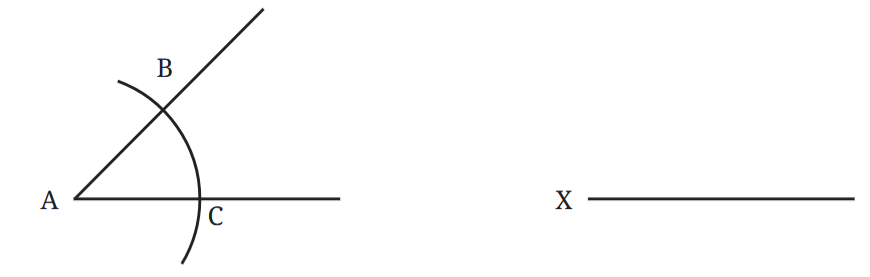
Draw an arc from A.
This gives us three points that form the isosceles triangle ∆ABC.
3. 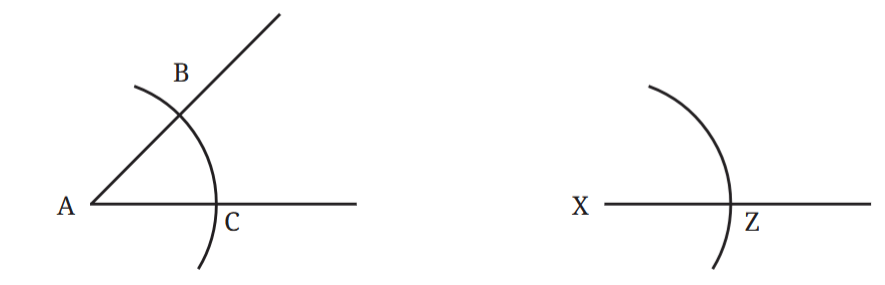
Draw an arc of the same radius from X.
4. 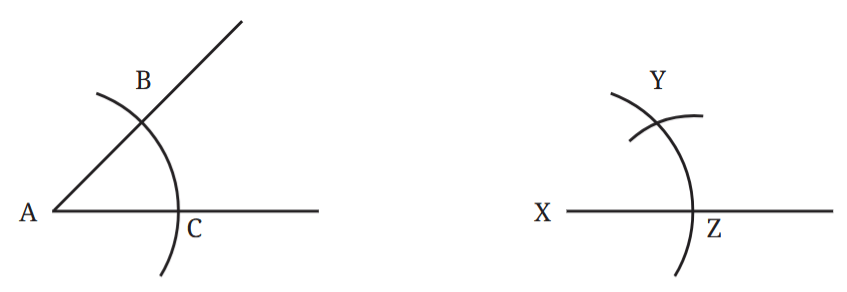
Measure BC using a compass. Transfer this length on the arc from Z to get YZ = BC.
5. 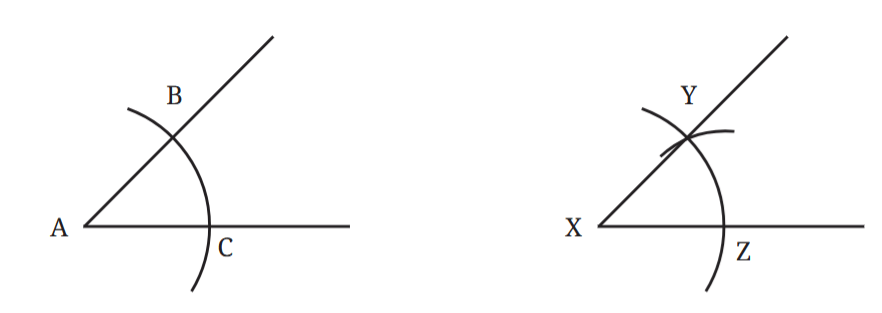
By the SSS congruence condition, ∆ABC ≅ XYZ. So, ∠A = ∠X.
Figure it Out
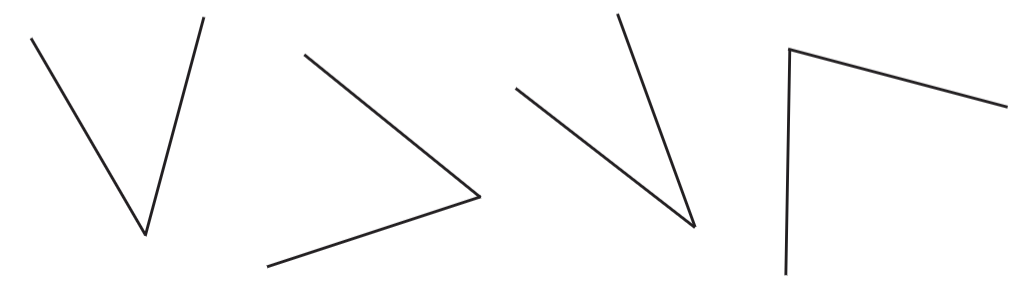
1. Construct at least 4 different angles in different orientations without taking any measurement. Make a copy of all these angles.
2. Construct the Fig. 6.6.
This procedure to copy an angle finds an important application in constructing parallel lines using only a ruler and compass.
Construction of a Line Parallel to the Given Line
Recall that in the construction using a ruler and a set square, we constructed equal corresponding angles to get parallel lines.
How do we implement this idea using a ruler and a compass?
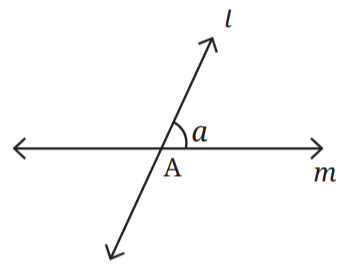
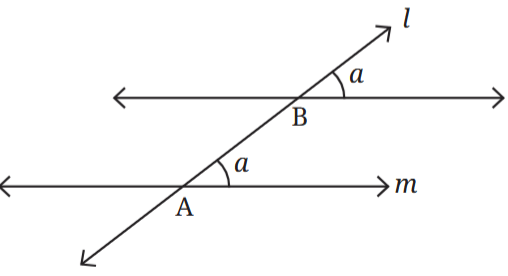
Suppose there is a line m to which we need to draw a parallel line. We construct a line l that intersects m. Line l will serve as a transversal to line m and to the line parallel to m that we are going to construct.
Let us choose a point B on l through which we are going to draw the parallel line. This parallel line must make the same corresponding angle, as shown in the figure. This can be done by copying the angle between m and l.
Here is a step-by-step procedure for carrying this out.
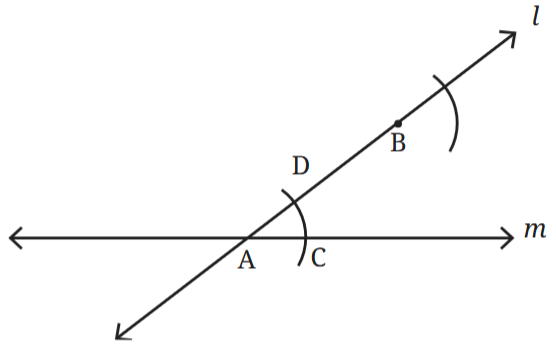
Fig. 6.8
Construct arcs of equal radius from A and B
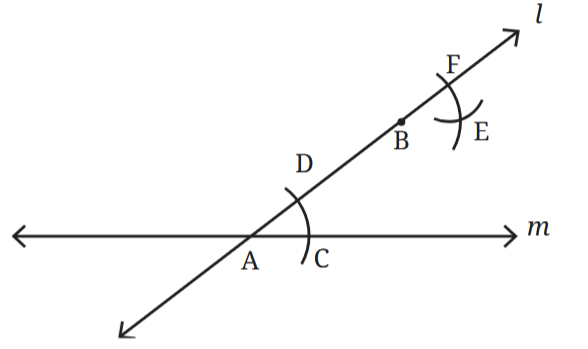
Fig. 6.9
Transfer the length CD to the arc from F
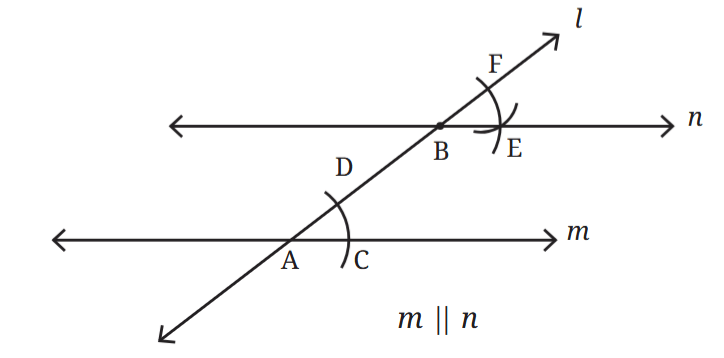
Fig. 6.10
Figures 6.7–6.10 describe a method to construct a line parallel to the given line.
Figure it Out
1. Construct 4 pairs of parallel lines in different orientations.
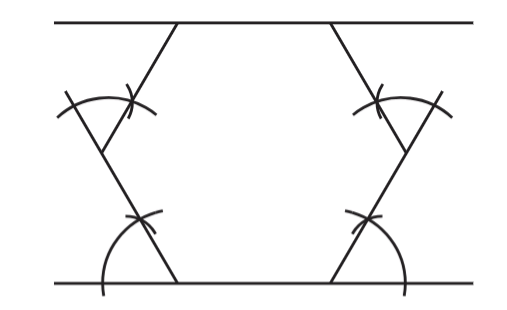
2. Construct the following figure.
Arch Designs
Trefoil ArchHave you seen this kind of beautiful arch?
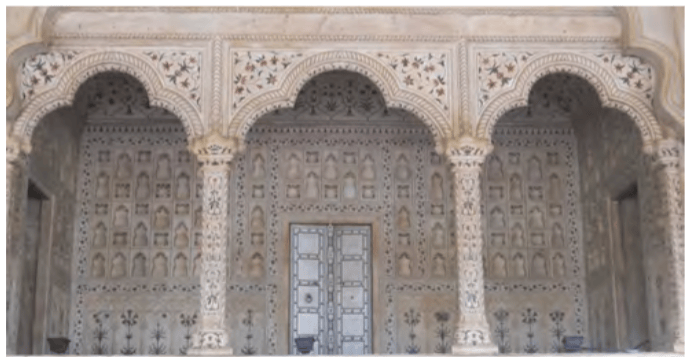
php?curid=28374748 Diwan-i-Aam, Red fort
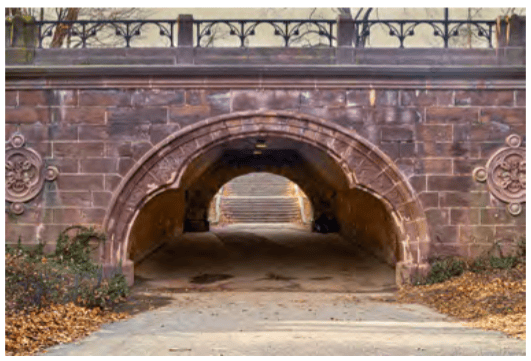
File:Central_Park_A.jpg Central park, New York City
How did they make these arches?
The first step is to be able to draw them on a plane surface such as paper or stone.
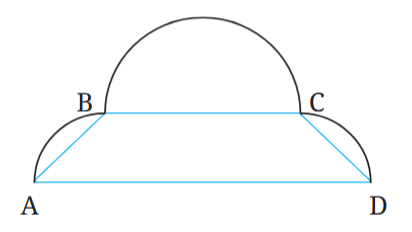
Construct this arch shape on a piece of paper.
Let us think about the support lines this figure will need.
For symmetry, we should have AB = CD, and ∠BAD = ∠CDA.
How would you construct these support lines?
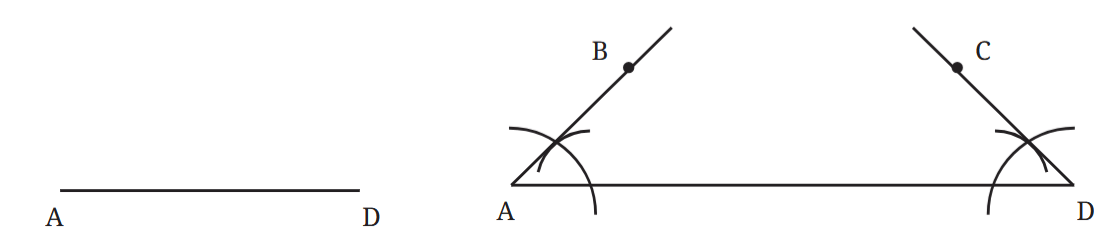
Construct equal angles at A and D. Mark B and C such that AB = CD.
Use these support lines to construct an arch. If required, adjust the radii of the arcs to make the arch look more aesthetically pleasing.
A Pointed ArchSome arches look like this.
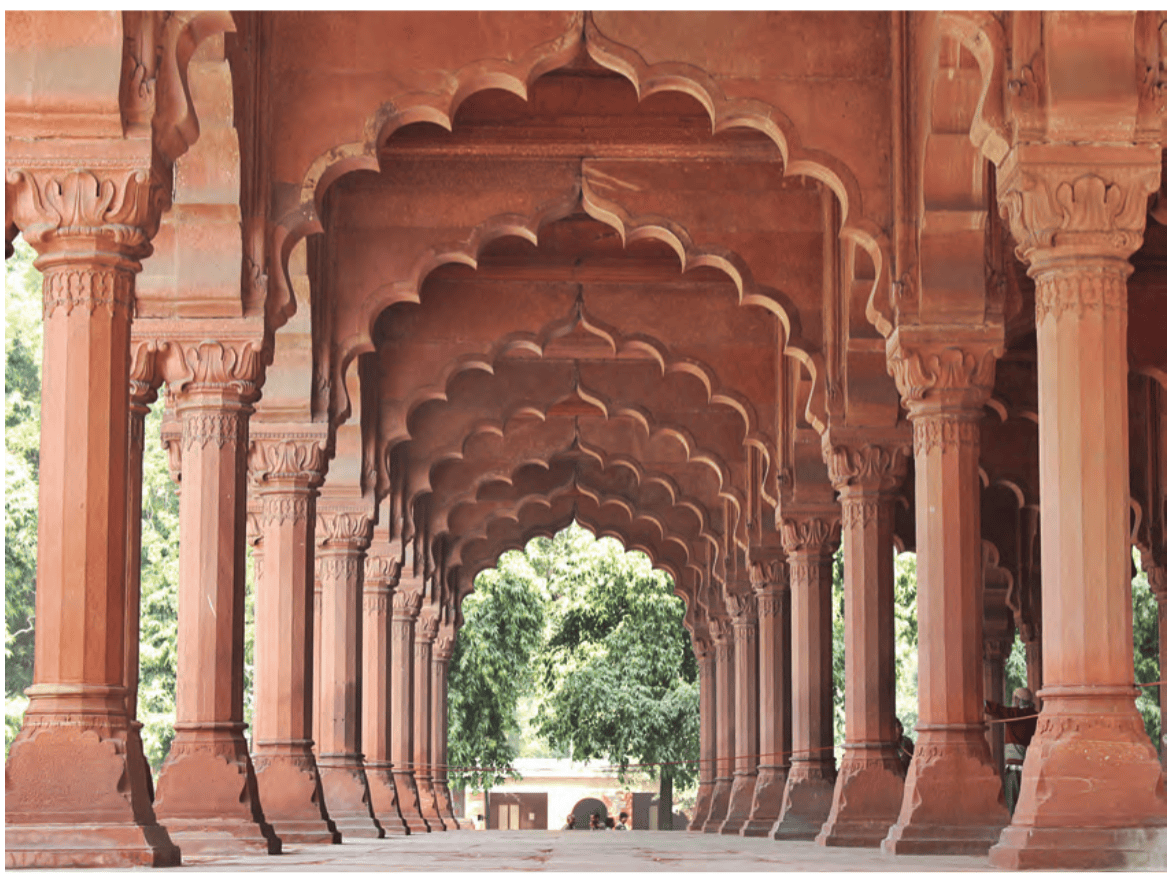
Diwan-i-Aam, Red Fort
How do we construct this shape?
What supporting lines will you use to draw this arch?
Remember ‘Wavy Wave’ from the Grade 6 Textbook?
The supporting lines are just two line segments of equal length.
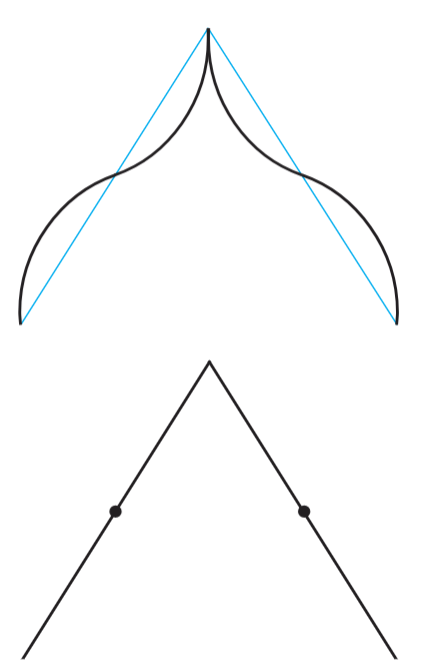
Fig. 6.11
If their midpoints are marked, will you be able to construct a pointed arch?
Figure it Out
1. Use support lines in Fig. 6.11 to construct a pointed arch. Make different arches, by changing the radius of the arcs.
2. Make your own arch designs.
Regular Hexagons
Recall that a regular polygon has equal sides and equal angles. A regular polygon with 3 sides is an equilateral triangle, and a regular polygon with 4 sides is a square. We have constructed these figures earlier.
How do we construct a regular pentagon (5-sided figure) and a regular hexagon (6-sided figure)? To begin with, try to construct a pentagon and hexagon with equal sidelengths.
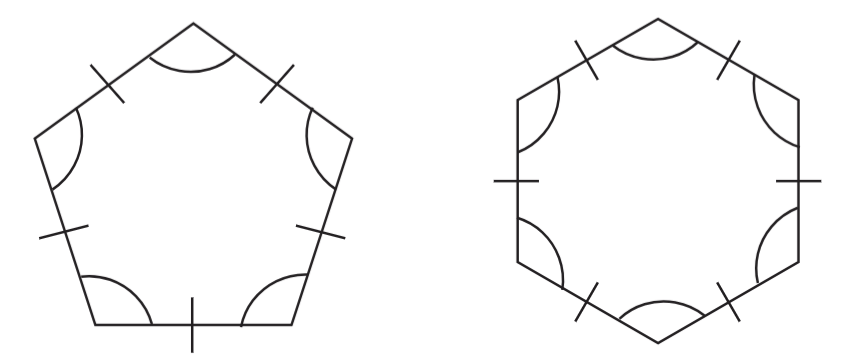
To construct a regular pentagon, we first need to have a better understanding of triangles and pentagons. We will discuss this in later years. However, constructing a regular hexagon is within our reach!
Can we break a regular hexagon into smaller pieces that can be constructed?
Regular Hexagon and Equilateral Triangles
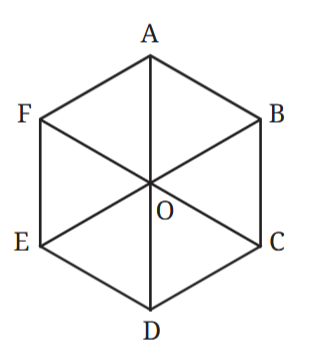
Fig. 6.12
What happens when we join the ‘opposite’ points of a regular hexagon? Since a regular hexagon has equal sides and angles, can we expect a figure like this?
Will all the triangles in the figure be equilateral triangles?
To answer these questions, we will reverse our approach.
Can six congruent equilateral triangles be placed together as in Fig. 6.12? If yes, will it result in a regular hexagon?
If six congruent equilateral triangles can indeed be placed as shown in Fig. 6.12, then the sides of the resulting hexagon are equal, and their angles are 60 + 60 = 120° (how?). So what we really need to examine is whether 6 congruent equilateral triangles can fit this way without overlapping and without leaving any gaps around the centre.
We have defined a degree by taking the complete angle around a point to be 360°. So all the angles around the centre should add up to 360°.
Consider this figure. Will the 70° angle fit into the gap? What is the gap angle ∠AOI?
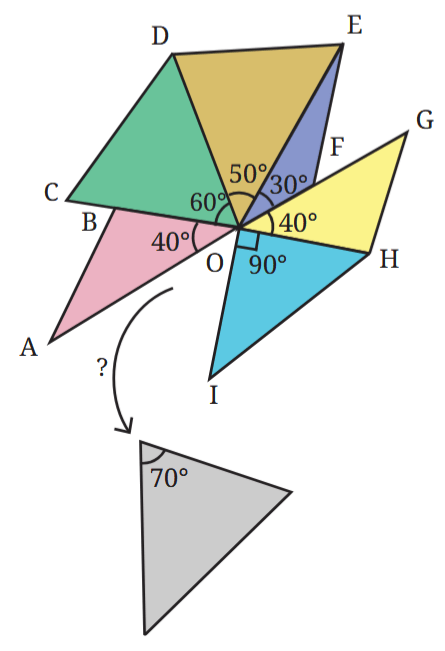
We have,
40° + 60° + 50° + 30° + 40° + 90° + gap angle = 360°.
Use this to determine whether the 70°angle fits the gap.
Thus, if there are angles that add up to 360°, their vertices can be joined together at a single point such that
(a) the angles do not overlap, and
(b) they completely cover the region around the point.
Since each angle in an equilateral triangle is 60°, six such angles add up to 360°. Therefore, six congruent triangles can be arranged as shown in Fig. 6.12.
In Fig. 6.12 can you explain why AOD, BOE and COF are straight lines?
Construct a regular hexagon with a sidelength 4 cm using a ruler and a compass.
We can construct a regular hexagon more directly if we can construct a 120° angle using a ruler and a compass.
How do we do it?
This can be done if we can construct a 60° angle.
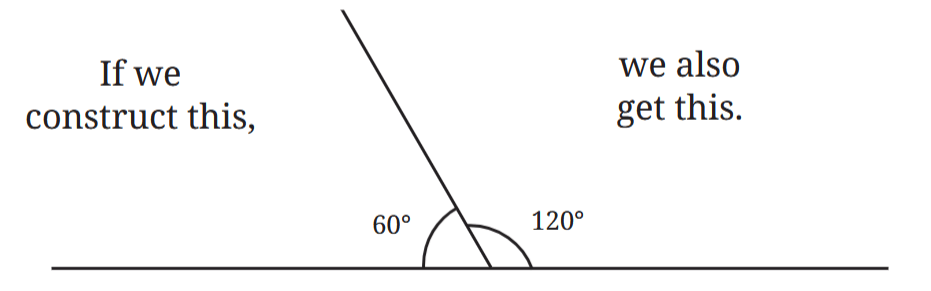
Construction of a 60° angle
How do we construct a 60° angle?
We get a 60° angle if we construct an equilateral triangle! We can use the following steps for this.
Suppose we need a 60° angle at point A on a line segment AX.
Step 1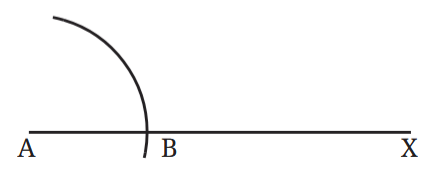
Construct an arc with centre A and any radius.
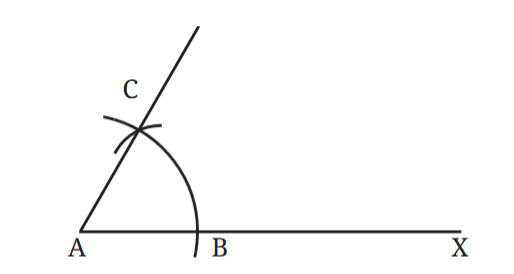
With the same radius, cut another arc from B that meets the first arc. Let C be the point at which the arcs meet.
We have ∠CAX = 60°.
Why is ∠CAX = 60°? Is there an equilateral triangle here?
We can use these ideas to construct a regular hexagon —
Construct a regular hexagon of sidelength 5 cm.
Related Constructions
Construction of 30° and 15° anglesHow will you construct 30° and 15° angles?
6-Pointed StarConstruct the following 6-pointed star. Note that it has a rotational symmetry.
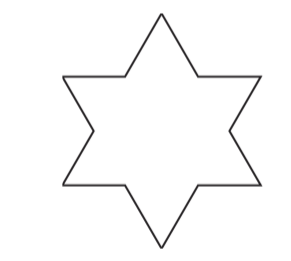 Hint:
Hint:
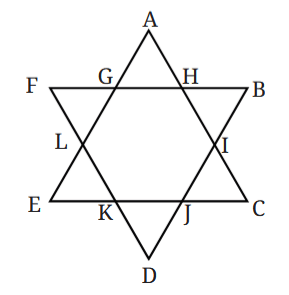
Do you see a hexagon here?
Are the six triangles forming the 6 points of the star — ∆AGH, ∆BHI, ∆CIJ, ∆DJK, ∆ELK, ∆FLG — equilateral? Why?
[Hint: Find the angles.]
Figure it Out
1. Construct the following figures:
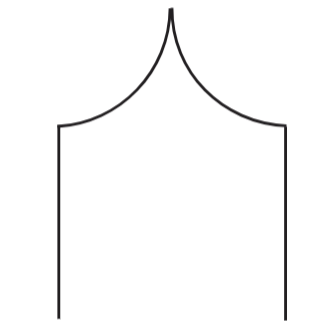
(a)
An Inflexed Arc
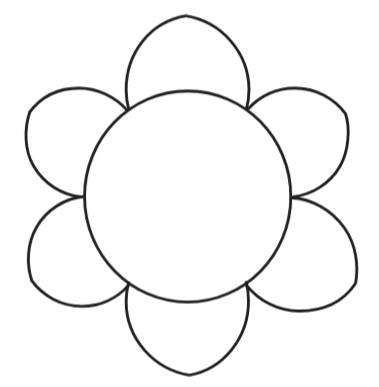
(b)
The fun part about this figure is that it can also be constructed using only a compass! Can you do it?
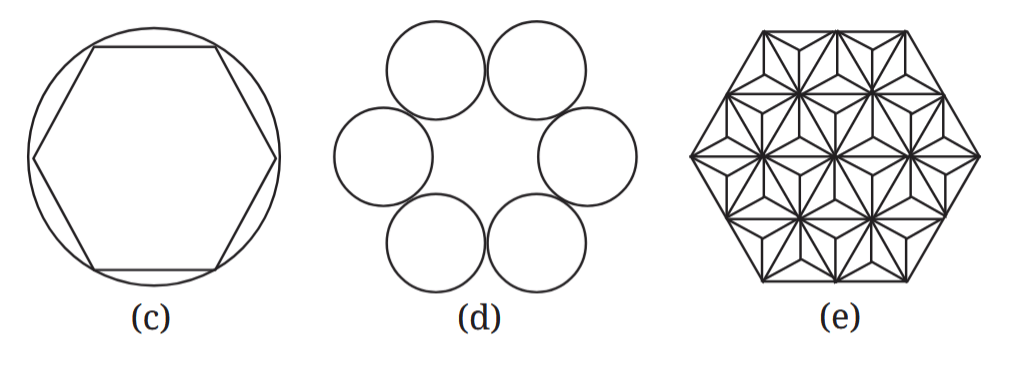
2. Optical Illusion: Do you notice anything interesting about the following figure? How does this happen? Recreate this in your notebook.
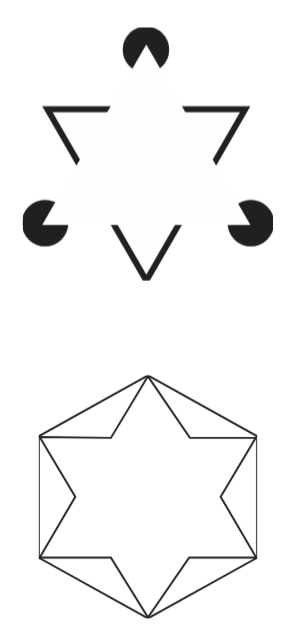
3. Construct this figure.
[Hint: Find the angles in this figure.]
4. Draw a line l and mark a point P anywhere outside the line. Construct a perpendicular to the given line l through P.
[Hint: Find a line segment on l whose perpendicular bisector passes through P.]
6.2 Tiling
Tangrams are puzzles that originated in China. They make use of 7 pieces obtained by dividing a square as shown.
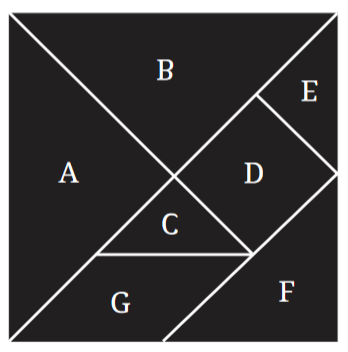
For the problems ahead, we need these 7 tangram pieces. These are provided at the end of the book. Or, by looking at the figure, you could make cardboard cutouts of the pieces.
We can form interesting pieces by rearranging the tangram pieces. Here is an arrow.
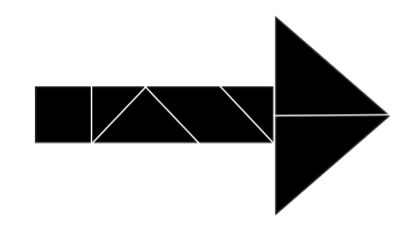
Figure it Out
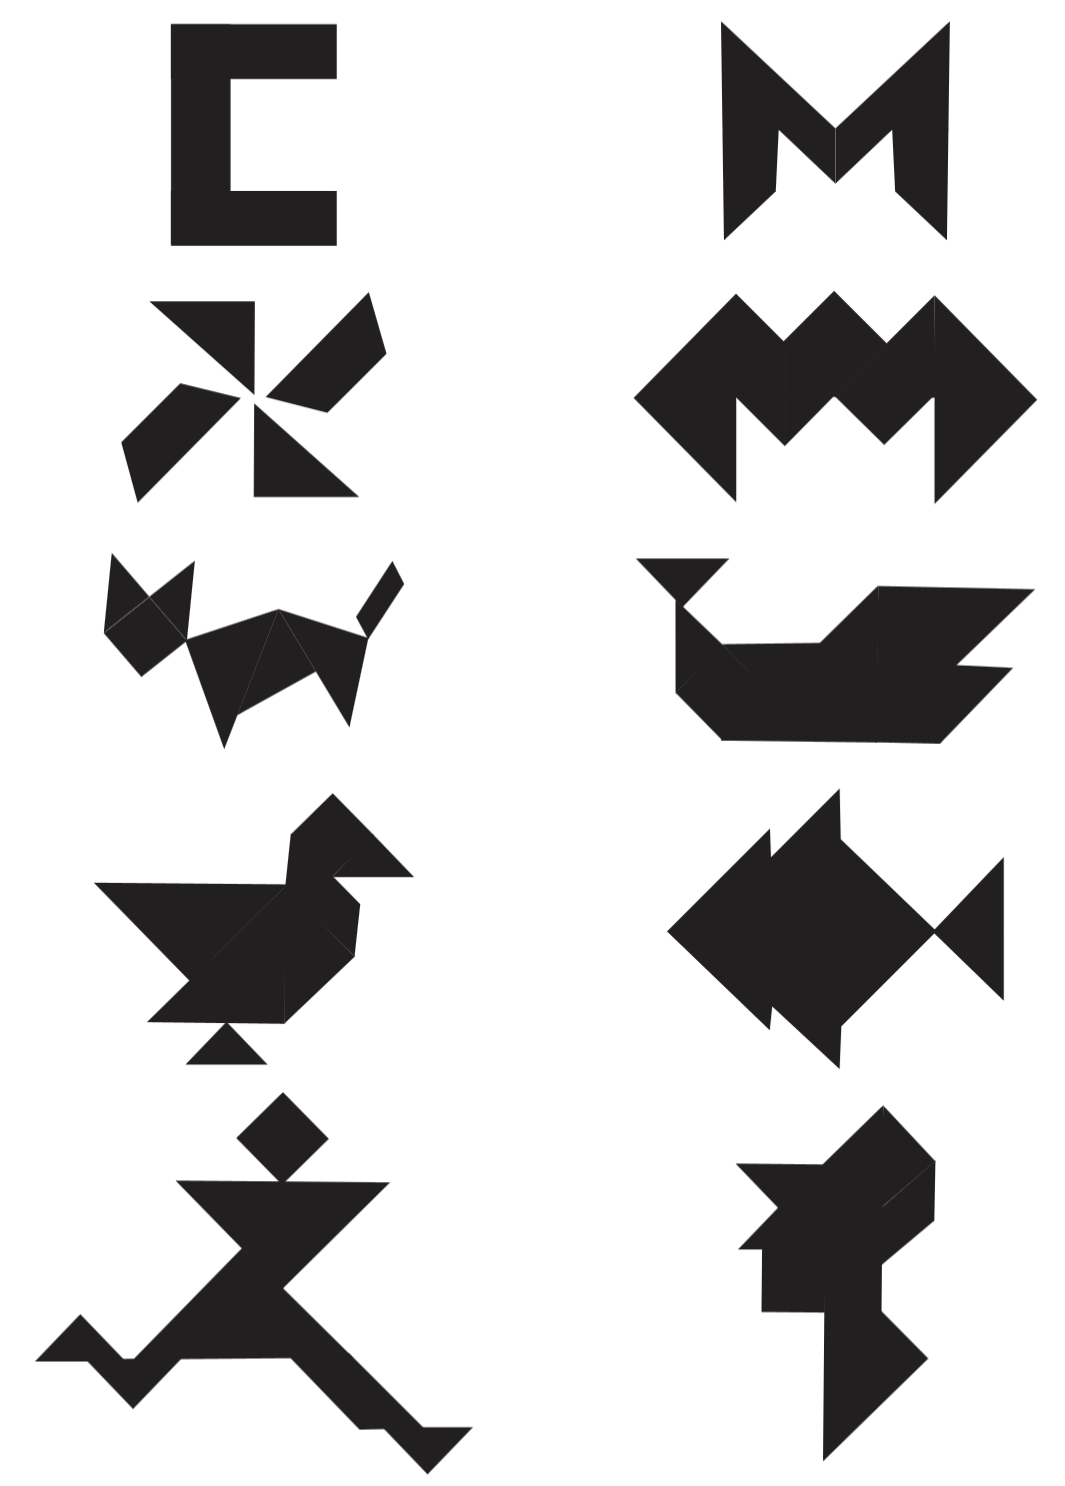
How can the tangram pieces be rearranged to form each of the following figures?
Covering a region using a set of shapes, without gaps or overlaps, is called tiling.
Consider a rectangular grid made of unit squares —
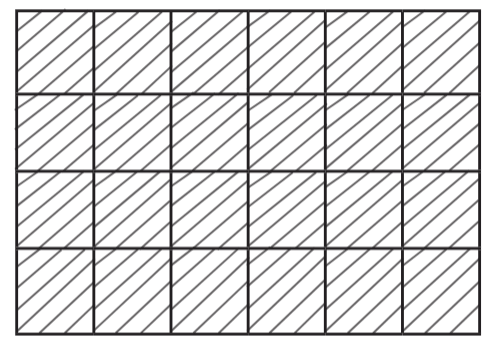
We call this a 4 × 6 grid, since it has 4 rows and 6 columns.
Can a 4 × 6 grid be tiled using multiple copies of 2 × 1 tiles?
We are allowed to rotate a 2 × 1 tile and use it.
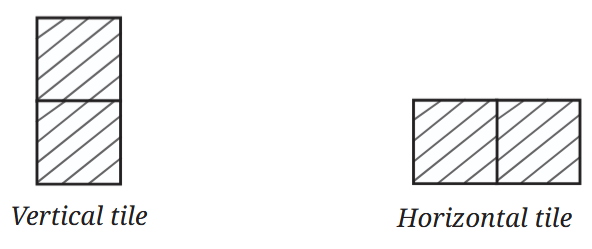 Vertical tile and Horizontal tile
Here is one way.
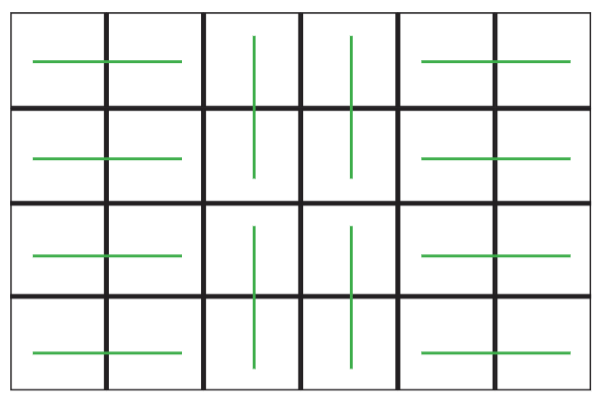
Obviously, this is not the only tiling possible.
Can a 4 × 7 grid be tiled using 2 × 1 tiles?
What about a 5 × 7 grid?
To see that there is no way to tile a 5 × 7 grid using 2 × 1 tiles, observe that this grid has 35 unit squares. Each tile covers exactly 2 unit squares.
Complete the justification.
Is an m × n grid tileable with 2 × 1 tiles, if both m and n are even? If yes, come up with a general strategy to tile it.
One general strategy for this case is to cover each column with vertical tiles. This is possible because the number of rows is even.
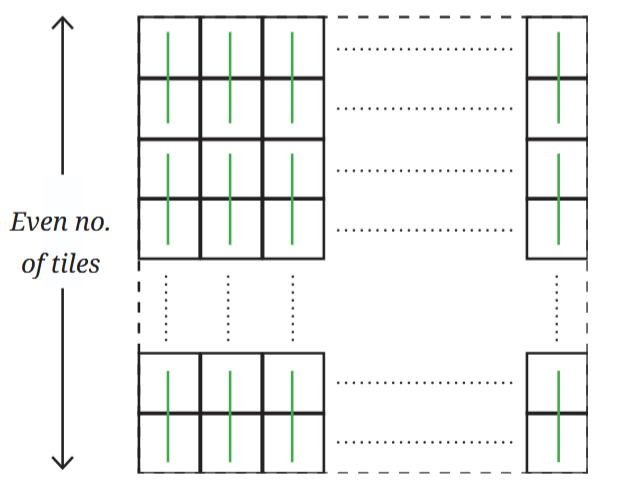
Is an m × n grid tileable with 2 × 1 tiles, if one of m and n is even and the other is odd? If yes, come up with a general strategy to tile it.
Is an m × n grid tileable with 2 × 1 tiles, if both m and n are odd? Give reasons.
Here is a 5 × 3 grid, with a unit square removed.
Now, it has an even number of unit squares. Is it tileable with 2 × 1 tiles?
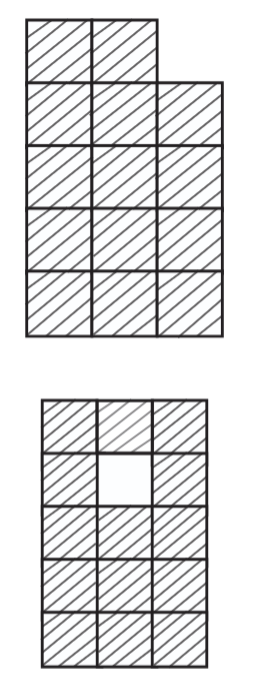
Is the following region tileable with 2 × 1 tiles?
What about this one?
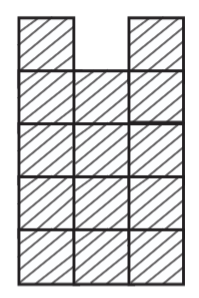
Fig. 6.13
Were you able to tile this? How can we be sure that this is not tileable?
Can you find another unit square that, when removed from a 5 × 3 grid, makes it non-tileable?
There is an interesting way to look at these questions. For any tiling problem of this kind, we can create a similar problem with the unit squares coloured black and white so that black squares have only white neighbours and white squares have only black neighbours. For the tiling problem in Fig. 6.13, we get the following.
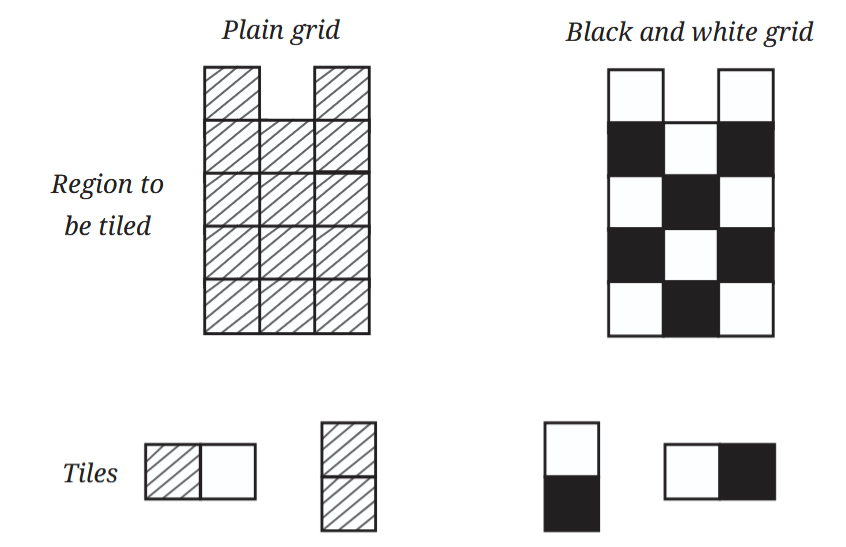
Fig. 6.14
In the black-and-white region, the problem is to tile the region with the 2 × 1 black-and-white tiles so that each black square of a tile sits on a black square of the grid, and each white square sits on a white square.
If the plain grid is tileable, is the black-and-white-grid tileable?
If the black-and-white grid is tileable, is the plain grid tileable?
It can be seen that the answer to both the questions is yes.
Is the black-and-white region in Fig. 6.14 tileable?
Any region tiled with black-and-white-tiles must have an equal number of black tiles and white tiles.
Since the black-and-white region in Fig. 6.14 has 8 white squares and 6 black squares, it can never be tiled with these tiles!
Use this idea to find another unit square that, when removed from a 5 × 3 grid, makes it non-tileable?
Isn’t it surprising how, by introducing colours and making the problem more complicated, it becomes easier to tackle? What a creative way of looking at the problem!
Figure it Out
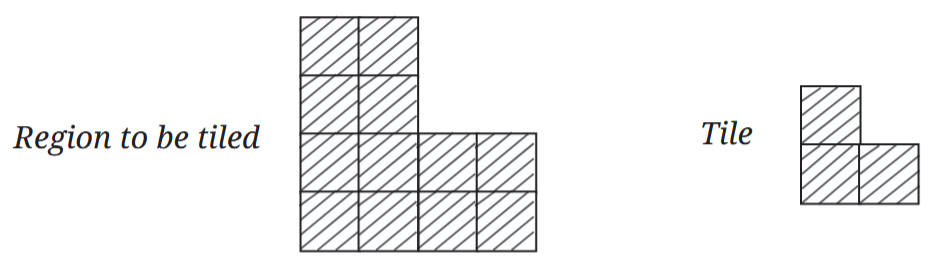
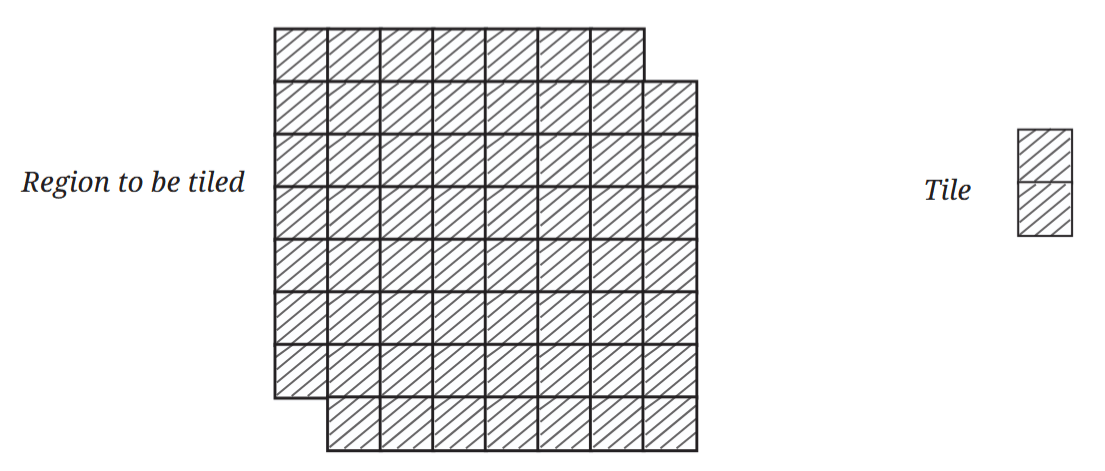
Are the following tilings possible?
1. 
2. 
So far we have seen how to tile a given region. What about tiling the entire plane?
Can you think of a shape whose copies can tile the entire plane?
Clearly, squares can.
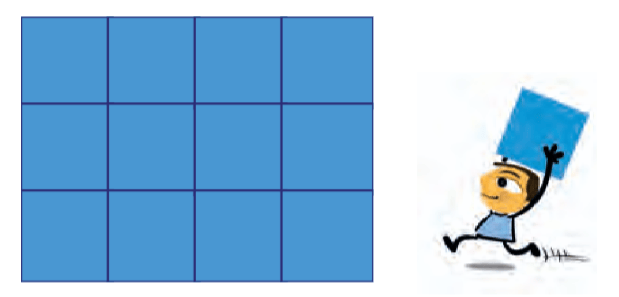
Are there other regular polygons that can tile the plane?
What about equilateral triangles?
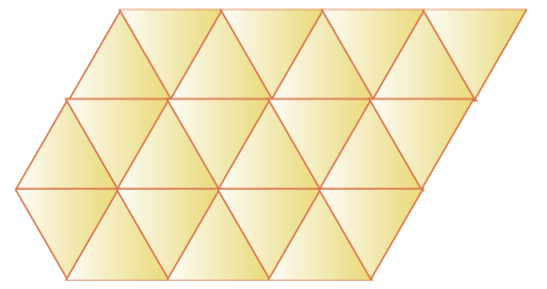
Tiling with equilateral triangles shows the possibility of tiling with another regular polygon.
A plane can be tiled using regular hexagons as well.
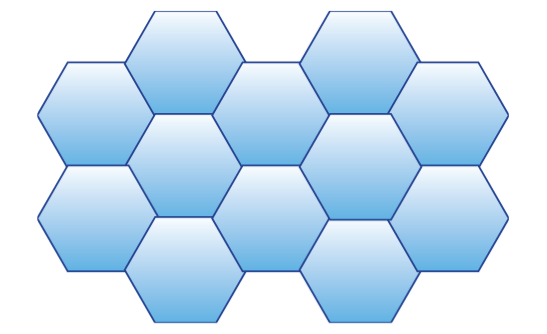
A plane can also be tiled using more than one shape, and using non-regular polygons. People such as the great Dutch artist Escher (1898 – 1972) — whose works explored mathematical themes such as tiling — have come up with creative ways of tiling a plane with animal shapes! Here are some examples.
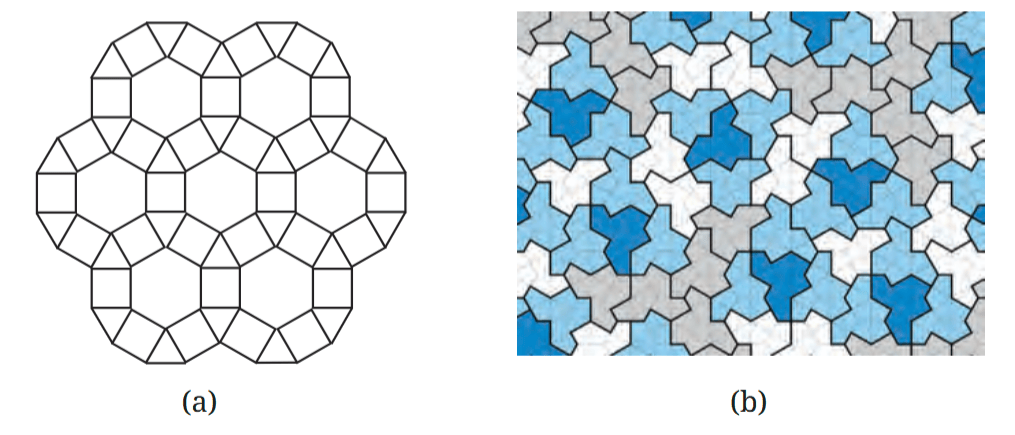
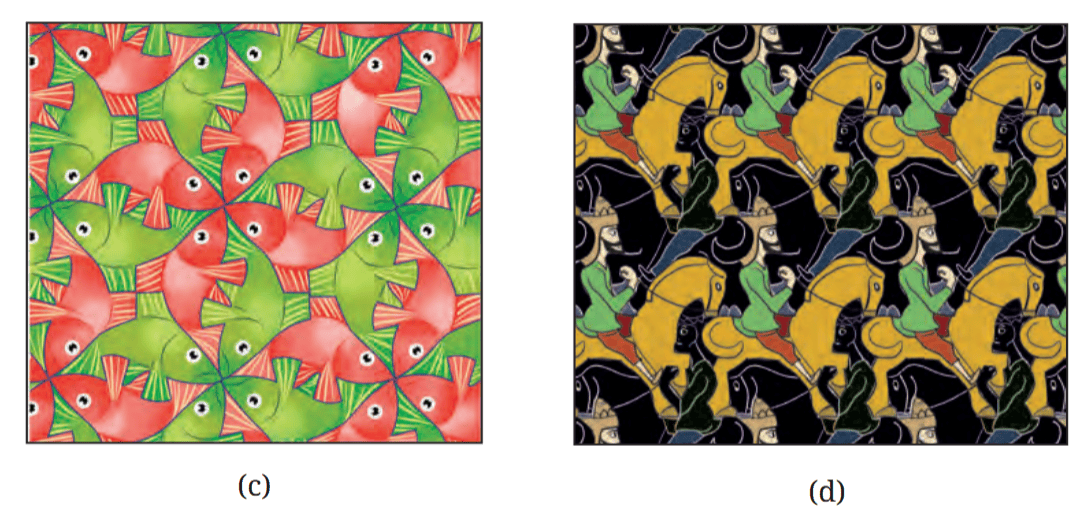
Mathematicians are still exploring various ways of tiling the plane!
Tiling (b) was found as recently as 2023.
Have you seen tilings in daily life? They are often used in buildings and in designs. Tilings are found in nature too. The front face of bee hives and some wasp nests are tiled using hexagonal cells!
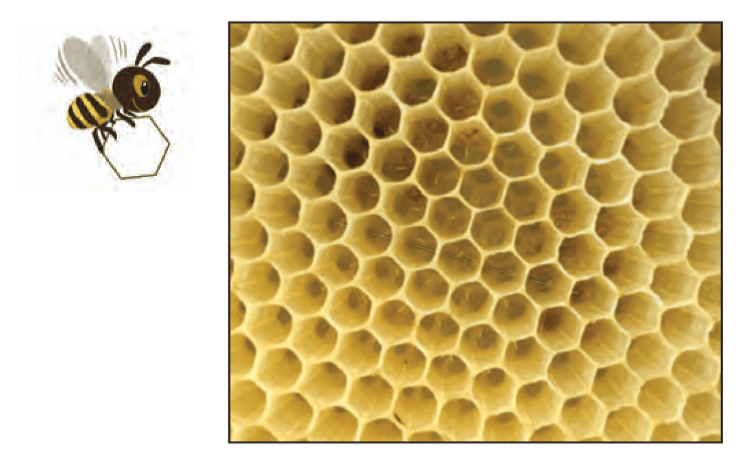
These cells are used by the insects to keep their eggs, larvae and pupae safe, as well as to store food. Because the region is tiled, no space is wasted.
Scientists still wonder how bees and wasps are able to make hexagonal cells. Next time you see any tiling, pay closer attention to it!
Tiling is still one of the most exciting and active areas of research in geometry.
SUMMARY
• A division of a line segment, or any geometrical quantity, into two identical parts is called bisection.
• Any point that is of equal distance from the two endpoints of a given line segment lies on its perpendicular bisector. This property can be used to construct the perpendicular bisector using a ruler and compass.
• The method of constructing the perpendicular bisector can be modified to draw a 90° angle at any point on a line using only a ruler and compass.
• An angle can be bisected and copied using the congruence properties of triangles.
• A 60° angle can be constructed using a ruler and compass by constructing an equilateral triangle.
• Covering a region using a set of shapes, without gaps or overlaps, is called tiling.