Part 1 : Work with Life Forms

‘Life forms’ include all living things on earth. They include human beings, mammals, birds, fish, plants, insects, reptiles and even bacteria and viruses. Projects on Work with Life Forms will help you work with living things in different ways. You can take up projects related to growing plants in various ways, recording the biodiversity around you, surveying medicinal plants, learning to care for domestic animals, and maintaining a nature journal. It is up to you to imagine all that you can do in the activities with your peers.
Two examples of projects are given in this section, which are Plant Nursery and School Habitat Garden. You must take up only one project. You can either choose one of these projects or you can design a project of your own choice with the help of your teacher.

Project 1: Plant Nursery
This project will help you learn how to provide conditions suitable for the growth of plants, and the different methods of plant propagation. You will do this while developing a plant nursery in your school.
As part of the project, you will be able to:
- Identify conditions necessary for growth of plants
- Design a plant nursery
- Use different methods of plant propagation
- Observe plant growth
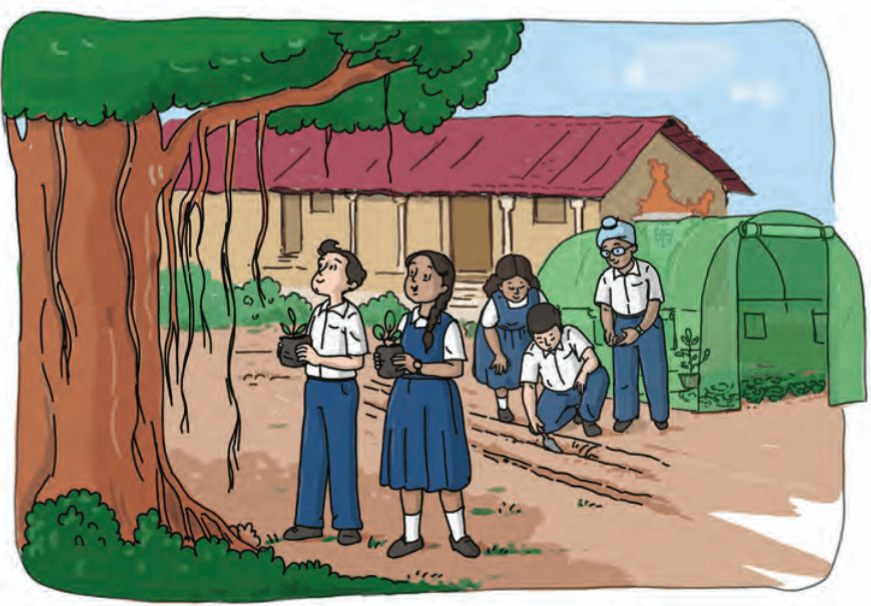
Plants propagate, that is, they reproduce themselves, through various methods. Tiny seeds germinate and grow into a huge tree or a small flowering plant. However, some plants can be grown directly from the branches of the mother plant or tubers (e.g., potatoes).
Like humans, plants require a suitable environment to survive and grow. In science, you have learned that plants need air, sunlight, nutrients, and water for their growth. These factors are essential, but beyond them, plants also need a favorable environment to thrive, just like we do.
Let us understand this with an example. Do you live in a warm and humid region, a cold and dry region, or a place that experiences different seasons? If you reside in a cold and dry area, you might have heard people say, "It is so dry", the dryness can cause itchy skin and burning sensation in the nostrils. That is why, when using a heater or bukhari, people often place a bowl of water in the room to add moisture to the air.
But what causes humidity or dryness? As you have studied, air contains various components, including water vapor. When there is a high amount of water vapor in the air, the weather feels humid, whereas a lower amount makes the air dry.
Just like too much or too little humidity affects us, it also impacts plants, especially during their growth stages. Similarly, extreme temperatures can be uncomfortable for humans, and plants also require an "optimal temperature" to grow. However, the ideal temperature varies among plants, which is why some plants flourish only in specific seasons.
Have you observed that more plants grow near a water stream, on the edges of ponds or near water sources (e.g., wells, water-tap) than in dry places? This is because they get optimum temperature, humidity, and moisture in the soil.
In the plant nursery (Figure 1.1) you will need to create these conditions for optimum survival and growth of plants.
Did you know?
Thimmamma Marimanu, a banyan tree located in Ananthapuramu district of Andhra Pradesh, is spread over 5 acres. This is the size of a small village.
Imagine! A tree spread so far that it could house an entire village under its branches. Isn't it fascinating that a single seed has grown into such a big tree? The banyan tree provides shade, oxygen, and shelter to birds, animals, and humans. It teaches us to care for nature and plants.
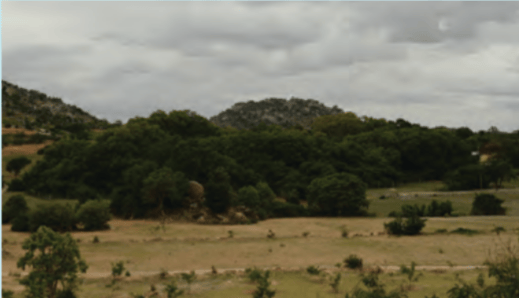
Plant nurseries are important for various reasons, e.g., preserving original plant species, creating new varieties of plants, and producing plants on a very large scale. Since nurseries are developed in a smaller space compared to farms, it is easier to prevent pests and provide protection from unsuitable conditions like heavy rain or severe heat.
Since conditions for healthy growth of plants can be created in plant nurseries, plants can be grown whenever required and not only during the seasons that are generally suitable for them. People visit plant nurseries to buy plants for their homes, gardens, and agriculture fields.
What will I be able to do?
- 1. Describe the needs of germinating seeds and young plants.
- 2. Cultivate new plants using different plant propagation methods.
- 3. Provide suitable conditions for initial growth of plants.
- 4. Develop a plant nursery in the school.
What will I need?
You will need the following tools, equipment, and materials for developing the plant nursery (Figure 1.3):
Gardening tools: Garden shovel, spade, hand cultivator, grafting knife, pruning shears (secateurs) or sharp cutter, watering can, and gardening gloves.
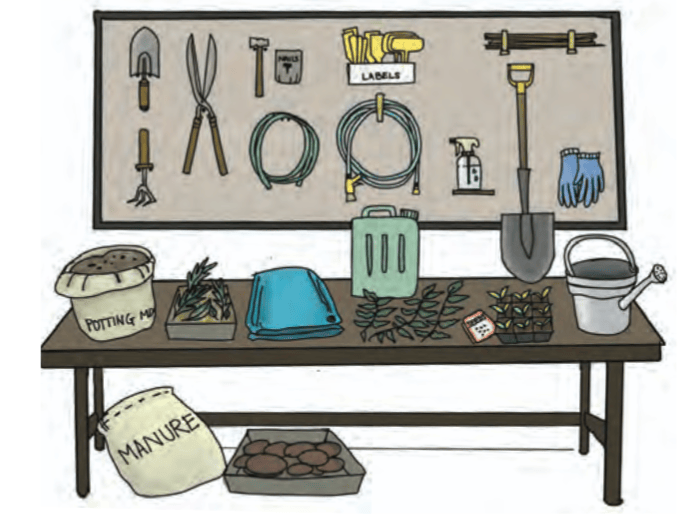
Nursery materials: Seedling or plug tray, cocopeat, sphagnum moss or coco husk, compost or manure, seed germination paper or cardboard (45 cm × 28 cm).
Other materials: Shade-net, bamboo or wooden pole (8 ft in height), PVC pipe, tarpaulin sheet, bricks, measuring tape, plant labels, first-aid kit, lime powder, geometry scale, pencil, rubber bands, plastic tray, and water.
How do I keep myself and others safe?
Some key precautions to be followed while working in a plant nursery are as follows:
- 1. Always use the right tool and equipment for the job.
- 2. Follow instructions while using gardening tools and materials. Tools like spades, shovels, pickaxes, etc., are heavy and should be handled with caution. Sharp tools like cutters and knives must be used carefully. You need to take necessary care to ensure your safety and of others too.
- 3. Use gloves that fit well so you have a good grip on tools and equipment.
- 4. Always ask for help if you are unsure about how to use a tool.
- 5. Wash hands carefully after working with soil as it may contain many disease-causing micro-organisms.
- 6. Use proper lifting techniques - bend your knees not your back while lifting heavy weight.
- 7. Hang tools on racks or place them in marked places or storage boxes.
Internet safety: Ask your teacher for help while using the Internet. Be careful not to upload or download anything without checking. Do not share personal information anywhere.
What do I need to know before I start?
There are different types of plant nurseries - some may be for growing vegetables, and others for fruit crops, trees, flowering plants, ornamental plants, and so on.
Different areas will have different kinds of nurseries. While the process of developing the nursery remains the same, the kind of plants change.
In agricultural areas, you will find nurseries for vegetables like brinjal, tomato, onion, etc., and crops like banana. In urban areas, nurseries provide ornamental and flowering plants such as rose, marigold, etc., that can be kept in homes. Where possible, especially in coastal and hilly areas, horticultural nurseries for plants like mango and coconut are set up.
Nurseries can be on plots of land or on terraces of buildings. They may be large or small ones maintained at homes. Visiting any one of these will help you to prepare your nursery well. In case there is no nursery close to your school, you can invite a farmer or gardener to your school to guide you.
Activity 1: Visit to a nearby plant nursery
During your visit to the nursery, observe how essential factors, such as air, sunlight, water, humidity, temperature, and nutrition are maintained.
Write the details of your visit(s) and interaction with the expert in the following format:
- 1. Date of visit:
- 2. Name of nursery visited:
- 3. Type of nursery (e.g., vegetable, fruit, flowering plants, ornamental plants):
- 4. Types of plants grown (e.g., vegetable, flowering, fruit, etc.):
- 5. Nursery tools and equipment used:
- 6. Management practices, such as watering, pest control, nutrient, etc.
Some questions you can ask are given below. You may also frame your own questions for interaction.
- 1. Which plants are generally grown in the nursery?
- 2. What methods of plant propagation are used in the nursery?
- 3. Are the same plants grown throughout the year or are there seasonal variations? If yes, which plants are grown in which season?
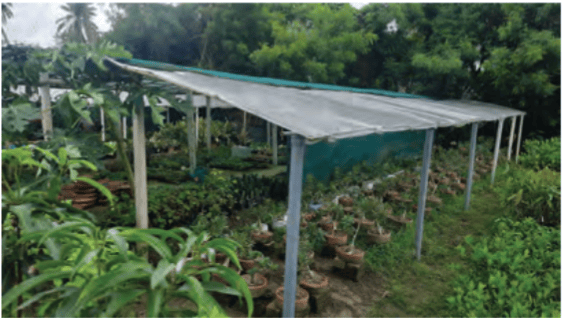
Observe how the conditions necessary for healthy growth of the plants are provided in the nursery. Some specific questions you can ask the people working in the nursery are as follows:
- 1. How do you ensure that plants receive the right amount and duration of sunlight?
- 2. What methods do you use to provide shade for plants?
- 3. What measures do you take to maintain ideal temperature for plants?
- 4. How do you make sure that plants receive the right amount of water?
- 5. How is optimal humidity maintained?
- 6. Is there anything else that plants need for their healthy growth?
- 7. How do you prevent damage to plants from external factors, like pests, animals, or human activity (e.g., are there pathways between plant beds and protective fencing)?
- 8. How are plants transported from the nursery to home gardens/farms?
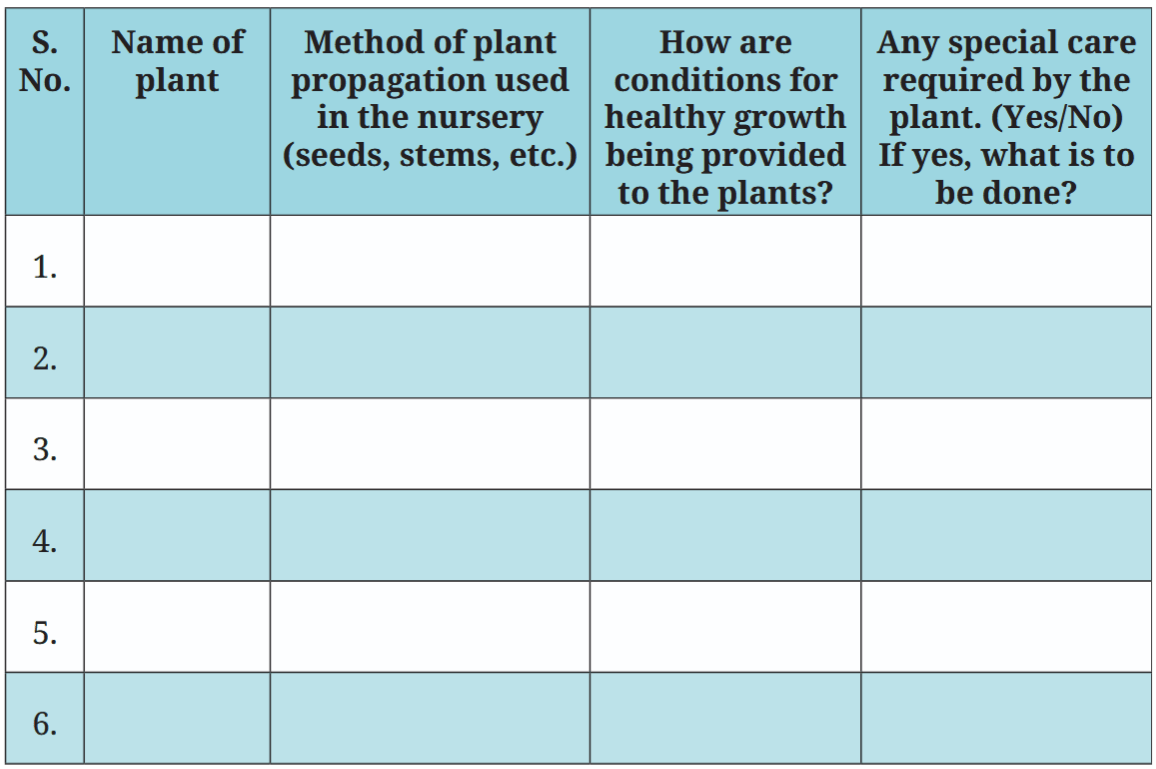
On the basis of the expert's advice, decide which plants you will grow in your plant nursery. Note important information related to these plants in table 1.1 with the help of the expert.
Table 1.1: Information for developing the plant nursery
What do I have to do?
Now that you have learnt about what plants need for growth, start planning for setting up the school nursery. You will plant seeds in beds and seedling trays, grow new plants from stem cuttings, and use them in the school or give them to others. You will also prepare nursery bags for planting and transferring plants from beds/trays to another part of the school (Figure 1.5).
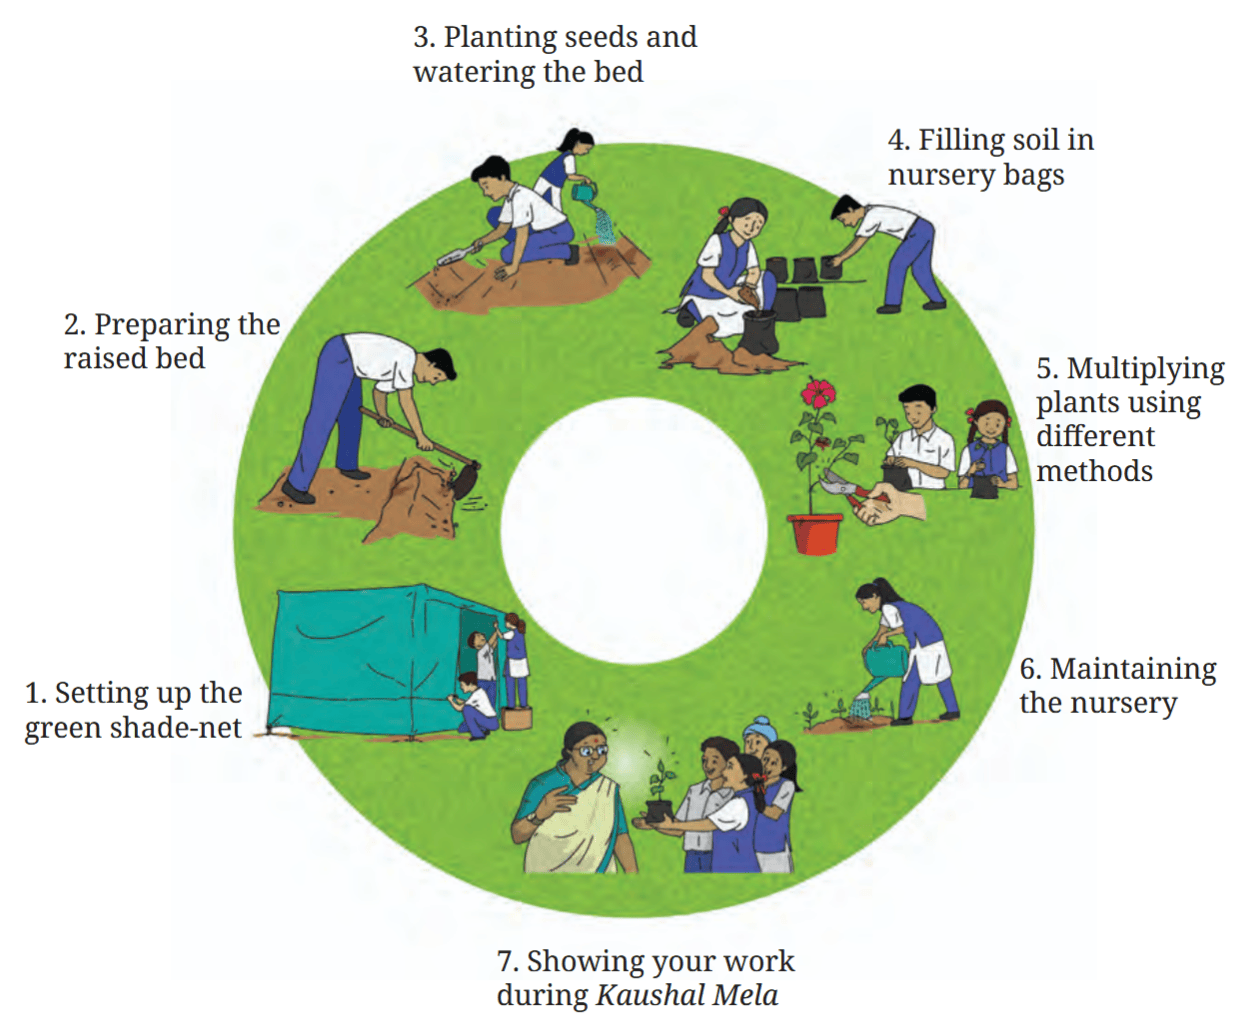
- 1. Setting up the green shade-net
- 2. Preparing the raised bed
- 3. Planting seeds and watering the bed
- 4. Filling soil in nursery bags
- 5. Multiplying plants using different methods
- 6. Maintaining the nursery
- 7. Showing your work during Kaushal Mela
Activity 2: Planning and laying out plant nursery
You have identified the plants that you will grow during Activity 1.
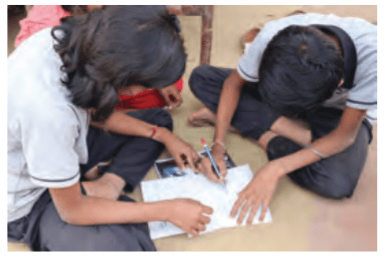
Now that you have to plan the plant nursery (Figure 1.6), the first step is finding a suitable place. The selected area should preferably get at least 2-3 hours of sunlight. The place should be such that excess water (waterlogging) can be avoided.
A 150-200 square feet area should be sufficient. If land is not available on the school premises, you can utilize any unused space, pathway, or parking lot, or you can also create the nursery in pots (Figure 1.7).
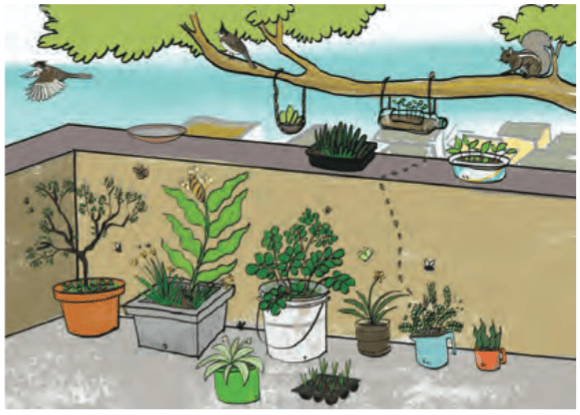
Once land is identified, calculate the area of the plant nursery.
- 1. What is the available space for the nursery?
- 2. What factors were considered while choosing the particular location?
Draw a layout or sketch of the nursery with dimensions (length, width). Show as many details as you can - pathways, source of water, layout of beds, and so on.

Activity 3: Preparing land and setting up shade-net
You have made the layout of the nursery. Now, you need to prepare the land and install a shade-net to reduce sunlight so that young plants are protected from excessive heat, preventing heat stress.
- 1. First remove unwanted plants, debris, rocks, etc., to clean the selected area.
- 2. Mark the nursery boundary with lime powder. Mark important components like pathways, plant beds, and so on (Figure 1.8).
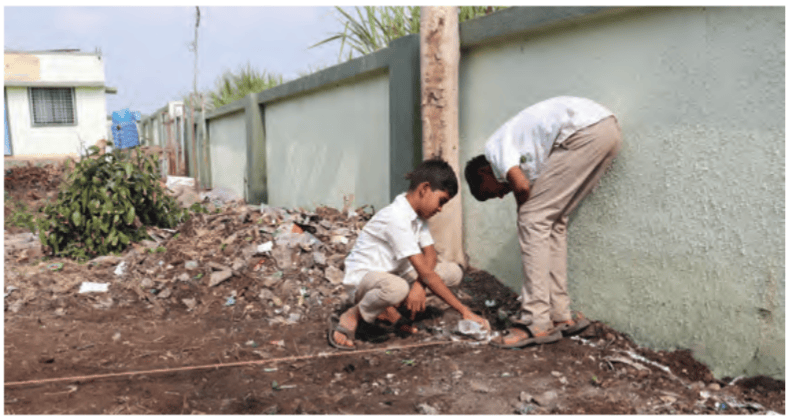
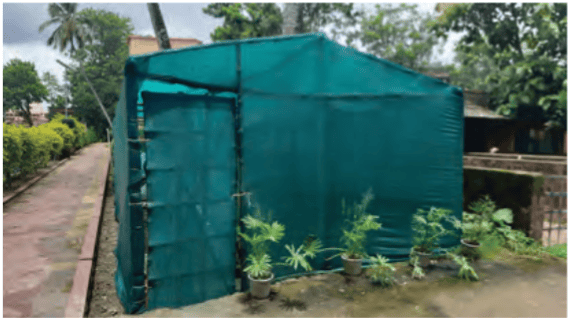
- On the basis of the area and your design, fix green shade-net on the nursery using bamboo or wooden poles (Figure 1.9).
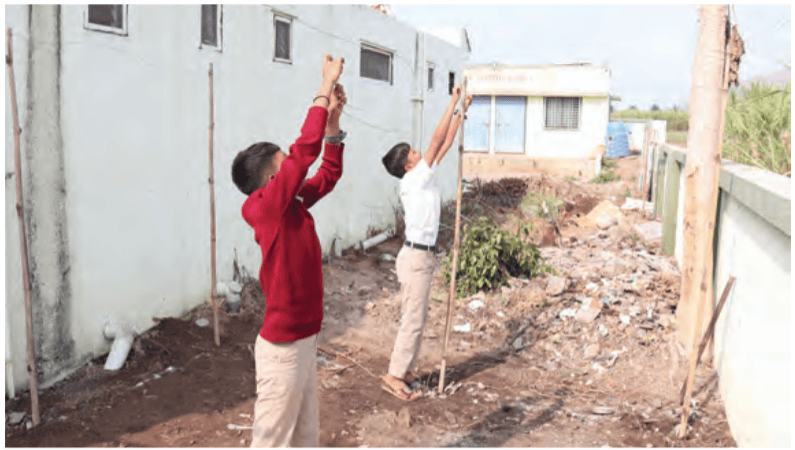
- 4. Choose a shade-net with appropriate shading percentage (50% or 75%), based on plant need. In case a green shade-net is not available, you can use tree branches or old cloth (sarees) to provide shade (Figure 1.10). If you are building the nursery on a terrace or concrete floor, then you can use metal tin boxes, or a plastic drum filled with sand to fix poles for the shade-net.
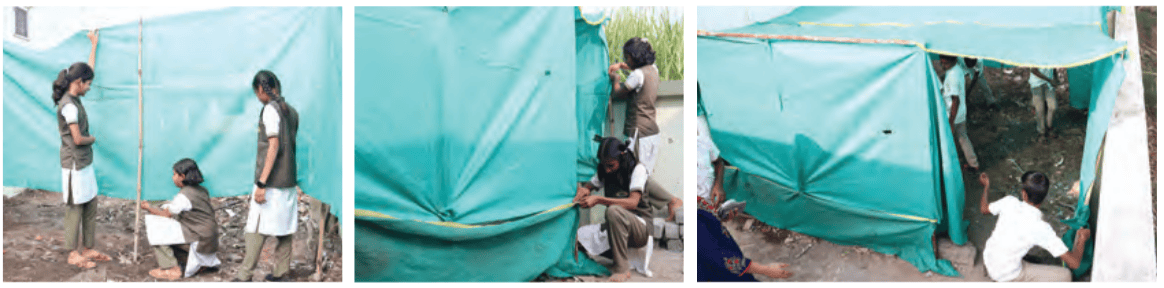
- 5. Use discarded pipes/rods, bamboo, or fallen branches to make a protective fence for your plant nursery. It is required to prevent entry of animals and human beings.
Once the basic structure is ready, respond to the following questions:
- 1. What kind of shade-net or clothes did you use to provide shade to the plants?
- 2. Which materials did you use to fix the shade-net (e.g., bamboo, wooden pole, mild steel pipe, etc.)?
Activity 4: Germinating seeds
All seeds may not germinate after sowing. The seed germination rate tells you how many seeds are likely to germinate to become plants. It is necessary to know the germination rate to estimate the quantity of seeds required to be planted in a nursery.
This activity will help you to understand the importance of germination test.
Follow the steps in figure 1.11 to perform the seed germination test.
Materials required
- (i) Cereal or pulses seeds
- (ii) Geometry scale
- (iii) Pencil
- (iv) Rubber bands
- (v) Plastic tray
- (vi) Water
- (vii) Seed germination paper (45 cm × 28 cm)
Seed germination paper is specially designed for germination tests since it can hold moisture. In case seed germination paper is not available, you can use a cardboard sheet.
-
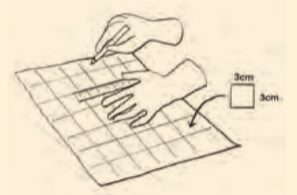 Step 1: Mark 3 × 3 cm squares on the paper.
 -
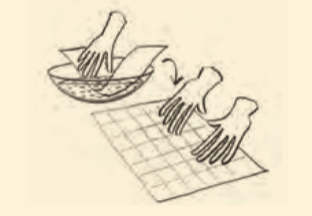 Step 2: Soak the paper in water. Let the extra water drain out.
 -
 Step 3: Count 100 seeds and place them on equal distances as per markings.
 -
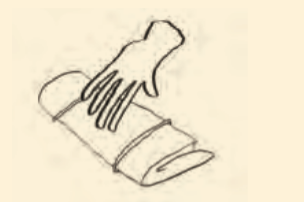 Step 4: Gently roll the paper. Place rubber bands on the paper and keep it for 3-5 days.
 - Step 5: Count the germinated seeds.
- Step 6: Calculate germination percentage using the formula given below:
Germination percentage = (Number of seeds germinated / Total number of seeds placed / sown) × 100
Record your plants' growth
You can create a video of seeds sprouting. You can take photographs (using a smartphone or camera) of seeds at different times. Search on the Internet using a search engine for the keywords "timelapse photo apps". You can upload the photographs to create a video of seeds growing into sprouts and young plants.
Now, you must have understood that the germination rate helps you to estimate how many seeds need to be planted to get the required yield. This ensures that space, effort and time is not wasted. If you look at seed packet labels, you will find that the seed germination rate is mentioned on them.
Please respond to the following questions to learn more about seed germination rate.
- 1. Which seed did you use for conducting seed germination test?
- 2. How many seeds were used for the germination test?
- 3. How many days did it take for the seeds to germinate?
- 4. How many seeds germinated?
- 5. What was the germination rate?
Activity 5: Raising plants in the nursery
You have learnt about the seed germination rate.
Let us now raise the plants in the nursery. Planting materials like seeds and cuttings contain reserve food in the form of carbohydrates, protein, vitamins, and necessary nutrients. This reserve is used by seedlings during germination and initial growth.
Remember, the number of seeds you use must be greater than the number of plants you wish to grow.
Did you know?
Rahibai Soma Popere, a recipient of Padma Shri and Nari Shakti Puraskar (Figure 1.12) also known as the 'Seed Mother of India' has developed a seed bank in her small home. She has conserved more than 43 indigenous crop varieties and wild food resources.
Her work is very important as many native plant species are at risk of being lost due to various factors, making their preservation essential.

Some of the common seed-sowing methods used in plant nurseries are given below. You can use these methods based on discussion with your peer and the teacher.
Method 1: Sowing seeds on raised-bed nursery
Step 1: Making raised beds for vegetable or flower seedlings
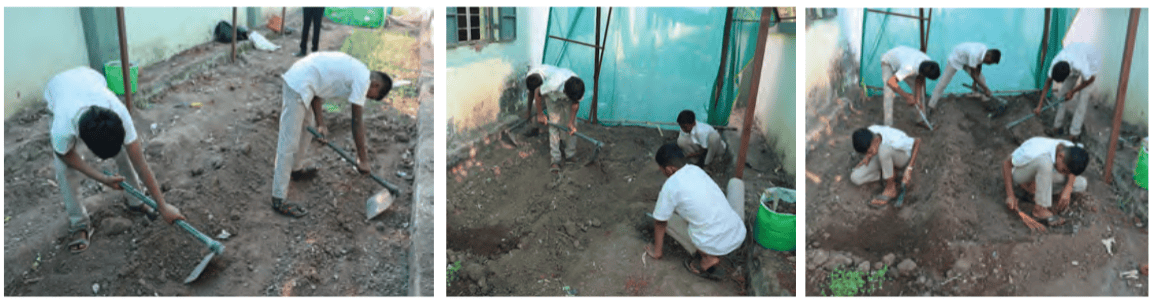
Nursery beds need to be free from weeds and stones. Raised-beds (Figure 1.13) ensure that extra water drains out from the root zone and roots get air for respiration.
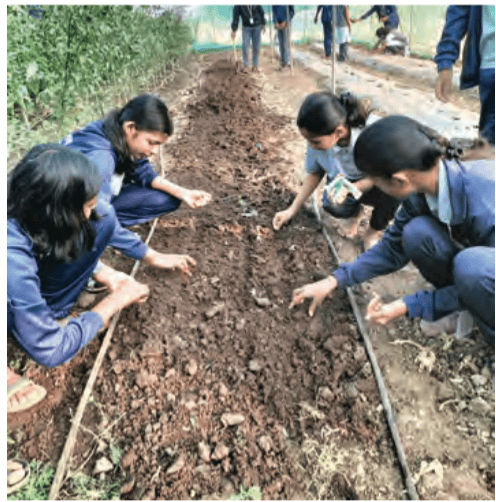
Follow the steps below to prepare raised-bed:
- 1. Dig and loosen the soil.
- 2. Remove bigger stones and pebbles.
- 3. Mix compost and soil (in a ratio of about 40:60) and raise the marked bed area by 15-20 cm above ground level.
- 4. The length of the bed could be 3-5 m and width 1-1.5 m.
- 5. You can maintain a distance of 0.30-0.40 m between two beds for human movement required for watering, weeding, and so on (Figure 1.14).
Step 2: Sowing seeds on raised-beds in a nursery
Now sow seeds on the raised-bed in the nursery. For this, follow the steps given below:
- 1. If seeds are very small, mix them with fine sand or soil. It will help in the easy sowing of seeds.
- 2. Sow the seeds on the raised-bed gently. Put soil on the seeds and water them using a water can to keep the soil moist.
Respond to the following questions after the activity:
- 1. Which seeds did you sow in the raised-bed?
- 2. What have you done to provide optimal conditions for growth of seedling?
Method 2: Sowing seeds in plug or seedling trays
An alternative to raised plant beds is using plug/seedlings tray (Figure 1.15). It is very useful if only limited space is available and also if we want to produce seedlings on a large scale. Use trays with appropriate sized cells - small cells for delicate seedling while larger ones for bigger seedlings.
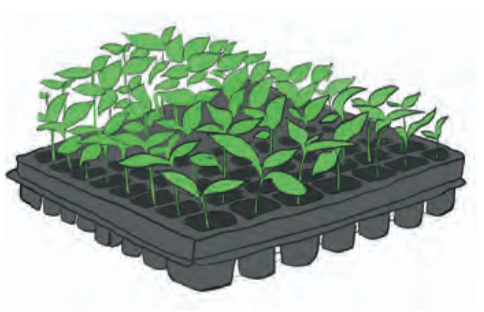
Cocopeat is generally used in seedling trays as a growing media.
In case seedling trays are not available, you can use coconut shells, old teacups, or similar waste materials.
Did you know?
Growing media has an advantage over soil in better management of moisture around roots. It also helps in avoiding disease spread and provides nutrients for growth.
Apart from cocopeat, minerals like vermiculite and bentonite are used in plant nurseries as growing media.
For sowing seeds in a seedling tray:
- 1. Soak cocopeat in water - 1 kg cocopeat can absorb 5-8 litres of water.
- 2. After all the water is soaked, fill the trays with the soaked cocopeat gently.
- 3. Sow seeds (1-2 seeds per hole) and cover the tray with tarpaulin sheet or gunny bags. Keep the covered tray(s) aside for 2-3 days.
- 4. Once the seeds start germinating, the tray should be placed in a shade-net nursery for further growth.
After completing the activity, answer the following questions:
- 1. Which method did you use for sowing the seeds? (If you have used more than one method, please mention all of them.)
- 2. What steps have you taken to provide optimal conditions for the growth of seedlings?
Method 3: Raising plants using stem cuttings
Plants can also be propagated using stem cuttings (Figure 1.16). You can use the stem of hardwood (e.g., rose, bougainvillea), semihardwood (e.g., dieffenbachia, croton), or softwood (e.g., duranta, alternanthera) as planting material.
Materials: Nursery bags (5 × 4 inches) You can also use old milk-pouches (500 ml).
-
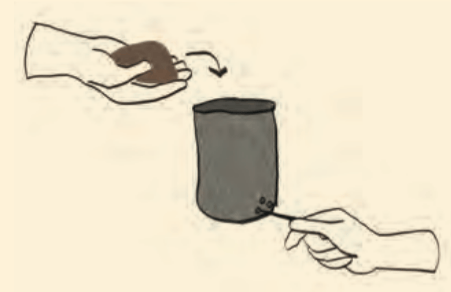 Step 1: Make 2-3 small holes at the bottom of the bags for water drainage and fill them with soil-compost mixture (2 parts soil + 1-part compost).
 -
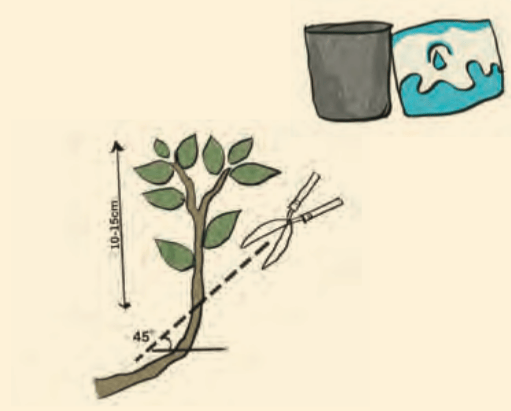 Step 2: Select a mature and healthy parent plant. Cut stem of 10-15 cm. Make a slant cut (45° angle) to the base (downside). This will give more surface area for rooting. The cutting should be 4-6 inches long with at least 2-3 nodes.
 -
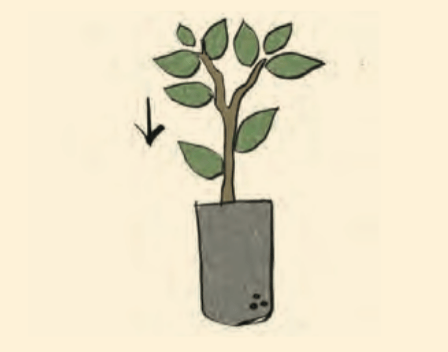 Step 3: Dip the cut end of the stem cutting into the rooting hormone powder or gel, ensuring it is evenly coated.
 -
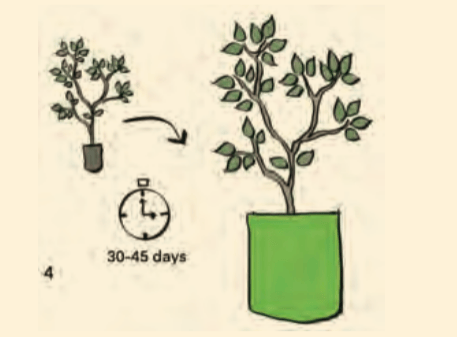 Step 4: After proper shooting (30-45 days) the new plant can be shifted to a bigger polybag or field.
Types of stem cutting used for plant propagation
- 1. Softwood cuttings from shrubs or deciduous trees are cuttings that typically measure 10-15 cm in length. The top two to three leaves are retained, while the rest are removed. Retaining some leaves are crucial, as the cuttings lack sufficient food reserves. Citrus, cherry, apple, peach, plum, pear, and apricot are commonly propagated using softwood cuttings under mist chambers, whereas plants like coleus, chrysanthemum, dahlia, holy basil (tulsi), and carnation are propagated through the herbaceous method.
- 2. Semi-hardwood cuttings are taken from partially mature, slightly woody shoots or tissues. These cuttings are still tender and succulent, typically prepared from the current season's growth of trees and shrubs. This method is commonly used for propagating fruit plants such as mango, guava, lemon, jackfruit, and flowering plants, such as roses.
- 3. Hardwood cuttings are taken from mature, woody stem material and are typically prepared during the dormant season. They are usually derived from one-year-old shoots that developed in the previous growing season. This method is commonly used for propagating plants such as grape, fig, mulberry, kiwi fruit, pomegranates, chestnut, plum, apple, and gooseberry.
- 1. Which kind of plants did you use for plant propagation using cuttings? Did you use a cutting of hard, semi-hard, or softwood?
- 2. What have you done to ensure conditions for growth?
Activity 6: Watching plants grow
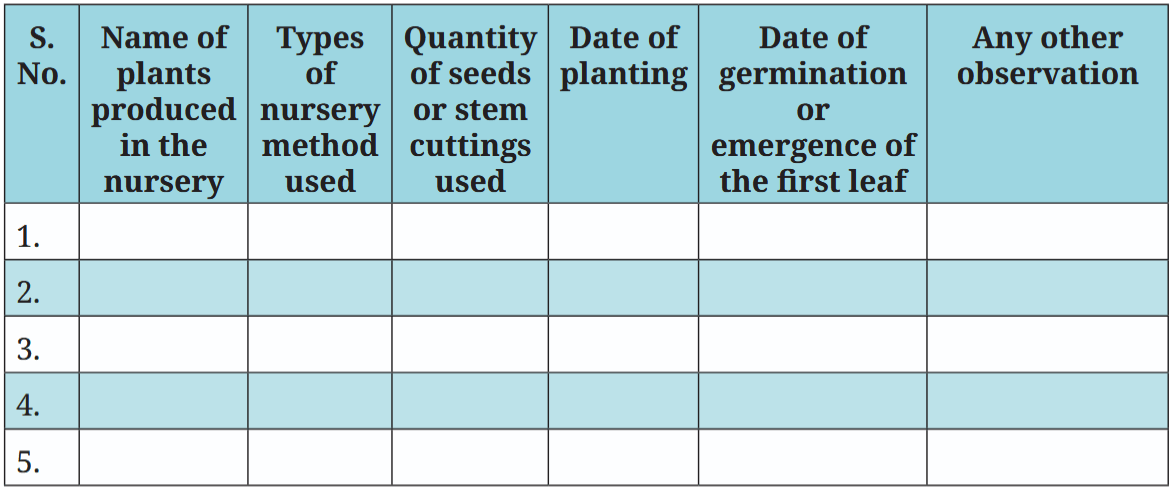
You have used different methods of plant propagation; now maintain a record as shown in table 1.2 for your nursery.
Table 1.2: Maintaining record for the plant nursery
Digital tools for nursery
There are different apps available to help you keep track of growth of your plants. You can search online with the keywords: plant nursery recording apps, pest identifier, plant watering reminder app, etc.
Planting is not sufficient - you need to take care of the plants till they are mature and ready for transplantation in their beds/pots. Young plants are very delicate, and you need to take care of them till they are strong enough. You can transplant them in the right season and right place (with suitable environment).
Activity 7: Calculating the cost
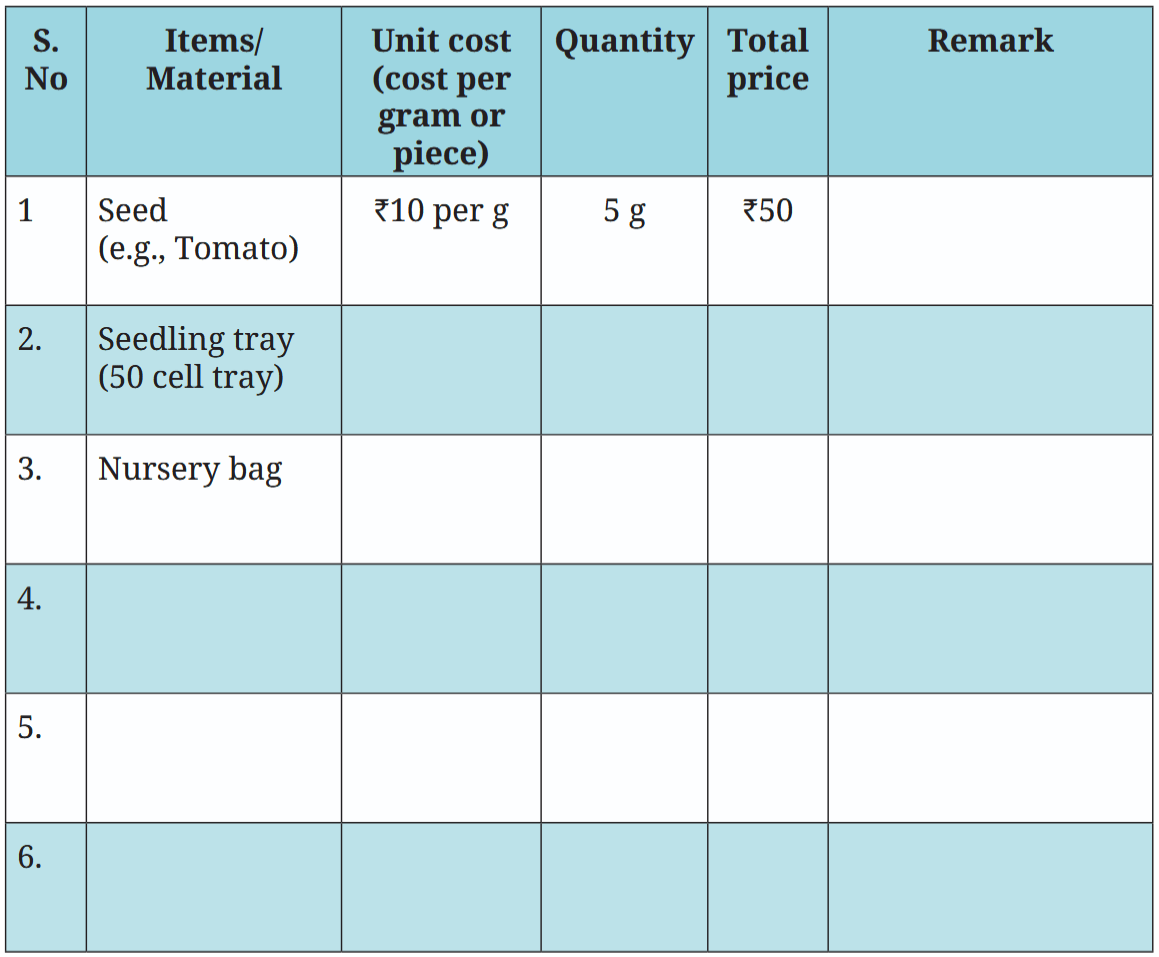
Record the cost incurred on items and materials in table 1.3. This will help you to decide the selling price the plants can fetch.
Table 1.3: Calculating the cost of items and materials
What did I learn from others?
- 1. Write about three most useful things you learnt from the visit to the plant nursery/interaction with the expert.
- 2. Describe three things you learned while making the plant nursery with your peer?
What did I do and how long did it take?
It is important to understand how much time is required for an activity to be completed.
Calculate the approximate amount of time in hours you spent on each activity. Mark them on the timeline below. If you did more than the activities suggested in the book, please add the number and time taken.
| Activity | 1 | 2 | 3 | 4 | 5 | 6 | 7 |
|---|---|---|---|---|---|---|---|
| Time taken (Periods) | - | - | - | - | - | - | - |
What else can I do?
Things that you can try to expand your learnings are as follows:
- 1. You can decorate a pot and grow your plants into it. It can be a good gift for visitors.
- 2. You can conduct a plantation drive on Independence Day/Republic Day or any other day and plant the saplings that you have prepared in your school or home.
- 3. You can grow seasonal plants in your school or home.
- 4. According to you, what is the importance of plant nursery?
Think and Answer
- 1. What did you enjoy doing?
- 2. What were the challenges you faced?
- 3. What will you do differently next time?
- 4. Identify few examples of jobs related to the work you did in this project. For example, gardener, botanist, forest officer, farmer, agriculture scientist. Look around, speak to people, and write your answer.