Part 2 : Work with Machines and Materials
Machines make our lives easy, and materials are all around us. Projects on Work with Machines and Materials will help you work with different machines and tools to create new things with different kinds of materials, and to repair and maintain things. You can take up projects related to making electronic toys, carpentry products from wood and bamboo, and pottery products (with and without using a wheel), sewing clothes, decorating fabrics, using computers and smartphones to make games and animations, and using waste materials to make toys or even instruments for a school band. It is up to you to imagine all that you can do with your peers.
Two examples of projects are given in this section, which are Tie and Dye and AI Assistant. You must take up only one project. You can either choose one of these projects or you can design a project of your own choice with the help of your teacher.

Project 3: Tie and Dye
This project will help you learn how to make beautiful patterns on fabric with dye. You will do this using different tie and dye techniques.
As part of the project, you will be able to:
- Learn about different techniques of tie and dye
- Prepare natural dye
- Explore tie and dye patterns on fabric
- Design a product using tie and dye
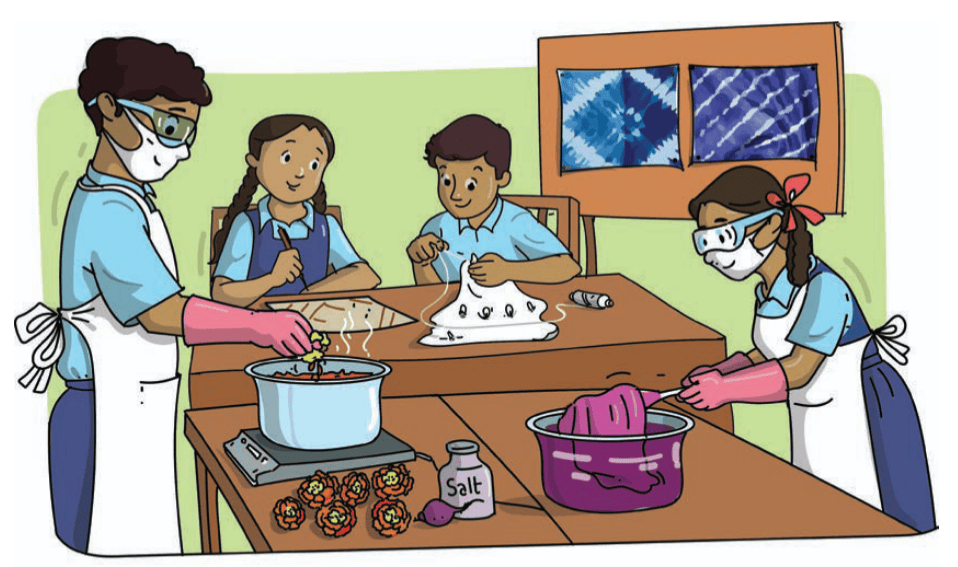
India has a rich history of textiles, with each state having its own traditional ways of weaving cloth and creating beautiful patterns using different methods, like dyeing, embroidery, and printing. Some of these weaves and patterns have been used across centuries.
Among these methods is tie and dye, e.g., Lehariya, Bandhani (Figures 3.1 and 3.2). Bandhani, which literally means 'to bind or tie', is a resist dye technique. Resist dye techniques prevent dye from colouring some parts, so that it retains the original colour. Thus, it creates beautiful patterns.
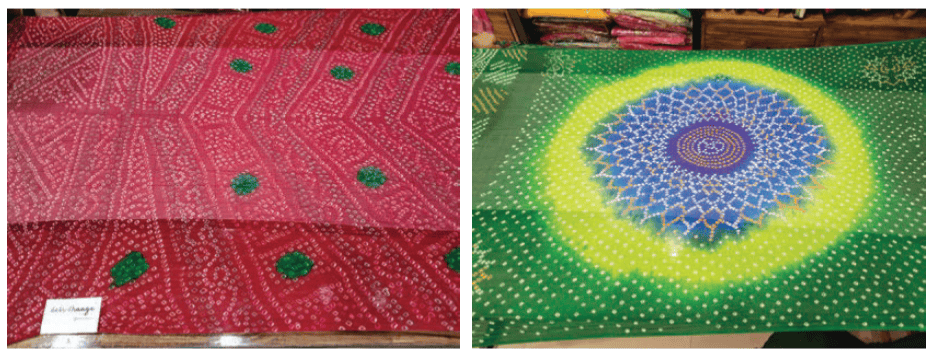
In the Bandhani method, fabric is folded, tied, twisted, and bound to prevent certain portions from being coloured. Artisans practising this method tie the fabric so that circles, spirals, stripes, and even patterns that appear like plants and animals are created. Bandhani is also known as tie and dye, and is generally practised in Rajasthan and Gujarat. Usually done on cotton, silk, and wool, traditional Bandhani is created using natural dyes made of plants and spices.
Did you know?
As communities migrate, they continue their traditional work even as they become part of the local community already living in the area. One such community, which migrated from Gujarat many centuries ago, lives in Tamil Nadu. While most of these immigrants got involved in weaving silk, those in Madurai introduced what came to be called the Madurai Sungudi - cotton tie and dye material, generally used for sarees.
Thus, tie and dye came to be associated with Gujarat, Rajasthan, and Tamil Nadu too.
Another popular resist dye method is wax resist where wax or a starchy paste is applied either freehand or using blocks/stencils, which have patterns carved on them. These patterns can be geometric, or in the shape of animals or plants. This is known as batik, and has traditionally been practised in Madhya Pradesh, West Bengal, and Rajasthan.
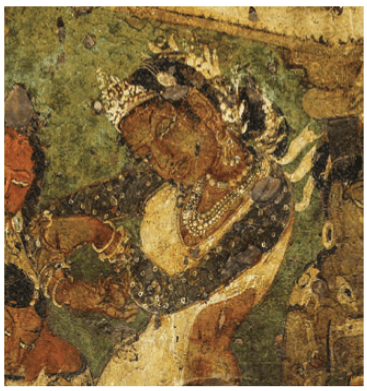
Bandhani is among the oldest tie and dye techniques. The earliest evidence of Bandhani is found in the Ajanta caves in Maharashtra where paintings show a woman wearing a dotted cloth that is believed to be Bandhani (Figure 3.3).
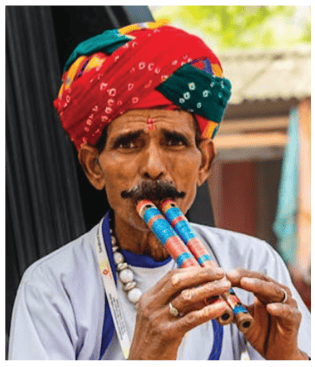
Bandhani is not merely an Indian art form, it also reflects the rich culture of our country. Different colours and styles of Bandhani are associated with different communities and worn with pride in both Rajasthan and Gujarat (Figure 3.4). In some communities, different types of Bandhani are associated with different rituals.
Since tie and dye products are created by hand, and no two artisans will tie the fabric in the same way, no two pieces are alike. Thus, each pattern is unique.
This project will help you create your own unique tie and dye product.
What will I be able to do?
By the end of this project, you will be able to:
- 1. Prepare natural dyes using vegetables, fruits, spices, and plants.
- 2. Design patterns for tie and dye.
- 3. Use tie and dye to create colourful patterns on recycled fabrics.
- 4. Prepare a product using tie and dye.
What will I need?
You will need different kinds of tools and materials before you start working:
Tools and Materials required
- 1. Fabric: Fabric used for Bandhani must be strong since it has to undergo multiple rounds of tying and dyeing. Hence, fabric made of natural fibres is used, e.g., cotton, silk, wool. You can use light coloured thin cotton fabric cut out of old clothes. If there are light-coloured linen or silk clothes that have been discarded at home, you can use them as well. You must ensure no traces of starch or dirt remain by washing the fabric carefully.
- 2. Material for tying: Thread for tying must be white or very light coloured. This is to avoid the colour from 'bleeding' from the thread, that is, to prevent the colour of the thread itself from dyeing the fabric. Rubber bands and clips can also be used if large portions are to resist the dye. Grains, pulses, seeds, small stones, peppercorns, etc., can be used to ensure that the area that resists the dye is of the desired size.
- 3. Material for dyeing and fixing: Natural dyes can be made using a variety of materials, e.g., beetroot, coffee, turmeric, red cabbage, pomegranate, henna, spinach, orange peels, onion skin, and indigo. To ensure the colour of the dye does not wash out or fade too soon or bleed from your product onto other clothes (e.g., on a shirt you are wearing), you will need fixers. For example, salt/vinegar is used to fix the dye when flowers or leaves are used.
- 4. Tools: Measuring cup/spoon, containers, burner/stove, stirrers, iron, mug, plates, scissors, tongs, glass, bowl.
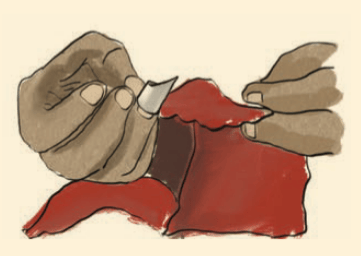
The nakhli or nakhlo (Figure 3.5) is a 'ring' made of metal with a protruding blunt edge used by artisans to pick the fabric.
How do I keep myself and others safe?
The following precautions need to be taken during various tasks involved in tie and dye techniques:
- 1. Wear gloves to protect your hands from warm dyes, and aprons to protect your clothes while using dyes. Use masks to avoid colour splashing on your mouth and prevent breathing in any vapour from the hot dye. Wear goggles to keep your eyes safe from hot water.
- 2. Work in a well-ventilated area so that smells and vapours do not irritate you.
- 3. Handle scissors with care while cutting fabric—never point the scissors towards yourself or anyone else.
- 4. Carefully dispose of any leftover dye solution in the sink. While using the dye, spread plastic sheets on the surface to prevent splashes and to keep the work area safe and clean.
Internet safety: Seek help from your teacher while using the Internet. Be careful not to upload or download anything without checking. Do not share personal information anywhere.
What do I need to know before I start?
Look at the Bandhani samples in figure 3.6 below - patterns are repeated across each sample. What patterns do you see? Draw them in the box below the image.
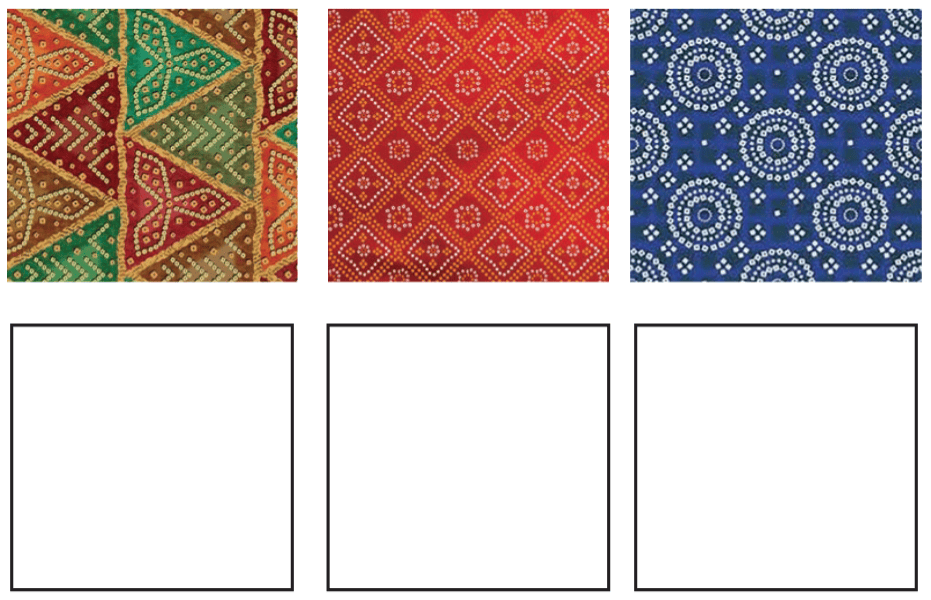
Now, compare the patterns you have drawn with those drawn by your peer. Discuss them with your peer.
Some other tie and dye techniques
Two examples of popular shaped resist tie and dye techniques besides Bandhani are given below:
- 1. Leheriya: Made by folding and tying the fabric before dyeing. This results in a wave-like pattern. The word leher means 'wave'. It represents the flow of water and greenery, which hold high significance in states like Rajasthan and Gujarat.
- 2. Shibori: Shibori is an ancient Japanese tie and dye technique. The word Shibori means to 'wring, squeeze or press'. Traditional Shibori often used natural indigo dye, which changes colour from green to blue as the fabric reacts with air during drying.
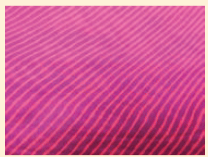
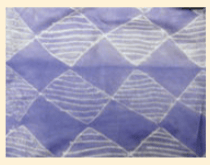
Before you start making your own tie and dye patterns, you need to identify which fabric should be used. It will be useful to understand which fabrics and patterns are popular, and likely to sell. You can also compare the cost of tie and dye products with other products.
One way to do this would be to visit a shop selling clothes. You could also interact with a local boutique owner or a fashion designer.
Visiting a tie and dye workshop will help you to gain firsthand knowledge of the process. You could also invite an artisan to your school to give a demonstration. However, if it is not possible to get an artisan, even a person who does tie and dye as a hobby could be invited.
It is quite possible that a tie and dye workshop is not present in the vicinity. In that case, you can visit a dyeing workshop to get an understanding of the process.
Activity 1: Visit to a shop
You will observe many types of products in the shop, made of different fabrics using different methods, like weaving, embroidery, dyeing, and so on (Figure 3.7).
While in the shop, try to get a feel of different fabrics by touching them. See if you can find Bandhani/Batik/Shibori or any other kind of tie and dye designs.
Before the visit, think of the questions you would like to ask the shopkeeper. Some pointers are given in table 3.1 but please add to these. Get responses for at least five types of fabrics.
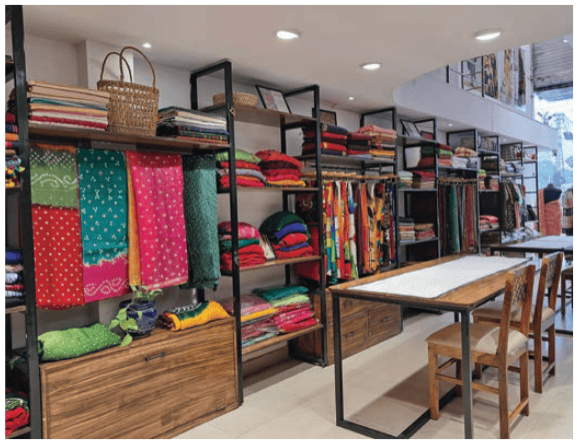
Table 3.1: Exploring fabrics in a shop
| S. No. | Type of fabric (e.g., cotton, silk, linen, synthetic, jute) | What technique has been used to make patterns (e.g., tie and dye, block printing, digital printing, embroidery) | Price (rupees per metre or the cost of a saree) |
|---|---|---|---|
| 1. | |||
| 2. | |||
| 3. | |||
| 4. | |||
| 5. |
- 1. Is tie and dye available?
- 2. If yes, then which type (e.g., Shibori, Leheriya, Bandhani,...)?
- 3. What kind of garment is most popular (e.g., saree, dupatta, scarf, stole, kurta)?
- 4. Which fabrics and colours are most popular with customers, and sell the most?
If you want to explore more varieties and patterns, search online with these keywords to find relevant videos: Bandhani saree shops in India, Bandhani cloth shop or types of design (your choice) + information.
Explore other keywords that will help you fill the table. Remember, there will be variations with change of place, so try and search information from your own city or village, or nearby places.
What else do you think tie and dye can be used for besides clothes, like kurtas, turbans, shirts, sarees, dupattas? Think, and write down your ideas.
Activity 2: A visit to a tie and dye workshop
While visiting the workshop, observe everything around and ask as many questions as possible (Figure 3.8).
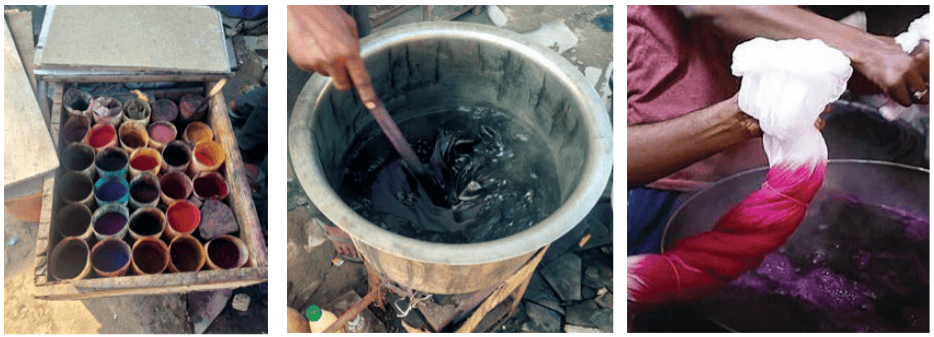
Ask for a demonstration of the process, and try to do some of the tasks yourself, if possible.
Here are some questions to get you started. Many other questions may come to mind when you are interacting with the experts. Do remember to note the responses to those questions as well.
- 1. How do you tie the fabric? How do you make sure the patterns are of the same size? How do you make the pattern larger or smaller?
- 2. Which tools and materials do you use for dyeing? Where do you get the dye from?
- 3. What type of fabrics can be dyed easily? Are all these fabrics good for tie and dye as well?
- 4. How do you ensure the colour does not bleed after dyeing?
- 5. What should be the temperature of the dye when you dip the fabric? Does the temperature have to be the same for all fabrics and all dyes?
- 6. How many times is the fabric soaked in the dye?
- 7. How is the fabric dyed? How long does it take?
- 8. Is it possible to dye different sections of fabric in various colours? If so, could you explain the process?
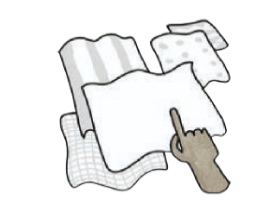
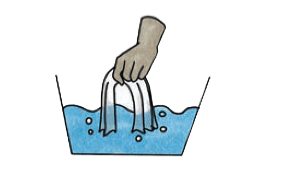
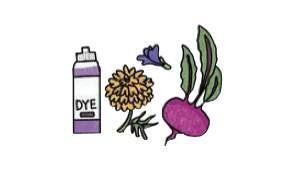
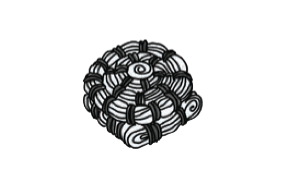
Look at the figure 3.9 below - it shows the process of tie and dye.
- Step 1: Select the fabric
- Step 2: Wash the fabric
- Step 3: Select the plant for natural dye
- Step 4: Tie the fabric
- Step 5: Prepare the dye and add fixer
- Step 6: Dye the tied fabric
- Step 7: Dry the dyed fabric
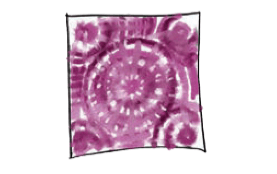
- Step 8: Untie the fabric and see the design
In case you are not able to visit a workshop or invite an artist, you can watch an online video, using the following search words on Internet to find a relevant video: tie and dye process, tie and dye workshop, Bandhani workshop, Bandhani artisans India.
In case you observed something else, do add it to figure 3.9.
What do I have to do?
Activity 3: Exploring the art of tie and dye
Before you make your product, you must practice and experiment with fabrics, dyes, and designs. First, make some samples on a small piece of fabric.
Step 1: Prepare the sample fabrics
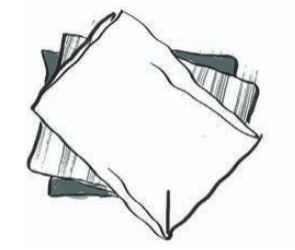
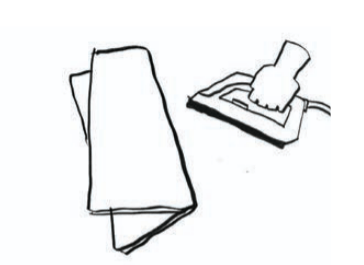
Get five handkerchief-sized (6 × 6 inches) fabrics. These fabrics could be from an old shirt, kurta, saree, or anything that is not in use anymore. You can use different kinds of fabric—thin cotton, thick cotton, silk, linen, or any other fabric to see the difference in results. Remember to start with white or light-coloured fabrics so you can see your designs better. Figure 3.10 shows how the fabric is to be prepared.
- Step 1: Cut the fabric
- Step 2: Wash to remove any starch or dirt
- Step 3: Dry the fabric and iron it to remove any crease

Write the details of the fabrics you are going to use in table 3.2 below:
Table 3.2: Checklist of samples
| Sample number | Fabric used | Preparation of fabric (e.g., cutting to size, washing, drying and ironing) |
|---|---|---|
Step 2: Tying the fabric
You have already read that when we tie the fabric, we prevent the part that has been tied from getting coloured by dye. This resisting of the dye creates patterns due to the difference between the parts that are dyed and not dyed. Tying the fabric in different ways will create different and unique design(s).
Experts can tie and dye the same fabric multiple times to introduce colours in the patterns - this is done by dyeing the fabric multiple times, each time tying different parts of the fabric to get a different colour and pattern. However, we will stick to two colours - the original colour of the fabric and the colour of the dye.
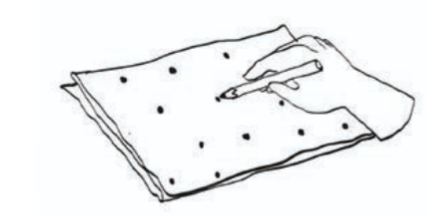
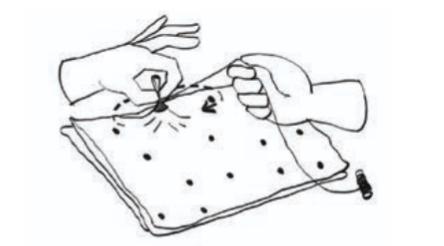
The technique for tying fabric for Bandhani, Shibori, and Leheriya is given in figures 3.11 to 3.13, respectively.
Bandhani tying technique
- Step 1: Draw a design on the fabric using tiny circles/dots.
- Step 2:Place a mustard seed on the fabric where you want the design element to appear. Pinch a small portion of the fabric around the seed using your fingers.
- Step 3:Pull the seed up with the fabric and tie it tightly with the thread. Repeat the process for the design you would like to create.
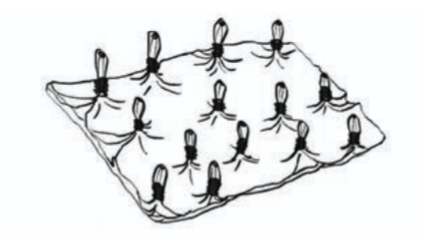
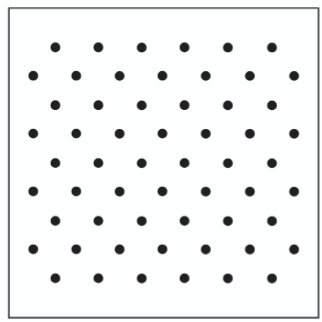
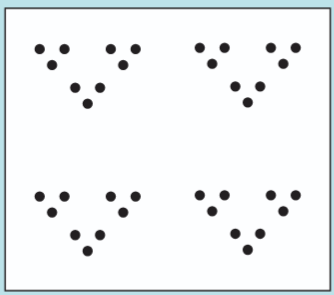
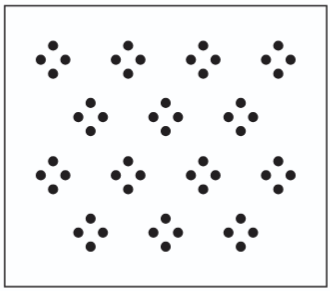
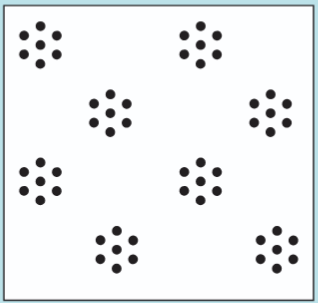
Traditionally, Bandhani patterns are given different names depending on the number of knots in the design. Larger designs are made by repeating these patterns. Some examples are given in table 3.3; try to make your own design using any of these.
Table 3.3: Examples of some traditional Bandhani patterns
| Name of the pattern and image | Your design using this pattern |
|---|---|
Ekdali: Single dot
|
|
Trikunti: Groups of three
|
|
Chaubandi/Chaubasi: Groups of
four
|
|
Satbandi: Groups of seven
|
Shibori tying technique
- Step 1: Draw the design on the fabric. You can draw the design either in a straight or dotted line.
- Step 2: Use a needle and thread to sew simple running stitches along the lines of your design. Make sure to keep even spacing for a neat pattern.
- Step 3: Continue stitching until your entire pattern is outlined with the running stitches. Keep the stitches loose, as they will be gathered later.
- Step 4: Gently pull the loose ends of the thread to gather the fabric, creating folds. The tighter you pull, the more distinct your design will be.
- Step 5: Once gathered, tie a firm knot at the end of the thread to hold the folds in place. Make sure it is tight, so the dye does not seep into the folded areas.
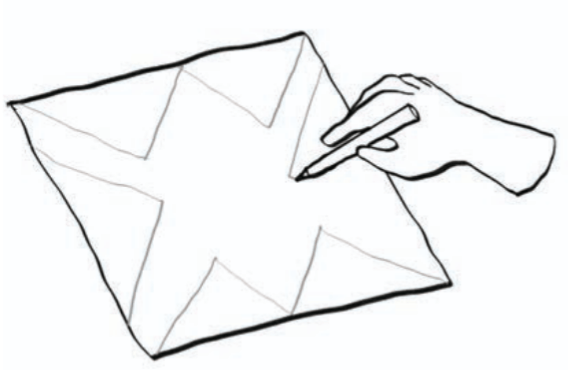
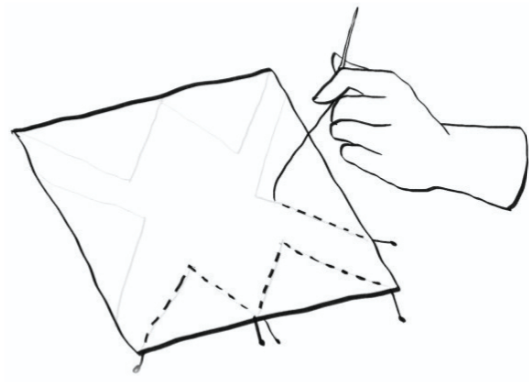
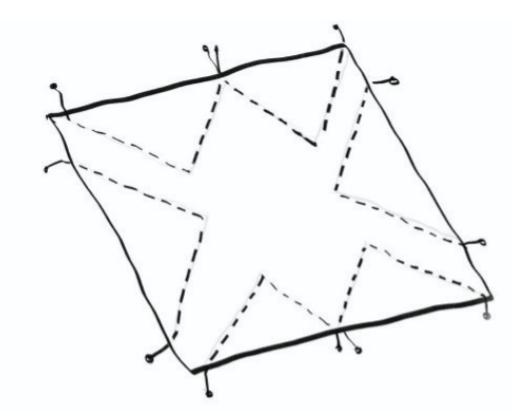
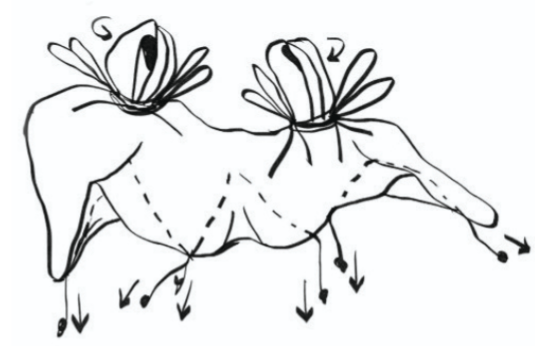
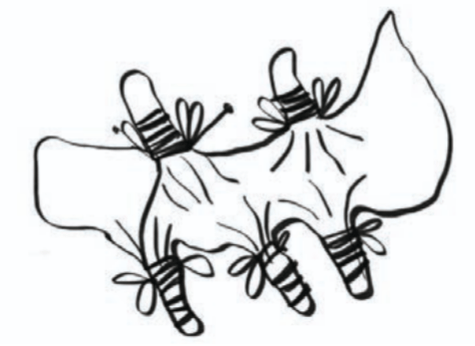
You can vary the pattern by varying the length of the stitches, the angle of the lines, and where and how tightly you tie the thread.
Leheriya tying technique
- Step 1: Fold the fabric in half and find the centre point. This will help in creating symmetrical pleats.
- Step 2: Start making small, even pleats by folding the fabric back and forth like an accordion. Ensure the pleats are neat for a clean pattern.
- Step 3: Continue folding until the entire fabric is pleated. Hold the fabric firmly to maintain the folds.
- Step 4: Carefully hold the pleats and tie them tightly with thread at the centre. Ensure the knot is secure to keep the pleats in place.
- Step 5: Tie the fabric at equal intervals on both sides of the centre. This will create the Leheriya pattern after dyeing.
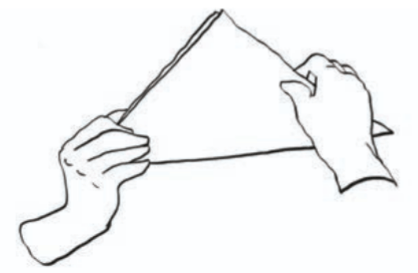
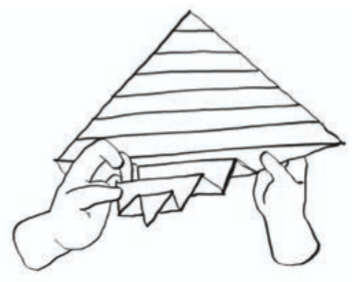
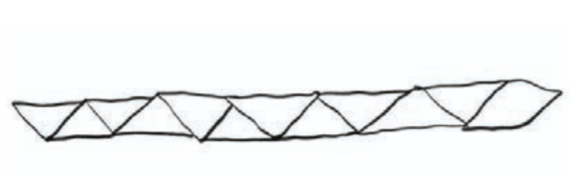
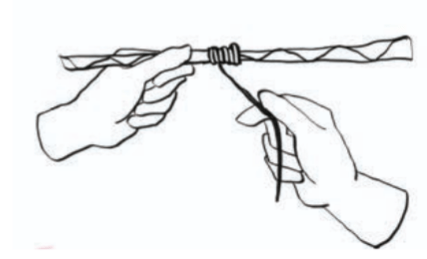
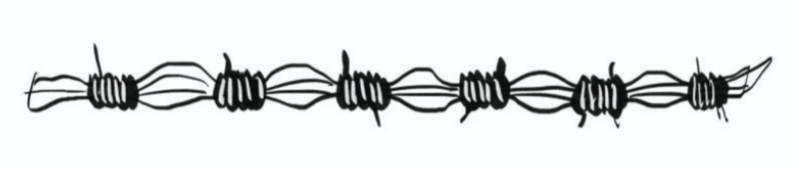
You can vary the design by decreasing or increasing the number of pleats, as well as the distance at which you tie the thread.
Now, you are ready to tie your first sample. First, think of a design, draw it on the fabric and then tie your first sample fabric. Do not tie and dye all samples together. Doing one sample at a time will help you improve your tying technique. You can decide which technique to use; however, it is recommended you try more than one technique.
On the basis of your experience of tying, fill table 3.4. Draw the design of the sample, and note any challenges you faced and their solutions. You can make additional samples if needed.
Table 3.4: Making the samples
| Actions | Details | Challenges and solutions |
|---|---|---|
| Sample number and fabric: Tying technique used: |
||
| Design of the sample | ||
| Sample number and fabric: Tying technique used: |
||
| Design of the sample | ||
| Sample number and fabric: Tying technique used: |
||
| Design of the sample | ||
| Sample number and fabric: Tying technique used: |
||
| Design of the sample | ||
| Sample number and fabric: Tying technique used: |
||
| Design of the sample | ||
Step 3: Preparation of dye
Different kinds of dyes, both chemical and natural, are available in the market. Of these, natural dyes are more environment friendly.
To prepare natural dyes, select the ingredients based on the colour you want (e.g., turmeric/marigold flowers for yellow, beetroot for pink, spinach leaves for green, blue hibiscus/blueberry/blue pea flower for blue).
You can also search for methods of preparing natural dyes of different colours on the Internet by using keywords: process for making natural dye from plants of colour (mention the colour of your choice).
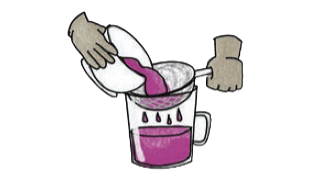
Figure 3.14 shows the process for making pink/red dye solution using beetroot.
Making pink/red dye
- Step 1: To create a natural beetroot dye, start by chopping or crushing two medium-sized beetroots. This helps effective release of colour.
- Step 2:Add the crushed beetroot to 1 L of water and let it slowly boil for about 1 hour. This process extracts the rich red pigment from the beetroots.
- Step 3:Once the mixture has cooled down, strain the liquid using a cotton cloth or a strainer to remove any solid pieces, leaving only the coloured liquid.
- Step 4:Finally, add one to two tablespoons of salt to the dye solution. This acts as a fixer, and helps set the colour, making it more effective for dyeing fabric.
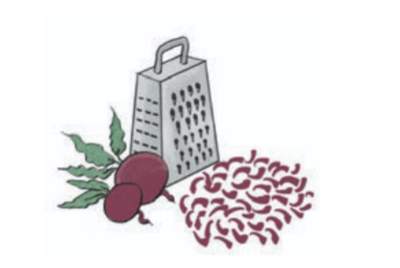
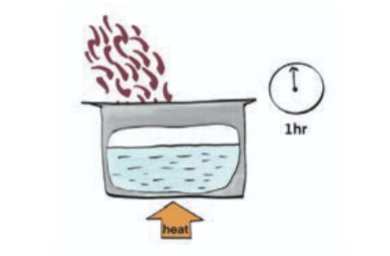
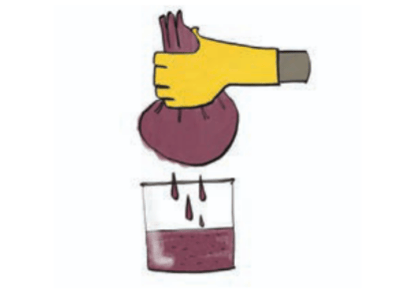
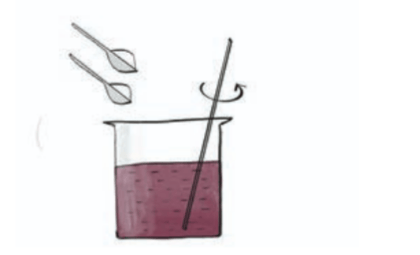
Your natural beetroot dye is now ready to use. The quantity of the plant (vegetable/flower/fruit) and water will depend on the shade of colour needed and the weight of the fabric - the darker the shade and the heavier the fabric, the more quantity is required.
Figure 3.15 shows the process for making yellow dye using turmeric, which is easily available at home.
Making yellow dye
- Step 1: Measure 2 tablespoons of turmeric powder and keep it ready for use in a bowl.
- Step 2: Take half a glass of cold water and dissolve the turmeric in it using a spoon.
- Step 3: Measure 1 L of water in a large container. Place it on heat and let it simmer.
- Step 4: Add the cold water and turmeric solution to the warm water, and let it simmer for an hour.
- Step 5: Add 1-2 tablespoons of salt/baking powder/vinegar to the dye - this will act as fixer.
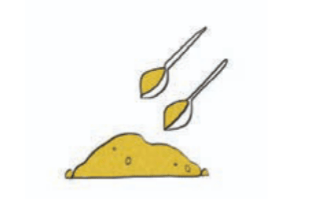
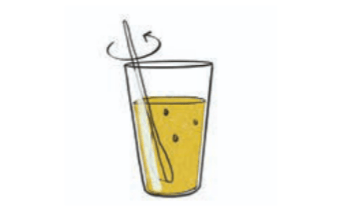
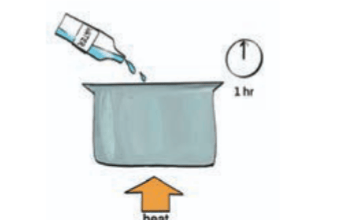
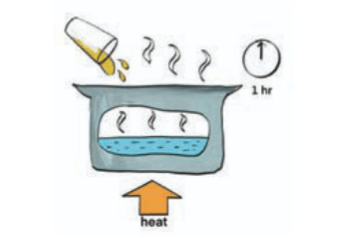
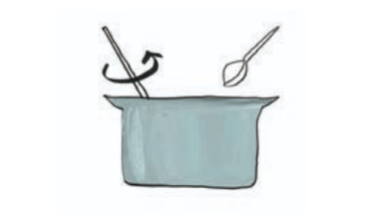
Your natural turmeric dye is now ready to use. The darker the shade of yellow and the heavier the fabric, the more quantity of turmeric is required.
Did you know?
Heating plays an important role in the dyeing process as it increases the solubility of dye in water, speeds up the dyeing process, and helps fix the dye to the fabric. However, there are some dyes and processes which require no or minimal heating. While there are several techniques, two are mentioned here:
Passive heating process
If time is not a constraint, then dye can be prepared using solar energy. This would require putting the dye and fabric in a glass jar and placing it in a sunny spot to slowly extract the dye with minimal heat. This process can take several days to weeks, depending on the shade of colour you want - the darker the shade, the longer it takes.
Cold water dyes
Cold water dyes, which use chemicals to fix the dye instead of heat, are available in the market. The dye is mixed in cold water or water at room temperature. Tied fabric is soaked in the dye, and then in a solution made with a fixer before the final rinsing.
Table 3.5: Making dyes from plants
| Colour | Plant | Image | Steps to prepare dye (the amount of dye needed depends on the shade you want to achieve) |
|---|---|---|---|
| Blue | Blue hibiscus | 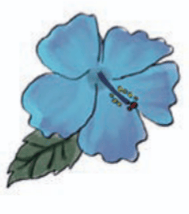 |
|
| Brown | Tea/Coffee | 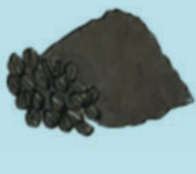 |
- Mix 100 g coffee powder/tea powder in 1 L of water - Simmer the water to boiling point - Strain the solution to remove any coffee particles and add 250 mL vinegar |
| Green | Spinach | 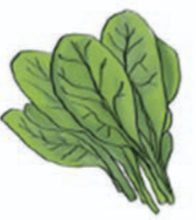 |
- Chop 100 g spinach - Add it to 1 L of water - Simmer the water to boiling point - Strain the solution to remove any vegetable particles and add 2 tablespoon of salt |
| Yellow | Marigold | 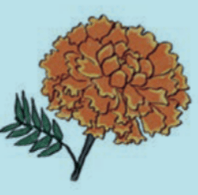 |
- Mix 100 g marigold in 1 L of water - Simmer the water to boiling point - Strain the solution to remove the flowers and add 250 mL vinegar solution |
| Red | Pomegranate | 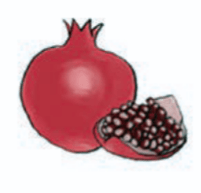 |
- Mix 100 g pomegranate seeds in 1 L of water - Simmer the water to boiling point - Strain the solution to remove the seeds and add 2 tablespoons of salt |
Which colours have you chosen to dye the samples?
Fill table 3.6 for the dye you prepared for each sample - in case you used the same dye, please mention the details.
| Steps | Details |
|---|---|
| Materials used to prepare the dye | |
| Quantity of the ingredients | |
| Quantity of water | |
| Materials used to fix dye | |
| Safety precautions taken | |
| Any other material that will give a similar colour |
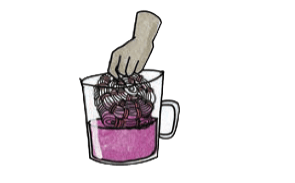
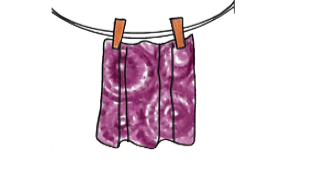
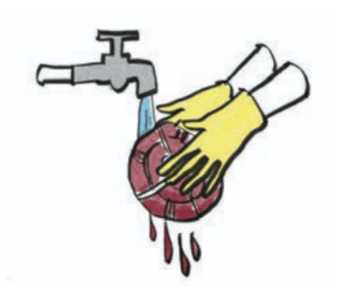
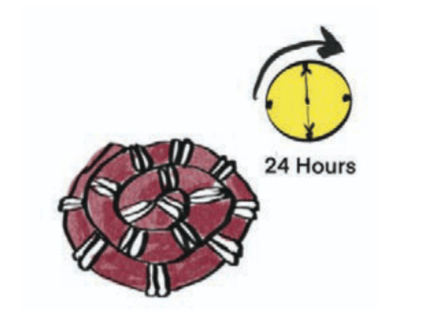
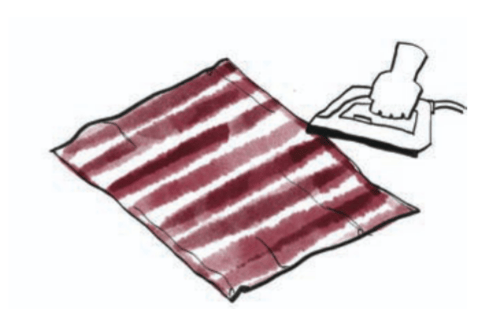
Figure 3.16 shows the process for dyeing the tied fabric.
Dye, dry and untie the fabric
- Step 1: Dip the tied fabric in normal water.
- Step 2: Dip the fabric in warm dye solution for 20-30 minutes.
- Step 3: Take the fabric out of the dye. Ensure you wear gloves.
- Step 4: Wash it with plain water once to remove excess dye.
- Step 5: Keep it in a clean space to dry for a day.
- Step 6: Next day, you can untie and press the fabric.
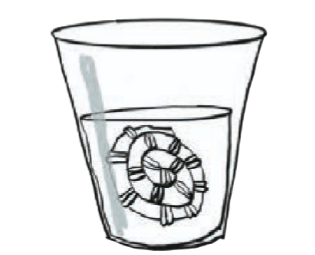
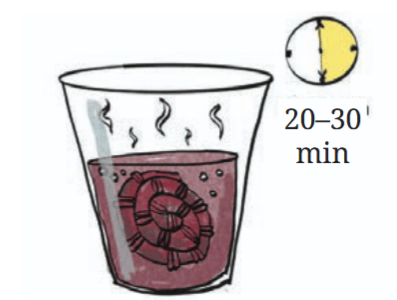
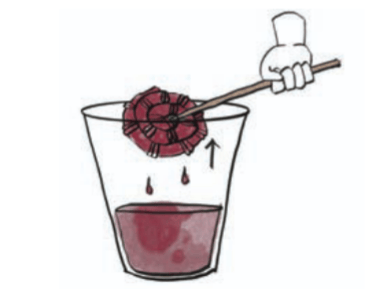
Repeat the process from steps 1-6 for all 5 samples.
Did you face any of the challenges listed in table 3.7? See if you can overcome these challenges with other samples.
Table 3.7: Common challenges and their solutions
| Challenge | Try this solution |
|---|---|
| Did the thread break or open during the dyeing process? | Tie the fabric tightly and handle it carefully to ensure that it does not loosen during the process. |
| Did you spill the dye solution during the process? | Ensure that there is enough space where you are working to keep the dye and other material. Use a cloth or gloves to hold the hot container. |
| Did you cut the fabric while untying the fabric by mistake? | Do not use scissors to cut the thread. You can use the needle to find the point of thread and use your hand to further untie it. |
Look at the samples carefully.
What did you learn to do/not to do as you moved from samples 1-5?
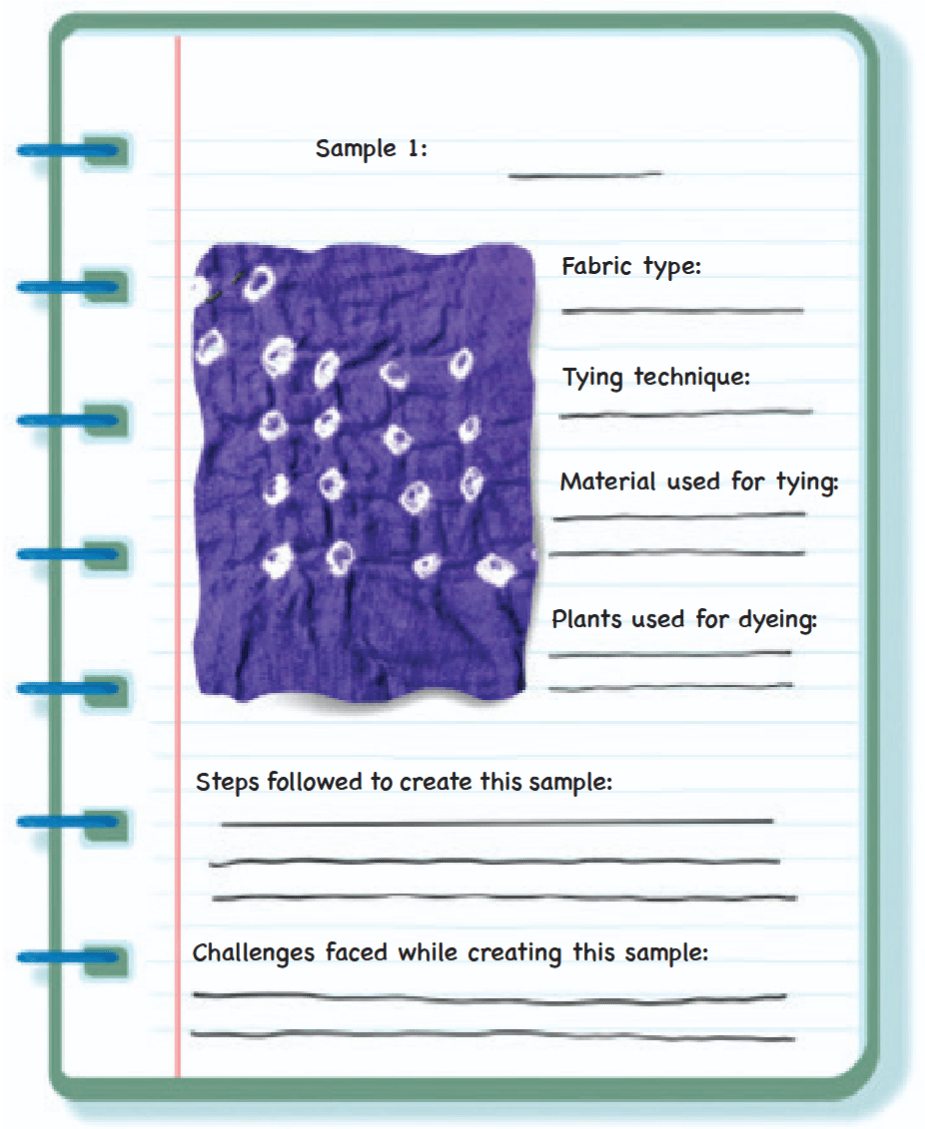
Step 4: Documenting a swatch file
Create a swatch file to display your samples (Figure 3.17). A swatch file is a combination of your creative samples with some details. You will use this file to present your samples. For each sample include the following:
- 1. Fabric sample
- 2. Type of fabric
- 3. Technique used for tying and dyeing
- 4. Fabrics and dye used
- 5. Challenges faced while creating the sample
- 6. Step-by-step process of preparing the samples
Activity 4: Making the final product
After trying your hand at 5 samples, you have learned the stepwise process of tie and dye. Now, you are ready to create a product you can use.
Step 1: Selection of a product
Select a product that you would like to create, e.g., dupatta, pillow cover, scarf, or dress material. First, select the fabric—try and find old clothes at home that are not worn anymore or old bedsheets, and cut them as needed. Figure 3.18 shows a size chart for some of the products.
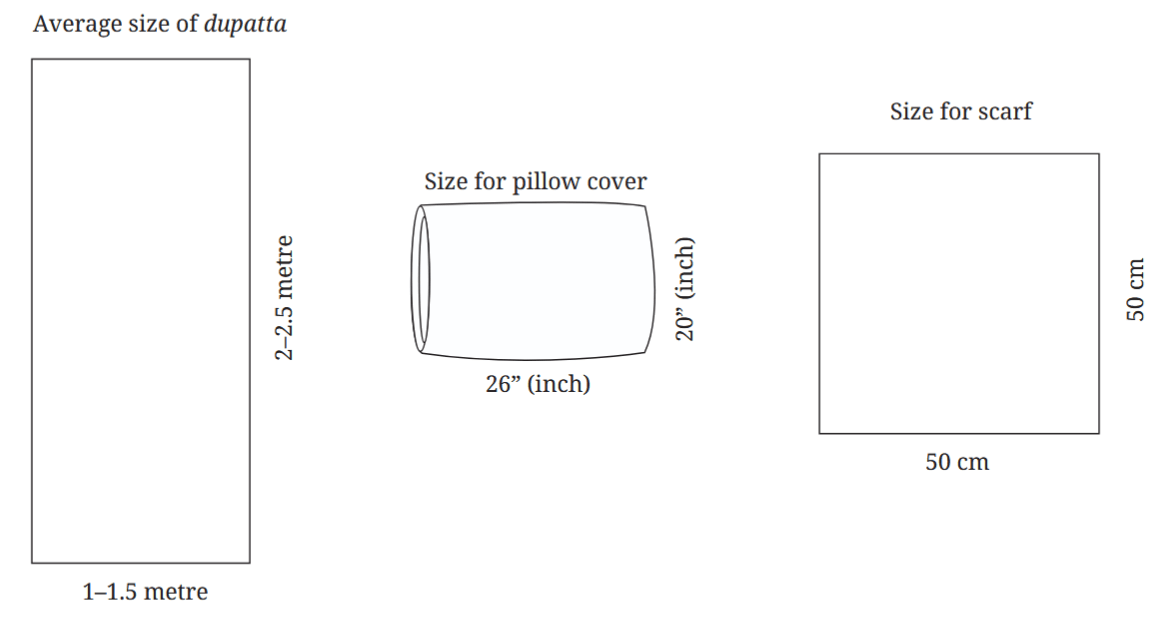
You can take the help of your teacher, a family member, or a tailor from a nearby shop to cut the fabric in the proper size.
- 1. Which product will you make?
- 2. Which fabric did you select? Why?
- 3. Sketch the pattern of your product with dimensions.

Step 2: Finalise the design, colour and tying technique
You need to come up with a design for using the tie and dye technique. You can take 'design inspiration' from things around you. Figure 3.19 shows some design examples inspired by everyday objects.
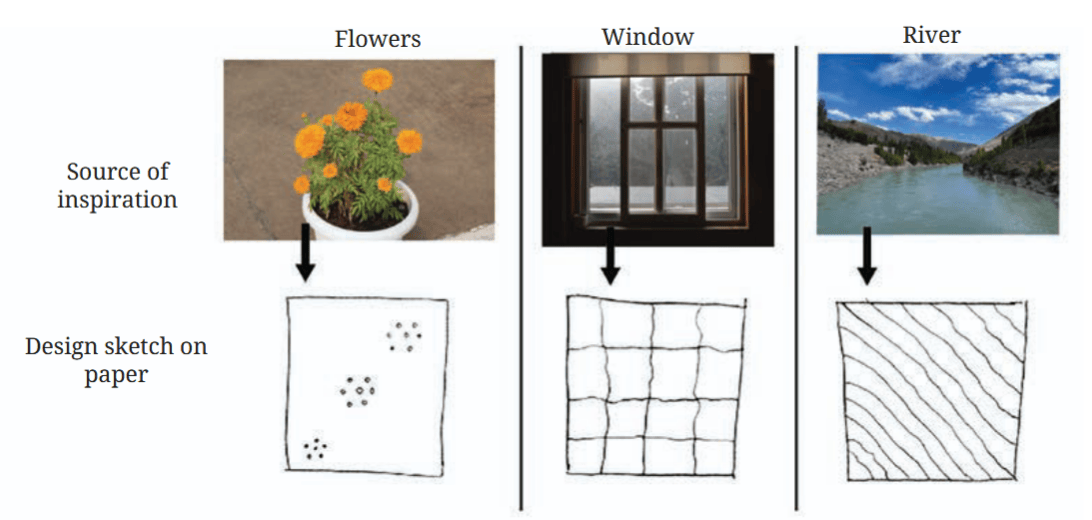
Now, try and draw a design inspired by the flower in figure 3.20.
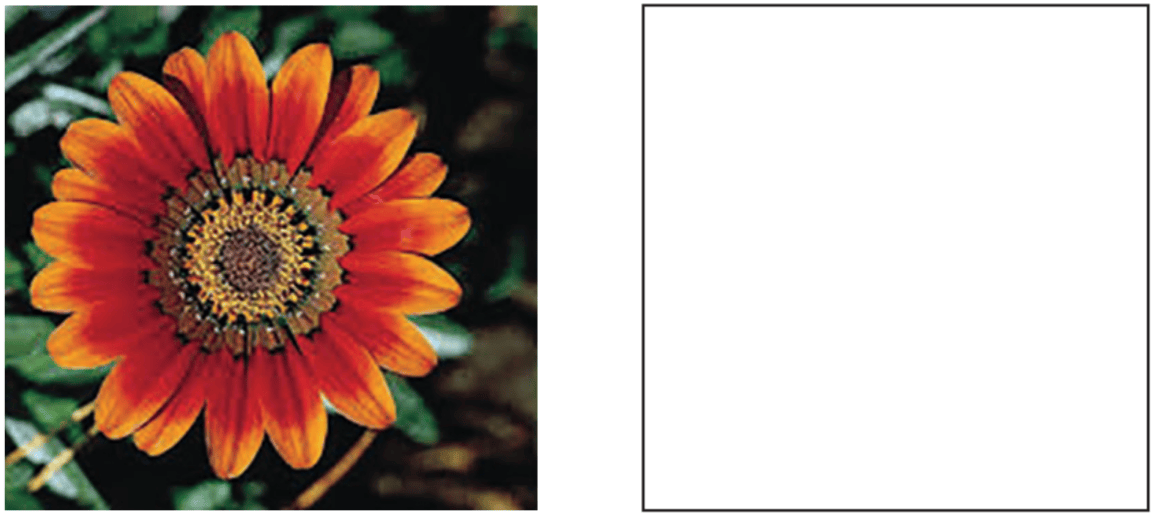
Take a fun walk around and get inspired by the world. Look at nature, art, or even your favourite things to spark ideas for your design. Imagine, nature can inspire patterns of tie and dye techniques. The pattern you finally chose could be based on such a 'design inspiration'.
After you decide your design(s), choose the dye colour and the tie and dye technique.
- 1. What is your design inspiration?
- 2. Draw the design you want on your product in the box.
- 3. Which plant (vegetables/flowers/fruits) or other materials (e.g., tea, coffee) will you use to prepare the dye?
- 4. Which tie and dye technique will you use?
Step 3: Tie and dye the product
It is time to bring your tie and dye dream to life. Prepare your fabric and make it ready for the tying and dyeing process. Follow your design and create patterns by tying the fabric in creative ways.
Make sure you follow all the safety rules. You have a bigger cloth this time than your sample fabrics, therefore use 2-3L of water to make a larger quantity of plant dye. After dyeing the fabric, leave it to dry for a day.
Describe what you did in table 3.8.
Table 3.8: Recording the process of making the final product
| Actions | Steps taken |
|---|---|
| Preparation of the fabric | |
| Tying | |
| Preparation of dye | |
| Dyeing and drying |
Step 4: Untying the product
The final step is untying the dried fabric carefully to reveal your unique design. Once the knots are undone, iron your product to smoothen out any wrinkle. The heat of the iron must be selected according to the fabric.
Did you know?
Some modern tie and dye artists use a technique called reverse tie and dye. Instead of adding dye to fabric, they remove colour using bleach or other chemicals to create striking white patterns against a dark background.
1. Did you manage to create the design you wanted? If not, what might be the reason?
Activity 5: What did you invest?
You invested both time and maybe some money was spent to gather material. Tables 3.9 will help you estimate the cost of the product.
Table 3.9: Product costing
| List of materials | Quantity of materials | Cost of the material (₹ 0/- if you recycled materials) |
|---|---|---|
What did I learn from others?
- 1. You learnt during field trips, online and offline interactions with experts, family and friends, community members, and other sources. What did you find most interesting?
- 2. What did you learn from family/community members (e.g., any information about traditional clothes at home, stories about making clothes or special memories attached to clothes)?
What did I do and how long did it take?
It is important to understand how much time is required for an activity to be completed.
Calculate the approximate amount of time in hours you spent on each activity. Mark them on the timeline below. If you did more than the activities suggested in the book, please add the number and time taken.
| Activity | 1 | 2 | 3 | 4 | 5 |
|---|---|---|---|---|---|
| Time taken (Periods) |
What else can I do?
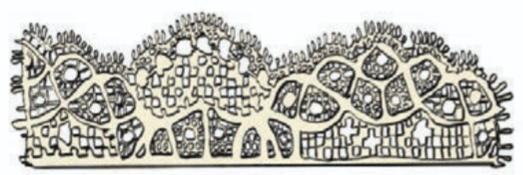
Ornamentation is about adding that special touch to your creation. You can add your creativity to decorate the product. Look for materials you already have - recycled items, leftover fabrics, buttons, silk or cotton thread, mirrors, etc. Table 3.10 has some examples; you can get more ideas from your teacher, family members, or friends.
Table 3.10: Ornamentation of your finished product
| Types of ornamentation | How to do it? |
|---|---|
 Lace
Lace |
- Place the lace on the fabric where you want to attach it. - Pin the lace to the fabric so that it does not shift when you sew. - Use a simple running stitch to fix the lace with the fabric. |
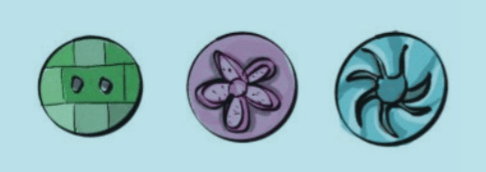 Buttons
 |
- Choose the buttons of your choice. - Plan how you will use them - for example, you may like to add 4 buttons at the corners of your scarf or 5 buttons on each side of your dupatta. - Fix the buttons to the fabric using needle and thread. |
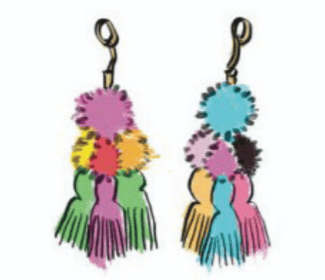 Pom-pom/Tassels
 |
- Choose the pom-pom/tassel of your choice. - Plan how you will use them, for example, you may like to add 4 tassels at the corners of your pillow cover/cushion or 7 tassels on each side of your dupatta. - Fix the pom-pom/tassels to the fabric using needle and thread. |
You can also explore embroidery, beadwork, and sequins apart from the things mentioned in table 3.10. This will make your product even more unique.
Think and Answer
- 1. What did you enjoy doing?
- 2. What challenges did you face?
- 3. What will you do differently next time?
- 4. Write the journey of a tie and dye product from producing raw materials to reaching the market. Which jobs are involved in this process?
- 5. Identify few examples of jobs related to the work you just did. For example, artisan, dyer, fashion designer, retailer, and textile researcher. Look around, speak to people and write your answer.