
Unit 6: Yoga
Yoga is an ancient practice designed to harmonise the body and mind. This unit will introduce and guide you through yoga for holistic development, emphasising the practical application of the eight limbs of yoga to achieve both physical health and mental well-being. We will explore how consistent yoga practice can foster self-awareness, discipline and ethical conduct, ultimately empowering students to become more responsible and compassionate individuals.
About Yoga
In the Grade 6, we learnt that the word ‘Yoga’ is derived from the Sanskrit root ‘Yuj’, meaning ‘to join’ or ‘to unite’ or 'to integrate.’ It is the union of body, mind and the inner self. Yoga brings balance, harmony and a sense of oneness within us and the world around us.
Yoga helps us to grow in many ways physically, mentally, emotionally and socially. Practising yoga regularly builds a stronger body, a calmer mind and more balanced emotions. This inner harmony helps us become better students, loyal friends, responsible family members, and citizens of the nation. It is necessary to maintain a consistent Yoga practice to handle life's challenges with balance and focus.
Each section in this unit will enhance your understanding and practice of yoga. We will start with an introduction to yoga for holistic Development. Then learn about Yama, Niyama and their applications in our daily lives; Sūkshma Vyāyāma (joint movements), Śithalīkarana vyāyāma (dynamic practices), Sūrya Namaskāra, Āsana (postures), relaxation, Mudras, Kriyas, Prānāyāma (regulation of breath), Pratyāhāra (mastery over senses), Dhārana (concentration,) Dhyāna (meditation) and Krīdā Yoga (Yoga games).
Yoga Session Structure
Begin your yoga session with the prayer given on next page. Through this prayer, we honour the bond between students and teachers. Together, they ask for divine guidance, protection and wisdom. They also wish for peace for everyone, everywhere.
General instructions to begin and end a Yoga session
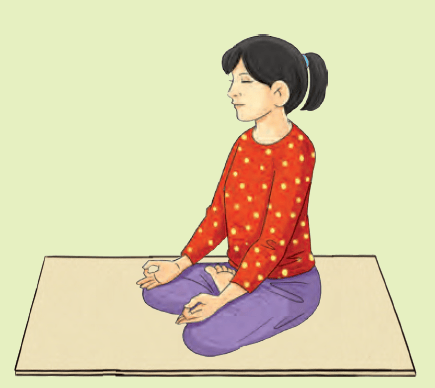
• Sit comfortably in Sukhāsana with your spine, neck and head straight.
• Close your eyes, relax your face and bring your awareness to your breath.
• Place your hands in Chin Mudra. Observe your breath for a few moments. Then, take a deep and slow breath. As you exhale, gently chant “Om.”
• Gently place your hands in Namaskāra Mudra and chant prayer given in the following page.
• Notice how you feel after chanting Om.
• Gently rub your palms together, place them over your closed eyes and then slowly open your eyes to the warmth of your hands.
|
Opening Prayer |
|
|
ॐ सह नाववतु। |
Om Saha Nāvavatu. |
|
Meaning of the Prayer May we both (Guru and Śiśya) be protected. May we both be nourished. May we practice with great vigour and energy. Let our studies be fruitful and enlightening. May we not hate each other. |
|
After the opening prayer, follow the session plan for various yogic activities. These activities include Yama and Niyama, Sūkṣma Vyāyāma, Śithilīkaraṇa Vyāyāma, Āsanas, Prāṇāyāma, Pratyāhāra, relaxation, Dhāraṇā, Dhyāna, and Krīḍā Yoga.
End each yoga session with the closing prayer given below. This prayer helps students absorb the knowledge and reinforce the day's learning in a positive and joyful way.
|
Opening Prayer |
|
|
ॐ सर्वे भवन्तु सुखिन: |
Om Sarve Bhavantu Sukhinah |
|
Meaning of the Prayer May all be happy. May all be free from illness. May all see what is auspicious. May no one suffer. Let there be peace everywhere. |
|
Chapter - 1
Yoga for Daily Life
In this chapter, we will explore different ways to integrate yoga into our daily routines. To incorporate yoga into our daily routine, it is necessary to practice ‘Yoga in action’ (Karma Yoga), as taught by Shri Krishna in the Bhagavad Gita. The Bhagavad Gita defines yoga as ‘Yogaḥ Karmasu Kauśalam (2.50),’ which means ‘Yoga is skill in action.’ This means doing our tasks in a relaxed and focused way to get the best results.
Think about a Kho-Kho player. They are not just running fast; they are also incredibly calm and focused, even when the game gets intense. That is a lesson for all of us. Whether we are studying, playing a sport, or learning a new skill, it is not just about working hard and stressing out. It is about staying calm, focusing our attention and truly enjoying the process.
Sri Aurobindo highlights that yoga is about overall personality development at the physical, mental, intellectual, emotional and spiritual levels. It is about growing in all areas of life.
Imagine a big tree. For it to be strong and healthy, all its parts—roots, trunk, branches and leaves—must grow together. Similar to this, we must grow in all facts of life to achieve balance and strength.
How can we grow in different aspects and achieve holistic development?
Yoga helps us understand the connection between our body, mind, and inner self. Similarly, in Pancha Kosha (पंच कोष) explained in the Taittiriya Upanishad, talks about the five layers of our existence, much like the layers of an onion. These layers are body, energy, mind, wisdom and bliss. Various Yoga techniques help nurture each of these layers, enhancing our overall well-being.
Let us understand each Kosha and its role in holistic development. The Pancha Kosha framework helps us understand ourselves better. It gives us insight into both our inner and outer worlds, helping us become more self-aware, empathetic and purposeful.
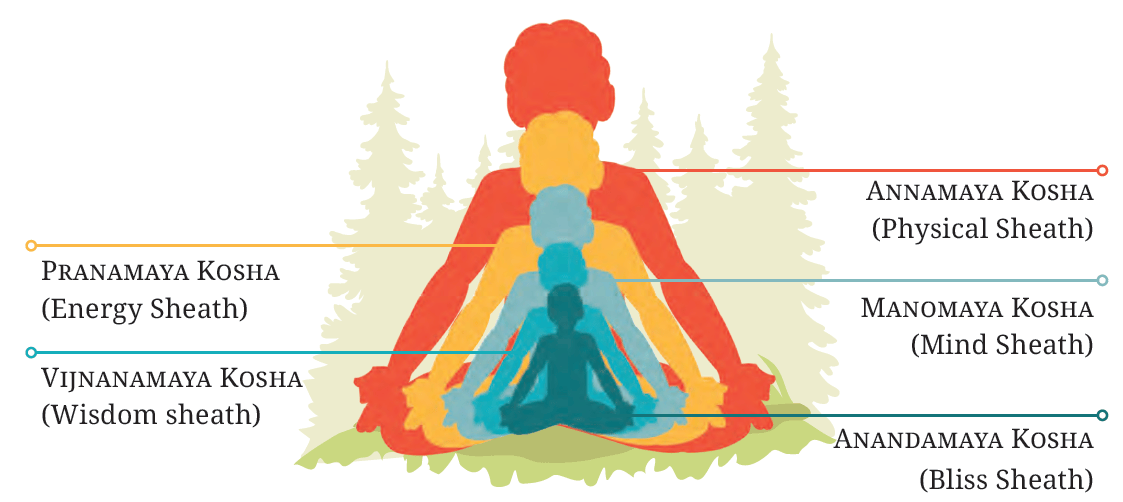
1. Annamaya Kosha (Physical Sheath)
This is the outermost layer, which is our physical body—the part we can see, touch and feel. It's made from the food we eat. Playing sports, running, eating healthy food, occasional fasting, living with nature and sleeping well are the ways to make us healthy. Yoga postures help strengthen and balance our physical body. Just like a plant needs water and sunlight to grow, our body needs food, exercise and rest to stay healthy.
2.Pranamaya Kosha (Energy Sheath)
Our bodies have layers, and the one just under our skin is called the Pranamaya Kosha. This layer is powered by ‘Prana,’ our life energy, which we get from breathing. Prana is like invisible rivers inside us, helping our lungs, heart and everything else work together. Breathing connects us to the air and the earth, giving us energy. We can strengthen our Prana with special exercises like Prānāyāma, Mudra, and Kriyā, helping us feel strong and healthy.
3. Manomaya Kosha (Mind Sheath)
This layer is about our thoughts, feelings and perceptions. It is where our emotions and desires come from. It includes what we think, how we feel, and how we react to things. Activities like meditation, mantra chanting (japa), listening to music, singing, painting, and Trataka (focusing on a point) help refine this layer. A calm mind helps you solve problems, stay focused on tasks, and handle challenges easily. When you feel happy or sad, it’s your Manomaya Kosha experiencing those emotions.
4. Vijnanamaya Kosha (Wisdom Sheath)
This layer helps us distinguish between right and wrong, good and bad. It is responsible for decision-making, knowledge, wisdom and understanding. Wisdom from this sheath helps us make the right choices, making us better students, friends, family members and responsible citizens of the nation. It also helps us understand our strengths and weaknesses and discover our life’s purpose. When we learn something new at school or figure out what’s right and wrong, it is our Vijnanamaya Kosha at work. Think of it as the map that helps us navigate life.
5. Anandamaya Kosha (Bliss Sheath)
This is the innermost layer and the source of pure joy or bliss. Think about how peaceful and happy you feel when playing with your pet, sitting quietly in nature, pursuing your hobbies, singing and listening to songs, helping others, or contributing to society. That deep sense of contentment and joy comes from the Anandamaya Kosha.
Understanding the five koshas shows us how interconnected we are. Yoga is a tool to nurture and balance all these sheath. By practicing yoga daily, we can improve our focus in school, excel in sports, enjoy our hobbies, and thrive in learning music or art and hence allowing us to reach our full potential in everything we do.
To achieve all-around development, we need to follow a systematic way of practice. Mahashri Patanjali has created this process known as Ashtāṅga Yoga.
Yama - Social discipline and ethics
Niyama - Personal discipline
Āsana - Physical postures
Prāṇāyāma - Regulation of breath
Pratyāhāra - Mastery over senses
Dhāraṇa - Concentration
Dhyāna- Meditation
Samādhi - State of ultimate joy and bliss
Activity
My Daily Yoga Plan to strengthen the Panchakosha
Create your own daily yoga plan:
1. Annamaya Kosha: Write one Yoga posture that you will practice each day.
..............................................................
2. Pranamaya Kosha: Choose a Pranayama that you will do daily.
..............................................................
3. Manomaya Kosha: List a simple mindfulness activity like japa, chanting of mantra, trataka, etc. that you would like to practice to be calm and focused.
4. Vijnanamaya Kosha:
(a) Imagine your self in the future. What kind of person do you want to be, and what skills, values and qualities will help you get there?
(b) What small things you do today to start becoming that person?
5. Anandamaya Kosha: What gives you a moment of joy—listening to birds, spending time with friends, helping your dear ones, playing with pets, sharing, etc.? Prepare a collage of activities that bring you joy.
Note for the teacher
• Explain to students how yoga can nourish and balance the Panchakosha through asanas, pranayama, and meditation.
Yama and Niyama
Yama and Niyama are golden rules for a balanced and fulfilling life. Just as we follow rules in school, these guidelines cultivate personal growth and harmonious relationships. Yama refers to moral principles guiding our behaviour with others, making us more kind, honest and responsible human beings.
Five Yamas
1. Ahimsa: Being kind to all living beings.
2. Satya: Always telling the truth and being honest.
3. Asteya: Not to take things that belongs to others.
4. Brahmacharya: Having self-control.
5. Aparigraha: Not being greedy.
Niyama
Niyama are personal habits that help us to take care of ourselves and transform us into better persons. By following Niyamas, we can overcome our limitations.
Five Niyamas
1. Sauhca: Cleanliness
2. Santosha: Being happy and content with what we have.
3. Tapas: Self-discipline and determination to achieve.
4. Swadhyaya: Self-study.
5. Ishwara Pranidhana: recognising the divinity.
In this grade, let us learn about Ishwara Pranidhana. one of the Niyamas, It is about recognising the divinity within our self and surrendering to it.
Ishwara Pranidhana is also about seeing our body as a temple and offering everything we do to the divine within us. Our senses, actions, breath, and even our happiness are all part of this offering. It’s about recognising the sacredness inside and around us and being grateful to it.
Divinity in all
We usually think place of worship and prayer rooms are sacred. But yoga teaches us that everything is sacred. Pranidhana means seeing the divine in everything – nature, friends family and even daily work. The story below gives us the message of finding divinity in all.
A Journey of Oneness
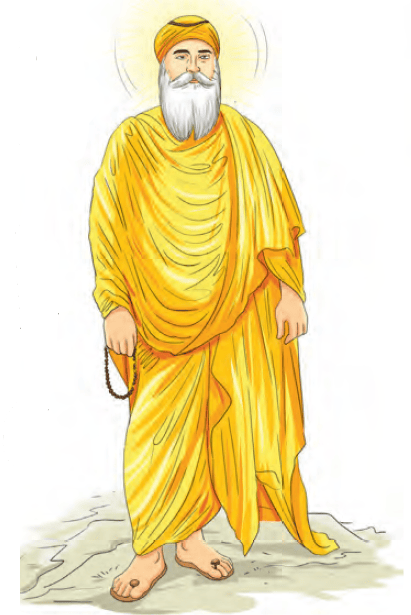
Guru Nanak was a great spiritual teacher who believed that God is everywhere. One day, he was on a pilgrimage to a holy city. Tired from the journey, he laid down to rest. A devotee saw Guru Nanak and was concerned.
“Your feet are pointing towards our holy place of worship,” he said. “It’s disrespectful.” Guru Nanak, politely asked the devotee to place his feet where there is no holy place.
But no matter which way the devotee moved Nanak’s feet, he still saw the place of worship in front of them. Then devotee recognized divinity of Guru Nanak and apologised to him. This story shows us that for Guru Nanak, every place was divine. He believed that God is present in all directions, places and in all creations.
Activity
Different communities have different beliefs and traditions. Give some examples of how people perform rituals and explain the reasons behind their actions. For example, harvest festivals are celebrated to thank the Earth for food. It shows that Earth is alive and deserves our respect.
Note for the teacher
• Encourage the students to take a walk in nature. Let them notice the pretty things around them and understand how everything works together. For example a tree with birds and small animals on it.
Students can keep a gratitude journal. Let them list five or more things they are grateful for everyday.
Chapter 2
Yoga Sadhana
Namaste Young Yogis!
Let us delve deeper into the fascinating world of Yoga!
In the previous chapter, we learnt about Yama and Niyama. Now, let us learn and practice Āsana (postures), Prānāyāma (regulation of breath), Pratyāhāra (mastery over senses), Dhārana (focused concentration), and Dhyāna (meditation). We will also learn and practice breathing practices, Sūkshṣma Vyāyāma, Śithalīkarana Vyāyāma, Sūrya Namaskāra, and Krīdā yoga.
It is important to learn these practices under the guidance of the teacher at school and self-practice at home every day to get better. Regular practice (Sadhana) makes us stronger, focused, flexible and calm. By practicing this, we can improve our focus and stay calm during studies, sports and doing important tasks. So, let us take a deep breath and stretch ourselves and start this amazing journey.
Yoga is about feeling good! Always listen to your body while practicing and follow the general guidelines for Yoga.
General guidelines for practicing yoga
1. Breathe normally: Do not force deep breaths or hold your breath. Breathe normally through your nose.
2. Be aware: Pay attention to your breath, muscle stretch and relaxation while practicing.
3. Stay focused: Watch your teacher and follow instructions. Focus on your own posture.
4. Rest if unwell: If you feel unwell (cold, headache, stomach ache, etc.), rest and ask your teacher for guidance.
Āsana guidelines:
1. Warm-up first: Begin with warm-up exercises like Sūksma Vyāyāma and Śithilīkarana Vyāyāma to prepare your body and reduce the risk of injury.
2. Practice on an empty stomach: The best time is in the morning on an empty stomach. If practicing later, wait 2–3 hours after eating.
3. Breathing: Breathe naturally through your nose with slow, deep breaths.
4. Wear comfortable clothing: Choose loose, comfortable clothing and practice without shoes and socks.
5. Avoid strain and over-stretching: Listen to your body. If a posture feels painful, gently come out of it. Never push yourself too far.
6. Focus on alignment: Proper alignment is key. Pay attention to your posture to get the most benefit.
7. Stay calm and focused: Avoid talking during practice. Focus on each posture and how your body feels.
8. Cool-down with relaxation: After Āsanas, relax in Shavāsana or another relaxation posture to unwind.
9. Be consistent: Regular practice is better than occasional practice. Try to practice a little each day.
Prānāyāma Guidelines:
1. Breathe naturally: Always breathe through your nose. Prāṇāyāma should be natural and easy. If you feel dizzy, stop and inform the teacher.
2. Sit comfortably: Sit with your back straight and hands resting on your knees.
3. Start slowly: Begin with a few minutes and build up slowly.
4. Check with the teacher: If you have respiratory issues like asthma or if you’re feeling unwell, check with the teacher before practicing Prāṇāyāma.
Remember, Yoga is about gradual progress. Keep practicing and see how it transforms you.
Sūkshma Vyāyāma
Sūkshma Vyāyāma is a series of gentle exercises designed to loosen the joints, release tension and improve flexibility and strength. The term ‘Sūkshma Vyāyāma’ comes from Sanskrit, where ‘Sūkshma’ means ‘subtle or micro’, and ‘Vyāyāma’ means ‘exercise or movement’. These simple exercises are accessible to everyone with limited mobility, and beginners new to Yoga. They can be performed while sitting or standing.
Each movement should be sychronised with the breath, enhancing the flow of Prāṇa (vital energy) throughout the body. This helps eliminate energy blockages in the joints and improves coordination, self-awareness and a sense of well-being. This set of practices promotes deep relaxation and prepares the body and mind for practicing Yogāsanas.
In this grade, let's learn Sūkshma Vyāyāma for the fingers, wrists, elbows, shoulders and neck.
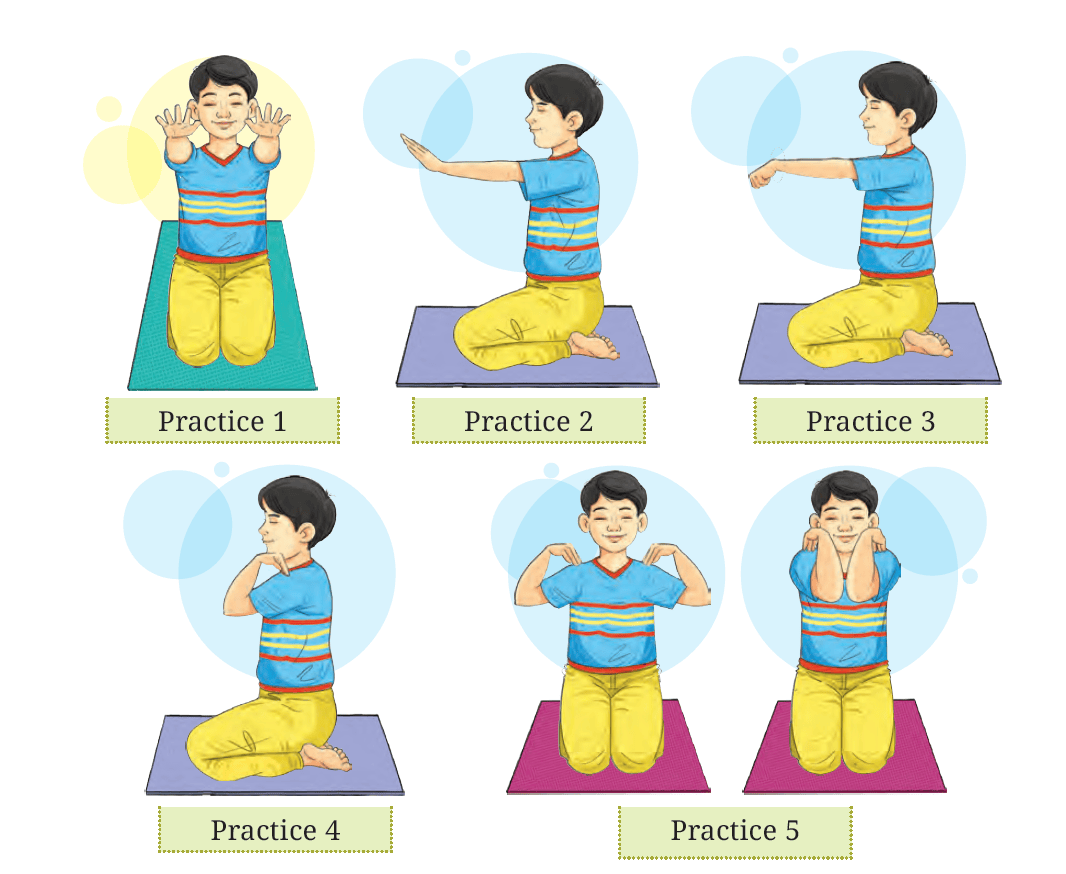
Practice 1 – Sūkshma Vyāyāma for strengthening of the fingers: (Aṅgulī Śakti Vikāsaka)
Practice 2 – Strengthening of the wrist (Maṇi Bandha Śakti Vikāsaka)
Practice 3 – Wrist joint rotation clockwise and anti-clockwise (Maṇi Bandha chakra)
Practice 4 – Strengthening of elbows (Kehuni Śakti Vikāsaka)
Practice 5 – Strengthening of the shoulder joint (Skandha Chakra)
General Guidelines for Conducting above practices stepwise
The instructions provided below outline the steps for all the Sūkshma Vyāyāma Practices. These same steps should be followed for all other practices as well.
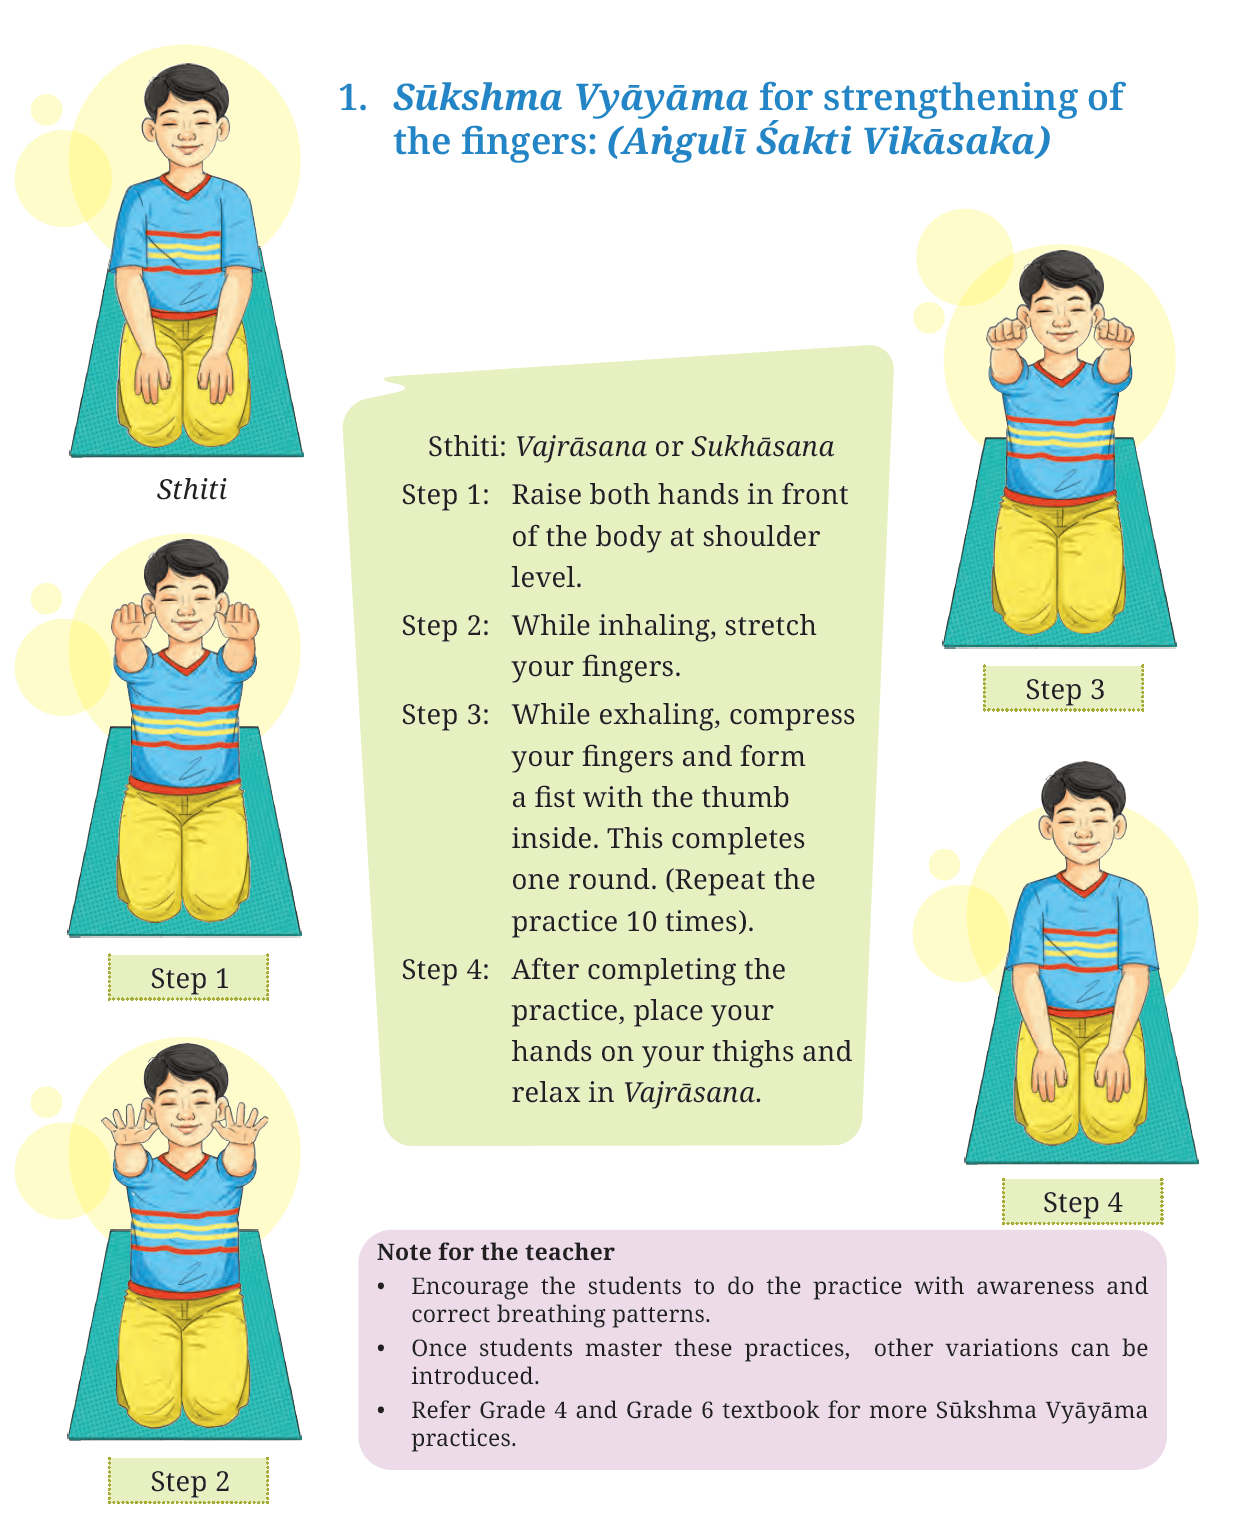
1. Sūkshma Vyāyāma for strengthening of the fingers: (Aṅgulī Śakti Vikāsaka)
Sthiti: Vajrāsana or Sukhāsana
Step 1: Raise both hands in front of the body at shoulder level.
Step 2: While inhaling, stretch your fingers.
Step 3: While exhaling, compress your fingers and form a fist with the thumb inside. This completes one round. (Repeat the practice 10 times).
Step 4: After completing the practice, place your hands on your thighs and relax in Vajrāsana.
Note for the teacher
• Encourage the students to do the practice with awareness and correct breathing patterns.
• Once students master these practices, other variations can be introduced.
• Refer Grade 4 and Grade 6 textbook for more Sūkshma Vyāyāma practices.
Śithalīkarana Vyāyāma
Śithalīkarana Vyāyāma refers to a set of loosening exercises that prepare the body by building a solid foundation through increased flexibility, endurance and strength for intense Yoga practices. These exercises are designed to Warm-up the body and improve spinal flexibility by repeatedly stretching and relaxing different muscle groups. They also enhance joint mobility and circulation. Śithalīkarana Vyāyāma is often practiced at the beginning of a Yoga session to ensure that the spine and large muscles are adequately prepared for āsanas.
In this grade, let us learn the following loosening practices:
1. Bending forward, backward and sideways: Improves mobility and flexibility of the spine region.
2. Spinal twists: Gentle twists to stretch and relax the spine.
Practice 1
Forward-backward bending
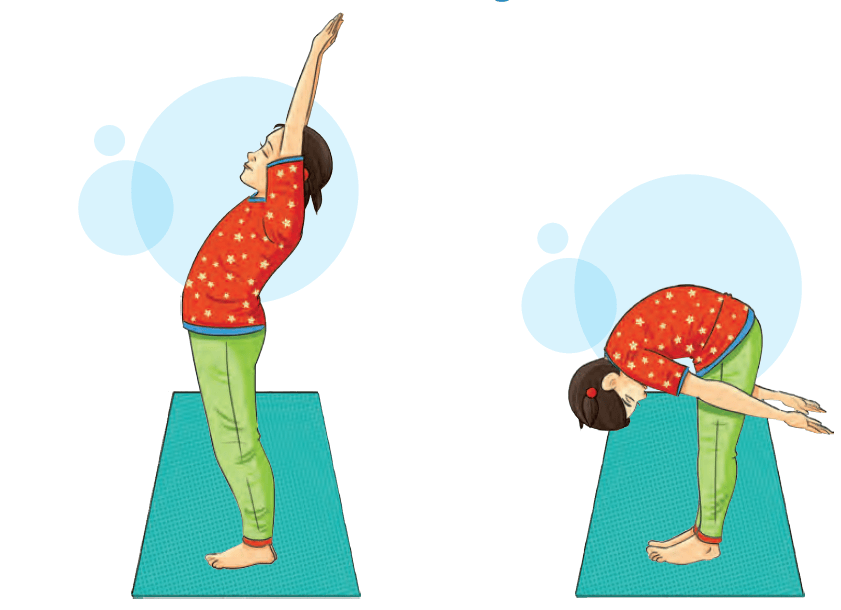
Practice 2
Side bending
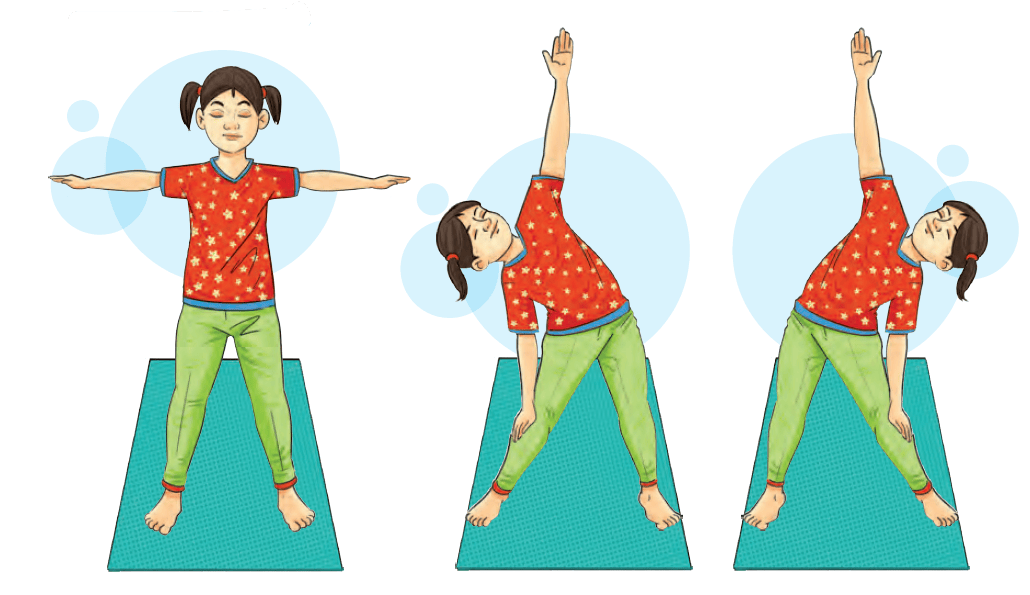
Practice 3
Bending and twisting
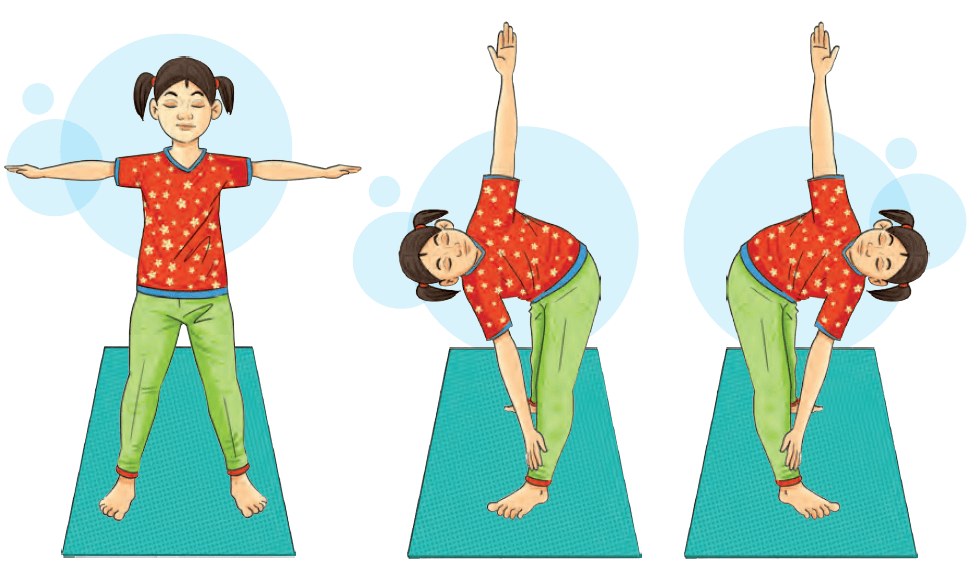
Practice 4
Twisting
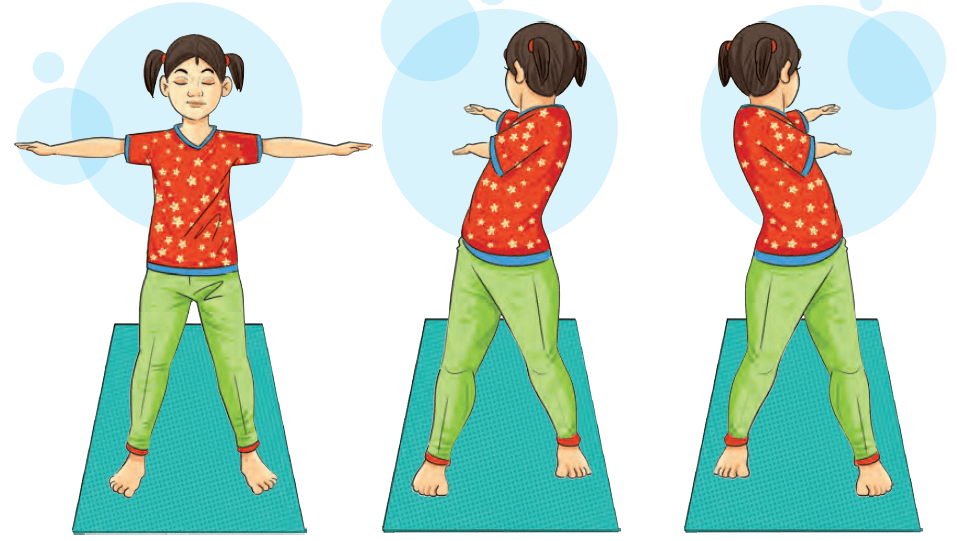
General Guidelines for Conducting Śithalīkarana
Vyāyāma stepwise
The instructions provided below outline the steps for all the Śithalīkarana Vyāyāma Practices. These same steps should be followed for all other practices as well.
Practice 1
Forward-backward bending
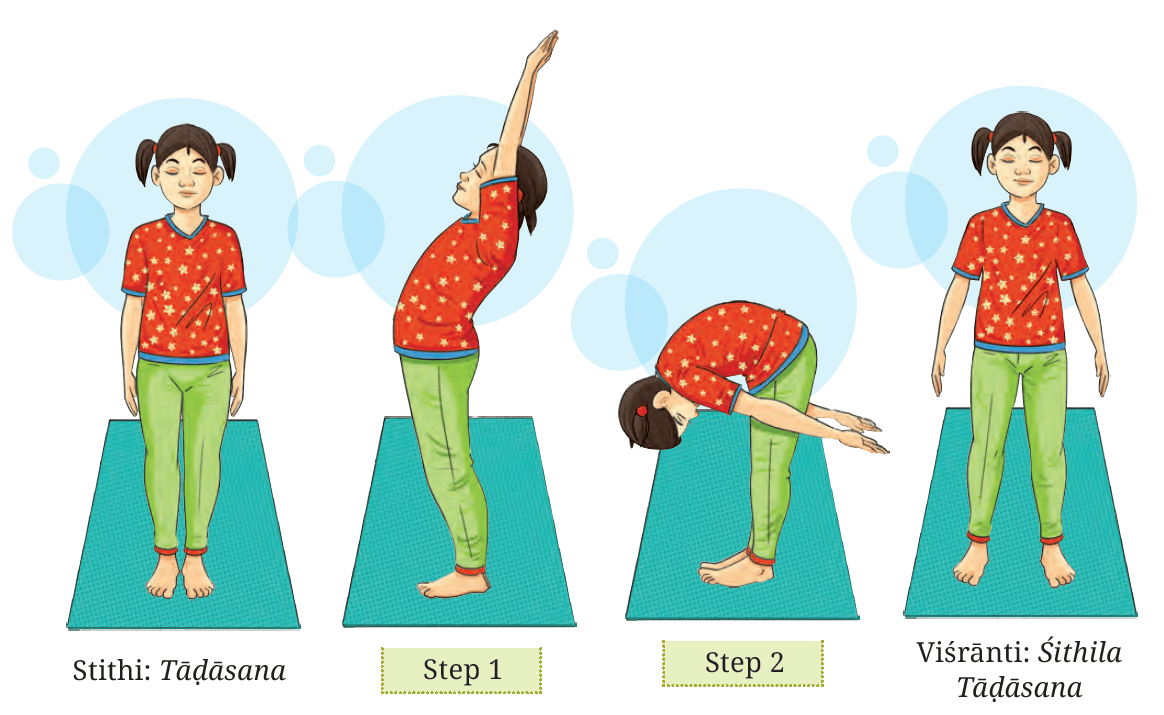
Come to Stithi
Step 1: Keep your legs apart. While inhaling, bend backward.
Step 2: While exhaling, bend forward and swing your hands.
Repeat this practice 10 times.
Make sure not to bend your knees.
Relax in Viśrānti.
Note for the teacher
• Encourage the students to do the practice with awareness and correct breathing patterns.
• Once students master these practices, other variations can be introduced.
Sūrya Namaskāra
In this grade, let us learn how to stretch, strengthen and rejuvenate our body and mind through the practice of Sūrya Namaskāra.
The Sun is important for life on Earth. It provides us with light and warmth, which are essential for plants to grow and for us to live. It is also a major source of Vitamin D, which helps our bodies stay strong and healthy. In many cultures, the Sun is seen as a symbol of power and knowledge. We can show our gratitude for the Sun by appreciating its life-giving energy and respecting its power.
Sūrya Namaskāra, is a series of Yoga poses performed in a sequence. It's a great way to greet the sun and start the day with positivity. Sūrya Namaskāra combines Āsana, Prānāyām and mantras. It's a complete workout for both body and mind. It also serves as an excellent warm-up for advanced Yoga practices or as a standalone routine for overall health and well-being.
Benefits of Sūrya Namaskāra
1. Strengthens muscles, improves flexibility and enhances cardiovascular health.
2. Stimulates digestion and metabolism.
3. Engages various muscle groups, building strength in arms, legs, core and back.
4. Boosts endurance and stamina, beneficial for athletes and overall fitness.
5. Aids in the smooth transition from childhood to adolescence by influencing hormones.
6. Combined with mindful breathing, reduces stress and anxiety, promoting mental clarity and focus.
7. Enhances mood and reduces feelings of depression.
8. Aids in anger management, boosts self-esteem and supports academic achievement.
Limitations:
• Students with certain serious or chronic physical conditions, heart issues or fatigue should avoid the practice.
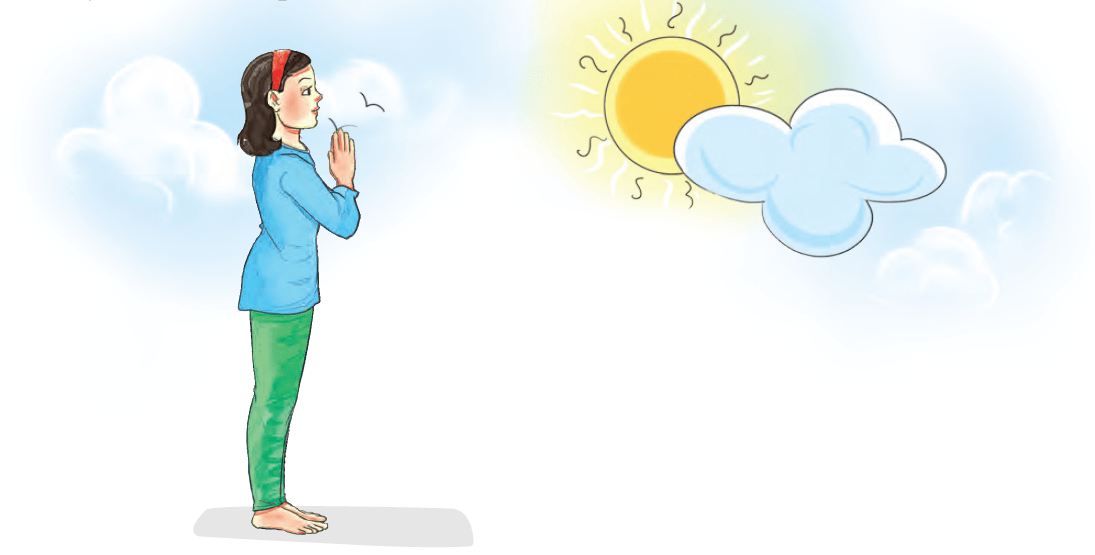
Step 1: Pranamāsana
Starting prayer for the practice
Adopt Namaskāra mudra and chant the prayer:
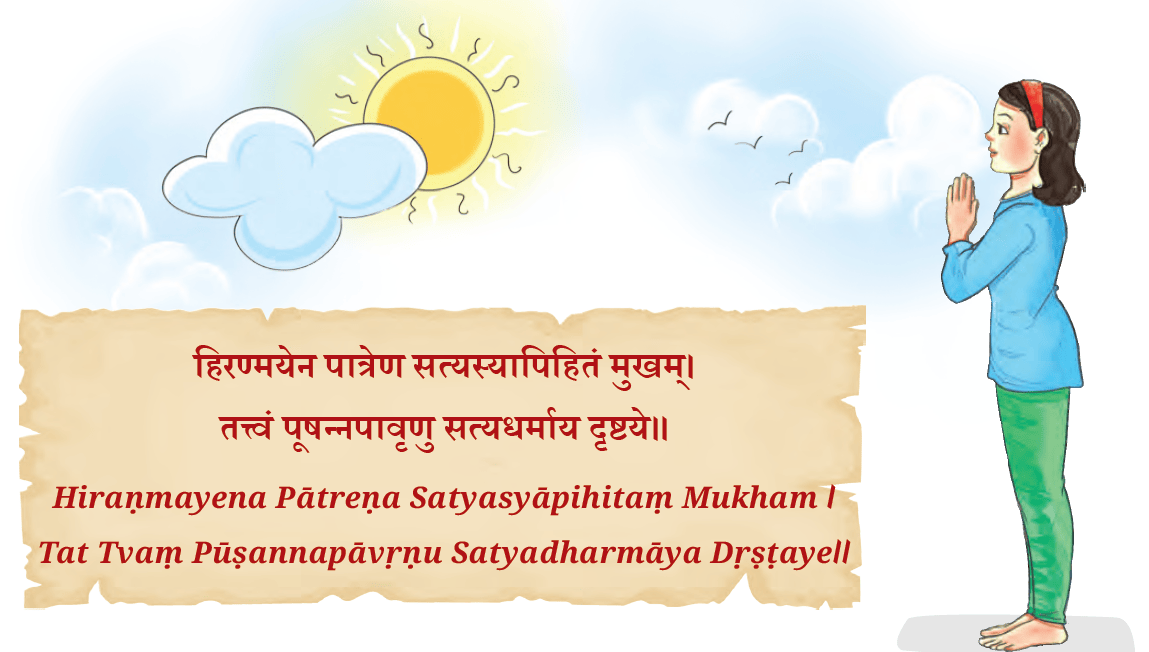
हिरण्मयेन पात्रेण सत्यस्यापिहितं मुखम्।
तत्त्वं पूषन्नपावृणु सत्यधर्माय दृष्टये।॥
Hiranmayena Pātreṇa Satyasyāpihitam Mukham
Tat Tvam Pūşannapāvṛņu Satyadharmāya Drştayell
Meaning of the prayer:
“O Pūṣan, please move the bright golden disk blocking the truth, so I, who seek truth, can see you.” This prayer is taken from Isha Upanishad.
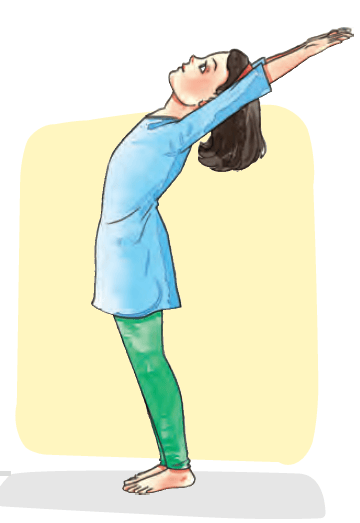
Step 2: Hasta Utthanāsana
• While inhaling, raise both hands above the head and bend the trunk backward as much as possible.
• Let the biceps touch the ears.
• Feel the stretch from the navel to the head, with a contraction at the back.
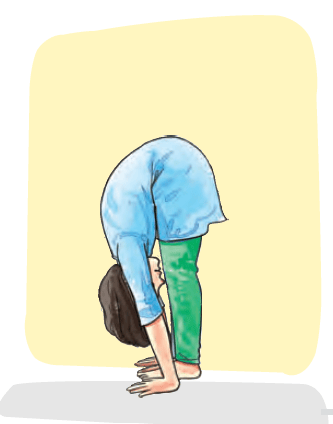
Step 3: Padahastāsana
• While exhaling, slowly bend forward and place the hands by the side of the feet.
• Let the forehead touch the knees and the abdomen rest on the thighs.
• Initially, bending forward and touching the knees with the forehead may seem difficult, but with continuous practice, it becomes easier.
Step 4: Ashwa Sanchālanāsana
• While inhaling, slightly bend the knees and stretch the right leg back.
• Keep your right knee and toes on the ground.
• Fold the right thigh and let the chest rest on it.
• Place the left foot such that the area from the toe to the knee is perpendicular (90°) to the ground.
• Lower the spine, arch the chest and thoracic region and look up.
• The left leg and the palms should be in a straight line.
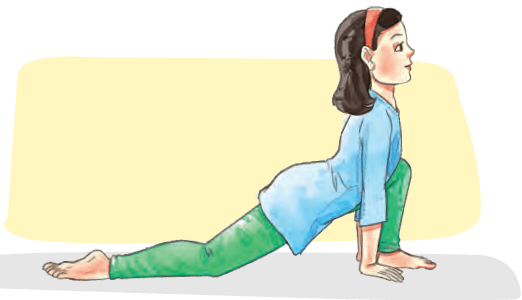
Step 5: Dandāsana
• While exhaling, take the right leg back and bring the whole body in a straight line. Keep your arms perpendicular to the floor.
• The body looks like a slide in its final position.
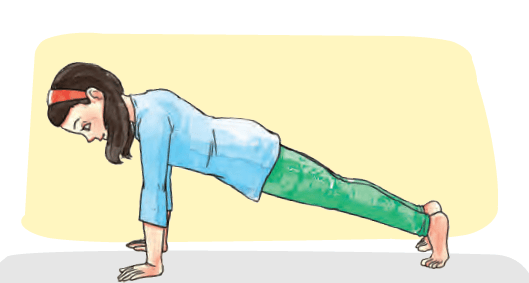
Step 6: Ashtāṅga Namaskara
• While inhaling and exhaling, place the forehead, chest, palms and knees on the ground so that eight parts of the body touch the floor (forehead, chest, two palms, two knees and two toes).
• Do not let the abdomen touch the ground.
• Raise the hips slightly upward.
• Hold the breath and stay in this position as long as possible, with ease and comfort.
• Initially, it may seem difficult, but with sufficient practice, it will become easier.
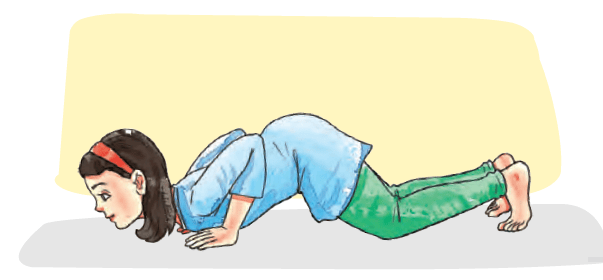
Step 7: Bhujangāsana
• While inhaling, slowly raise the body upward and the head towards the ceiling.
• Let the spine arch.
• Keep the thighs and hips on the floor, with the arms supporting the trunk.
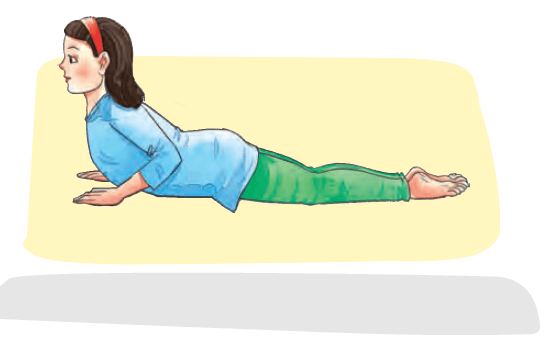
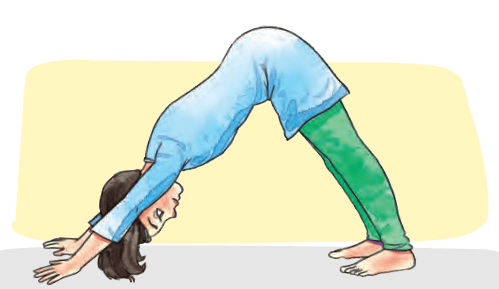
Step 8: Parvatāsana
• While exhaling, raise the waist.
• Keep the palms and feet flat on the ground, bringing the head towards the floor.
• The entire body weight should be distributed evenly between the palms and the feet.
• With continuous practice, you will be able to touch the head to the ground.
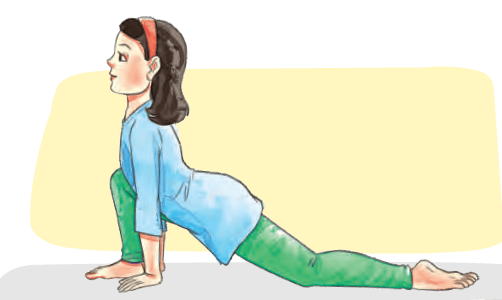
Step 9: Ashwasanchālanāsana
• While inhaling, bring the right leg between the palms.
• Keep your left knee and toes on the ground.
• Fold the right thigh and let the chest rest on it.
• Place the left foot such that the area from the toe to the knee is perpendicular (90°) to the ground.
• Lower the spine, arch the chest and thoracic region and look up.
• The left leg and the palms should be in a straight line.
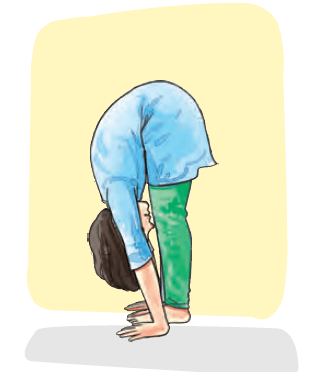
Step 10: Padahastāsana
• While exhaling, slowly bend forward and place the hands by the side of the feet.
• Let the forehead touch the knees and the abdomen rest on the thighs.
• Initially, bending forward and touching the knees with the forehead may seem difficult, but with continuous practice, it becomes easier.
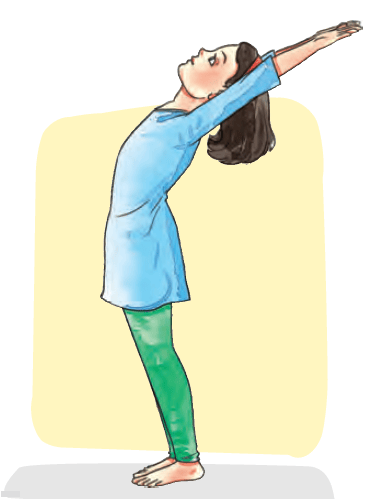
Step 11: Hasta Utthanāsanā
• While inhaling, raise both hands above the head and bend the trunk backward as much as possible.
• Let the biceps touch the ears.
• Feel the stretch from the navel to the head, with the corresponding contraction at the back.
• Keep the face smiling and the eyes gently closed.
Step 12: Pranamāsana
Slowly come to Step 1
Note for the teacher
• Ensure students perform this practice with ease and without jerky movements.
Chapter 3
Āsana
Āsana is the third limb of Ashtāṅga Yoga. The word āsana means comfortable posture. In Yoga, āsana are specific body postures designed to improve strength, flexibility and balance. Āsana are not just exercises, they are a part of a holistic lifestyle. Practicing Yoga postures regularly can have a positive impact on your physical and mental well-being.
Yoga believes that there are countless Yoga poses, as many as there are living beings in the world! These poses often resemble animals like snakes, birds, and fish, or plants like trees and lotuses.
Hatha Yoga, a popular type of Yoga, focuses on physical postures. It highlights 32 special poses that are believed to improve balance, help your body's energy flow smoothly and keep you healthy.
In this grade we shall learn following āsanas:
• Standing – Utkaṭāsana
• Sitting – Gomukhāsana
• Prone – Sarla Danurāsana
• Supine – Sarvāṅgāsana and Matsyāsana
Perform each āsana under the guidance of the teacher and according to the steps provided.
Utkatāsana: Chair Posture
Do you want to sit on an imaginary chair? Then let us learn about Utkatāsana.
Utkatāsana gives extra strength to the legs. It belongs to the balancing group of āsanas and by strengthening the lower body.
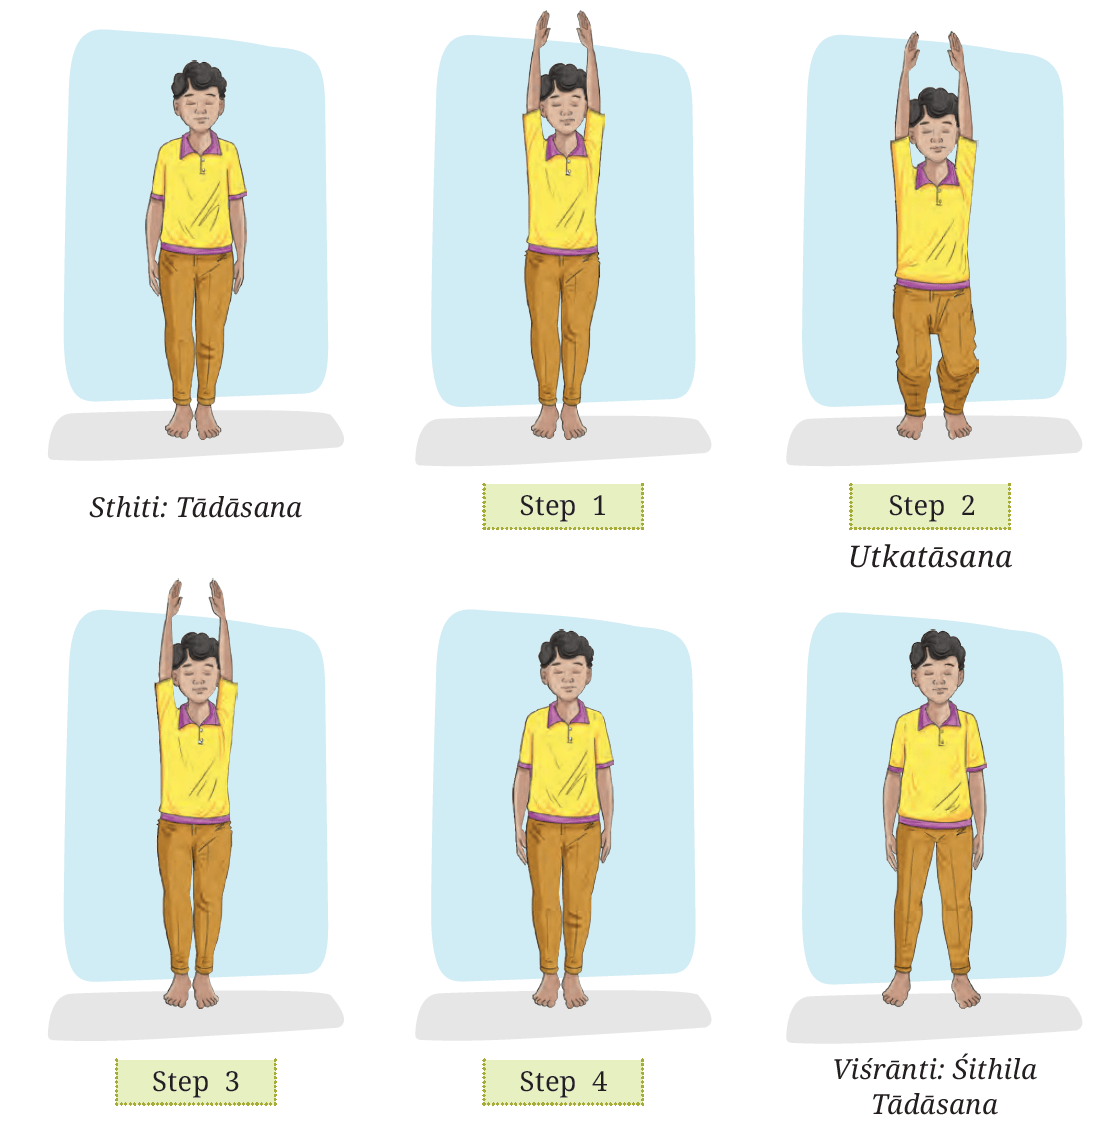
Come to Stithi
Step 1: While inhaling, raise both hands so that the biceps touch the ears. Keep both hands parallel to each other.
Step 2: While exhaling, bend the knees and lower the hips until the body resembles the shape of a chair. Stay in this posture for a count of 10, breathing normally.
Step 3: While inhaling, straighten the knees and return to a standing position.
Step 4: While exhaling, lower the hands to your sides.
Relax in Viśrānti
Benefits
• Utkatāsana strengthens and stabilises the ankles, thighs, calf muscles and spine.
• It also stretches the shoulders and chest, thus easing the respiration.
• This āsana improves concentration.
Limitations: Student with knee pain, sprained ankles, or with injured ligaments should avoid this posture.
Note for the teacher
• Encourage students to practice the other variation of Utkatāsana.
Gomukhāsana: Cow’s Face Posture
This āsana resembles the face of a cow.
Let us learn step by step how to achieve this posture.
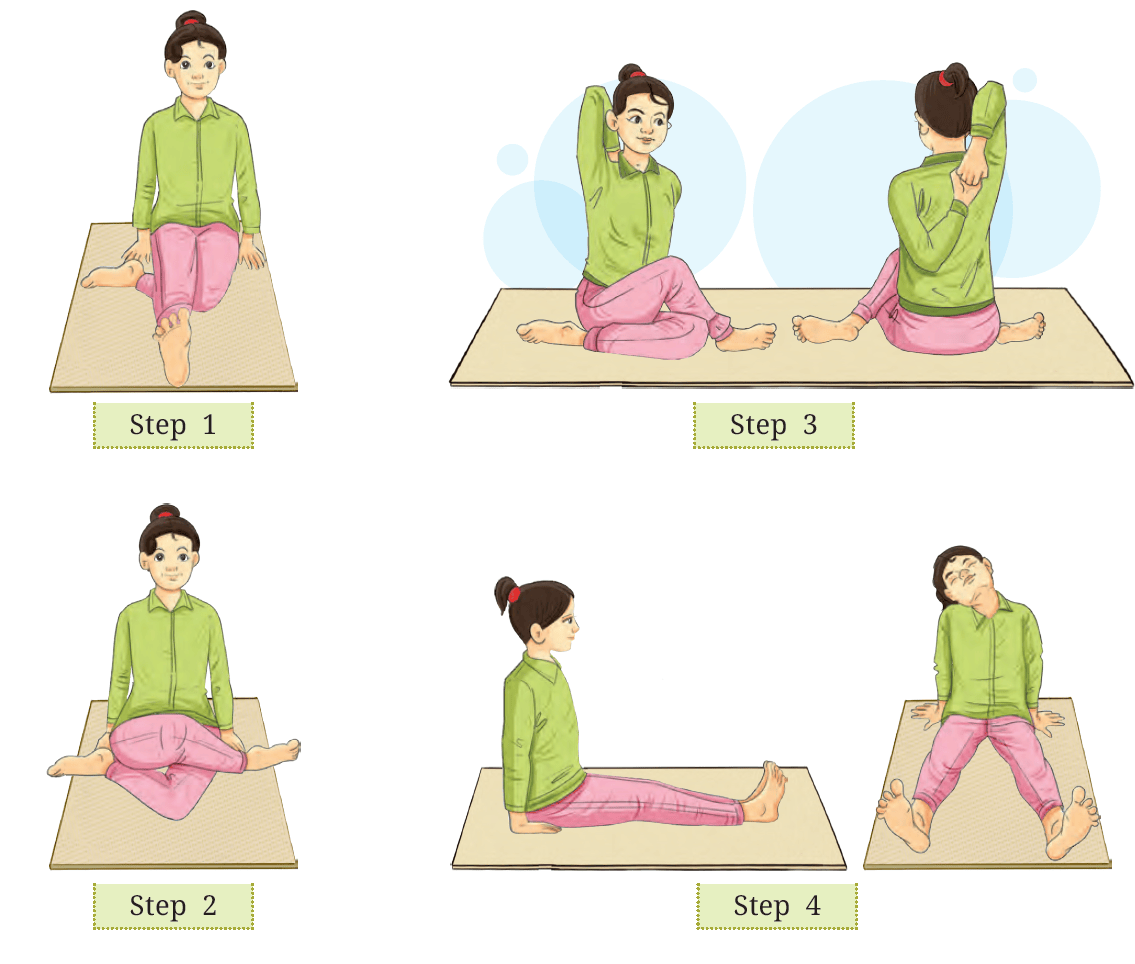
Come to Stithi
Step 1: Inhale and fold the right leg, placing the right heel by the side of the left buttock. Inhale again and fold the left leg, placing the left heel by the side of the right hip, with both knees stacked in line and the left knee on top.
Step 2: Raise both the hands sideways and take the left arm above the head and bend the elbow. Simultaneously, bring the right arm behind the back and interlock the fingers of both hands. Keep the spine erect, head slightly back and eyes closed.
Stay in this posture with normal breathing for 10 counts.
Step 3: Inhale and exhale, gently release the hands.
Step 4: Exhale and release your left leg, further exhalation releases the other leg and relax.
Viśrānti
Repeat the same āsana on the left side.
Benefits
• Gomukhāsana improves posture and removes stiffness in the shoulders, neck and legs.
• It also strengthens the muscles of the ankles, hips, thighs, shoulders, back and chest.
• It helps improve respiration.
• It is helpful in reducing anxiety, stress and tiredness.
Limitations: Those with acute knee and ankle problems can initially avoid this practice.
Note for the teacher
• Ensure students perform Sūkshma Vyāyāma related to shoulder joints to improve flexibility before performing the āsana.
• If the students are unable to interlock their fingers, they can use a hand towel or handkerchief.
Dhanurāsana: Bow Posture
Did you know that ‘Dhanur’ means a bow? This posture resembles a bow, with the bending of the back resembling the bowstring. That’s why it is called the Bow Pose. Let us learn, step by step, how to perform this pose.
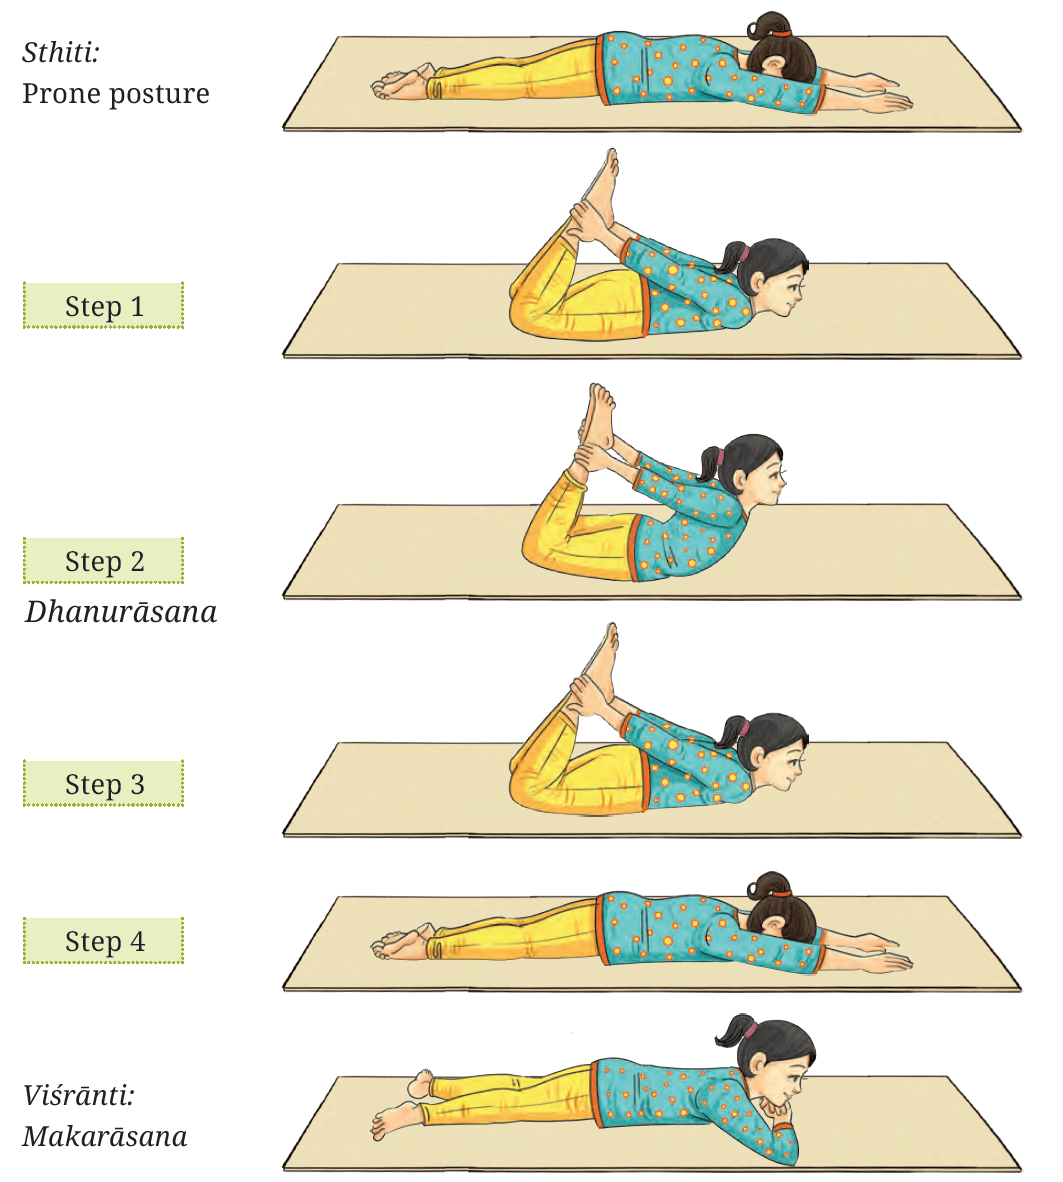
Stithi: Prone posture
Step 1: While inhaling, fold both the legs at the knees and catch the ankles with both hands, keeping the arms straight. Bring the heels close to the buttocks.
Step 2: Inhale and raise the head and chest as high as possible from the floor, slightly tilting the head back such that the posture resembles a bow. Keep your eyes closed and face relaxed.
Hold this position with normal breathing for 10 counts.
Step 3: While exhaling, slowly lower the thighs and head to the ground.
Step 4: Release the hands and legs, then take both hands above the head with palms facing down. Rest the forehead on the ground.
Viśrānti
Benefits
• Dhanurāsana improves spinal flexibility and strengthens the muscles of the back while opening the chest and shoulders.
• It also eases respiration.
• It enhances the digestive process.
Limitations: Avoid the practice if there is any injury related to the ankle, wrist or spine.
Note for the teacher
• This asana should be followed by forward bending postures like Parvathasana.
Sarvāṅgasana: Shoulder Stand Posture
‘Sarv’ means all, ‘anga’ means part of the body, and ‘āsana’ means posture. As the name suggests, Sarvāṅgāsana influences the functioning of all parts of the body, which is why it is called the Queen of Āsanas.
Let us learn step by step how to achieve this posture.
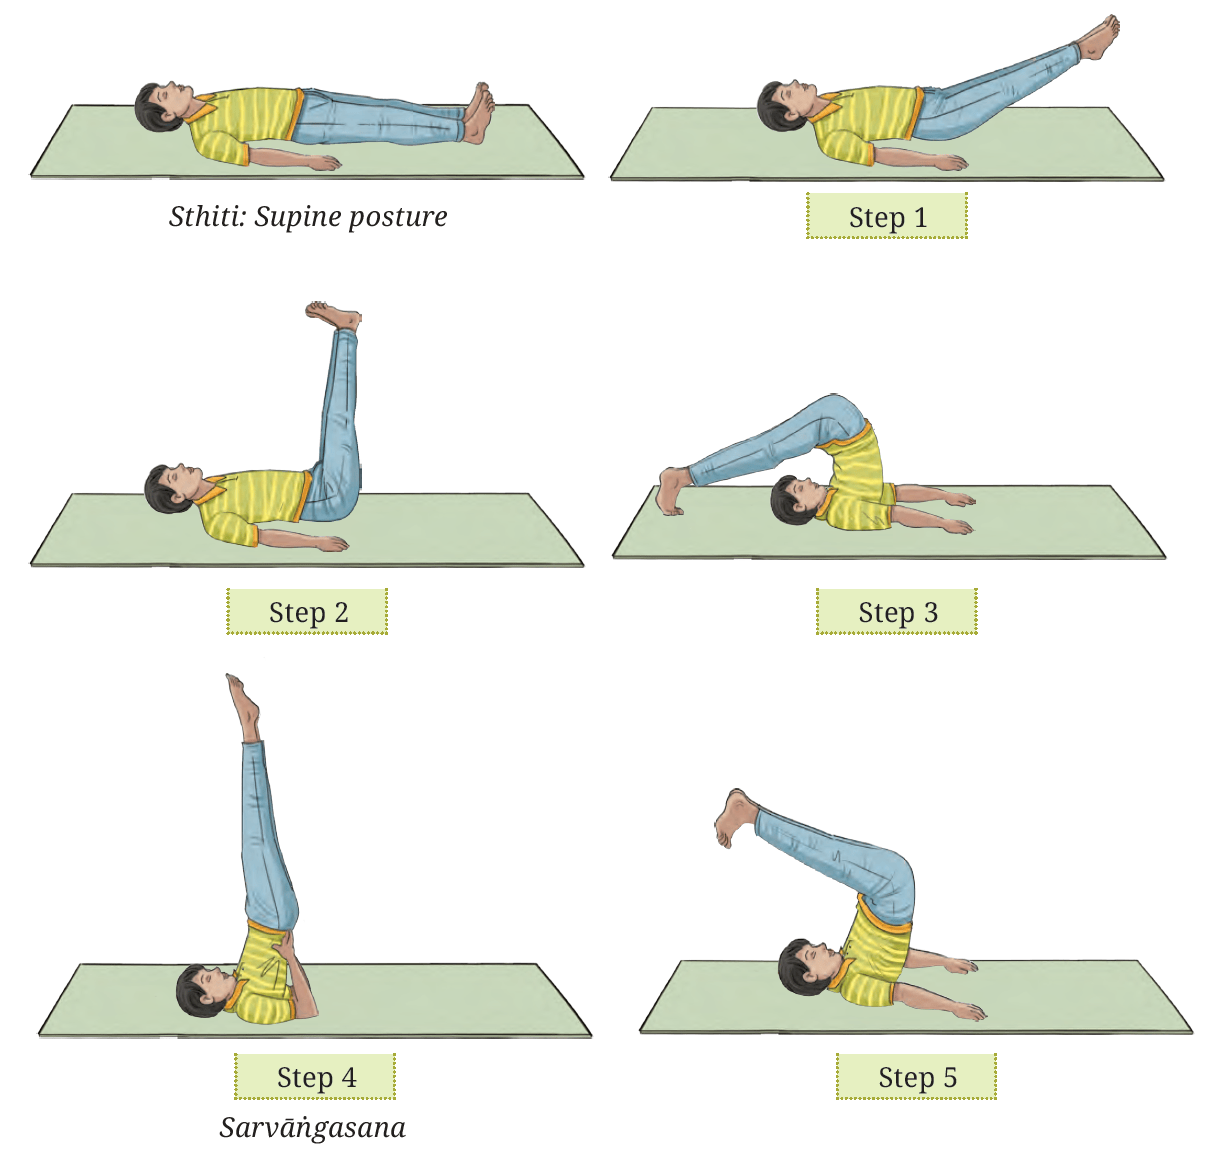
Come to Sthiti
Step 1: While inhaling, raise both legs to a 45° angle without folding the knees.
Step 2: Continue inhaling and raise both legs to a 90° angle.
Step 3: While exhaling, move both legs backward until they are parallel to the ground. Bring the hands forward and place them on the ground.
Step 4: While inhaling, slowly raise the body vertically upward, ensuring the chin touches the chest. The final position should resemble the shape of the letter 'L.' Hold this position for 10 counts with normal breathing.
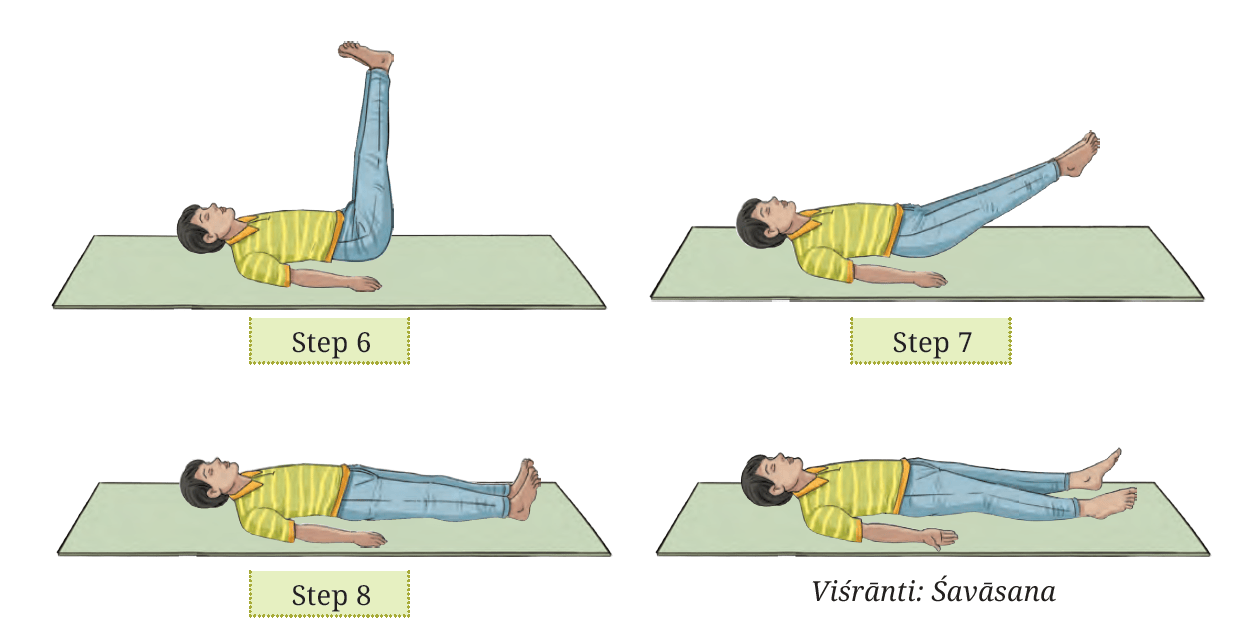
Step 5: While exhaling, slowly bring both legs backward until they are parallel to the ground.
Step 6: While inhaling, bring both legs back to a 90° angle.
Step 7: While exhaling, lower both legs to a 45° angle.
Step 8: Continue exhaling and gently place both legs on the ground.
Viśrānti: Śavāsana.
Benefits
• Sarvāṅgāsana improves the flexibility of the neck and enhances circulation to the brain, eyes, ears and nose.
• It strengthens the legs, arms, shoulders and keeps the spine flexible.
• It stimulates the thyroid and parathyroid glands.
• It improves the flexibility of the neck and enhances circulation to the brain, eyes, ears and tonsils.
• It increases focus, attention, clear thinking, and elevates the mood. .
Limitations: Avoid the practice if there are respiratory disorders, neck injuries, spinal injury and serious eye disorders eg., high myopia.
Note for the teacher
• Encourage students to keep their neck relaxed and avoid any jerky movements.
• Students should avoid this posture if they experience any dizziness or difficulty in breathing.
Matsyāsana: Fish Posture
The name comes from the Sanskrit word Matsya, which means fish.
Did you know how this posture got the name Matsyāsana?
The way of folding the legs in this asana resembles the tail of a fish.
Let us learn step by step how to achieve this posture.

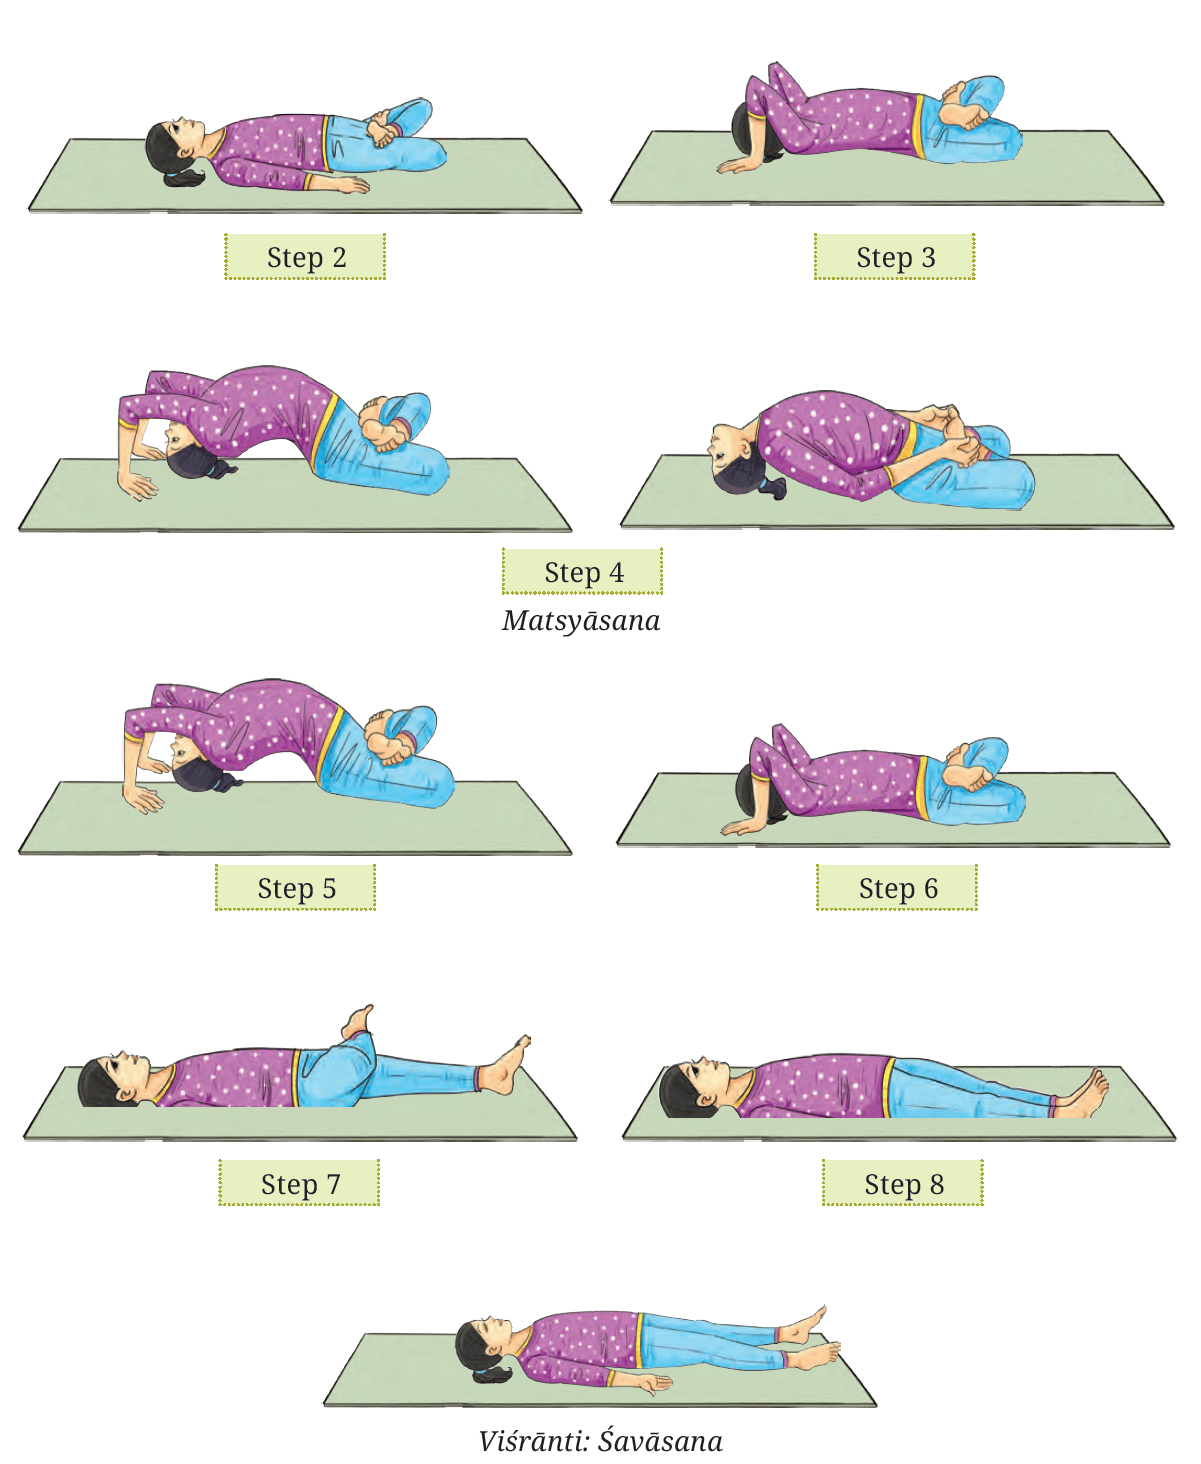
Sthiti
Step 1: Inhale and exhale, fold the right leg and place it on the left thigh.
Step 2: Inhale and exhale, fold the left leg and place it on the right thigh.
Step 3: While inhaling, position both palms by the sides of the neck. Place the palms on the ground with the fingers pointing toward the legs.
Step 4: While inhaling, slowly raise the head and rest the crown of the head on the ground. Hold the toes with the hands, forming the shape of a bridge. Breathe normally and maintain the posture for 10 counts, and keep the eyes closed and face relaxed.
Step 5: While inhaling, place both hands back by the sides of the neck.
Step 6: While exhaling, lift the head slowly and rest it on the ground.
Step 7: Inhale and exhale, release the right leg.
Step 8: Inhale and exhale, release the left leg.
Viśrānti
Benefits
Matsyāsana stimulates the thyroid glands and normalizes its functions.
• It helps to keep the spine flexible and healthy.
• It relieves tension in the neck and shoulder region.
• It strengthens the knees, calf muscles and thighs.
• It improves lung capacity and is very beneficial for asthma and bronchitis.
Limitations: This āsana must not be attempted if there is any abdominal or thoracic surgery, neck injury, hernia, peptic ulcers etc.
Note for the teacher
• This āsana must be performed with care, as it is very easy to injure the spine.
• If students feel Padmasana is challenging, they can perform the āsana with their legs stretched out.
Relaxation
Relaxation is essential after the practice session to regain and rejuvenate the body and the mind. Relaxation techniques remove the tightness in the muscles, relax the spine, and calm the mind.
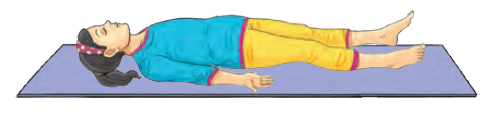
For this practice, lie down in Savāsana (supine posture), with feet apart, hands apart, and palms facing upward. Now, let go and relax the whole body.
For step-by-step practice on Relaxation refer to Khel Yatra Grade 6 Textbook
Note for the teacher
• The maximum benefit of this technique can be achieved after a dynamic activity such as Surya Namaskara, Shitilikarana Vyayama, or the practice of Āsanas.
• Prāṇāyāma should be practiced after relaxation.
Breathing Practices
Do you want to stretch like a cat?
Before practicing Prāṇāyāma it is essential to normalize breathing patterns. To make breathing uniform, continuous and rhythmic, full utilisation of the lungs are necessary. Breathing practices develop awareness on breathing while practising Yoga.
In this grade let us learn about Marjariāsana and Vyagrahāsana with breathing techniques. These āsanas are so called because they emulate the spinal stretching movements made by cats and tigers.
Come let us learn how to stretch…
Marjariāsana with breathing (Cat stretch Pose)
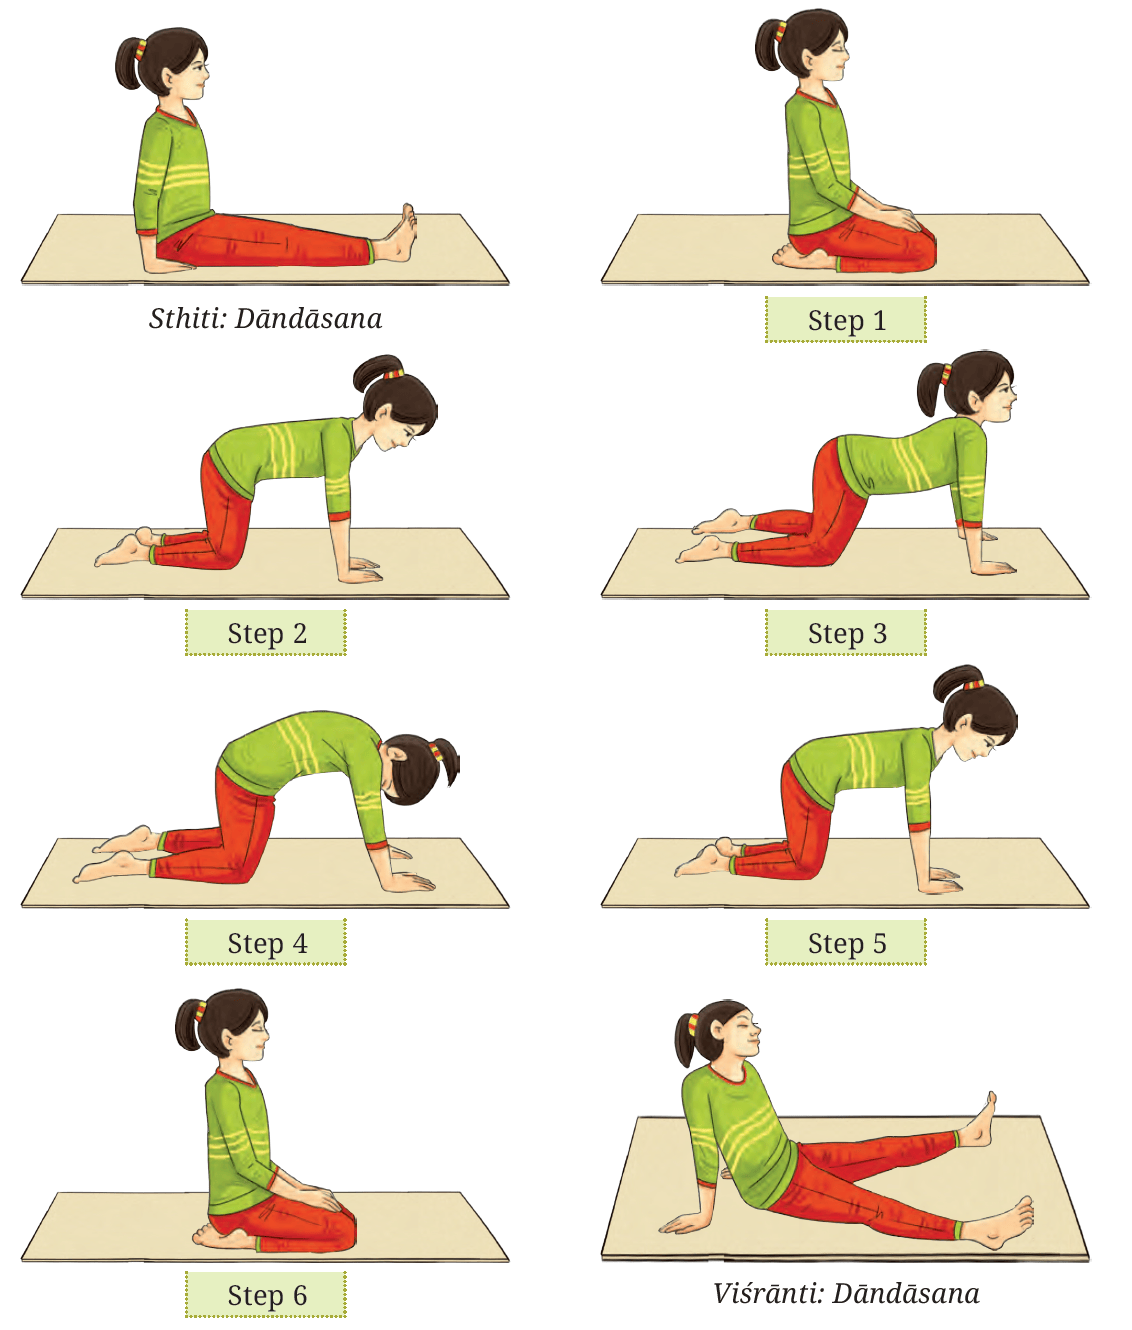
Stithi: Dāndāsana
Step 1: Sit in Vajrāsana by folding both the right leg and the left leg.
Step 2: Lean forward and place your hands flat on the floor, in line with your shoulders, with fingers pointing forward. Ensure that your arms, thighs and heels are about one shoulder-width apart, and that your arms and thighs are perpendicular to the floor.
Step 3: While inhaling, raise your head and look at the ceiling or roof. Simultaneously, depress your spine so that your back becomes concave.
Step 4: While exhaling, arch your spine upwards and bend your head downward, bringing your chin toward your chest. This constitutes one round of breathing. Repeat for 5 rounds.
Step 5: Return to the initial posture after completing the practice.
Step 6: Slowly return to Vajrāsana, then stretch your legs forward.
Relax in Śithila Dāndāsana
Benefits
• Marjariāsana with breathing improves the flexibility of the neck, shoulders and spine.
Limitations: Avoid the practice in case of knee injury or pain.
Now let us stretch like a tiger.
Vygrahāsana Breathing (Tiger Stretch Pose)
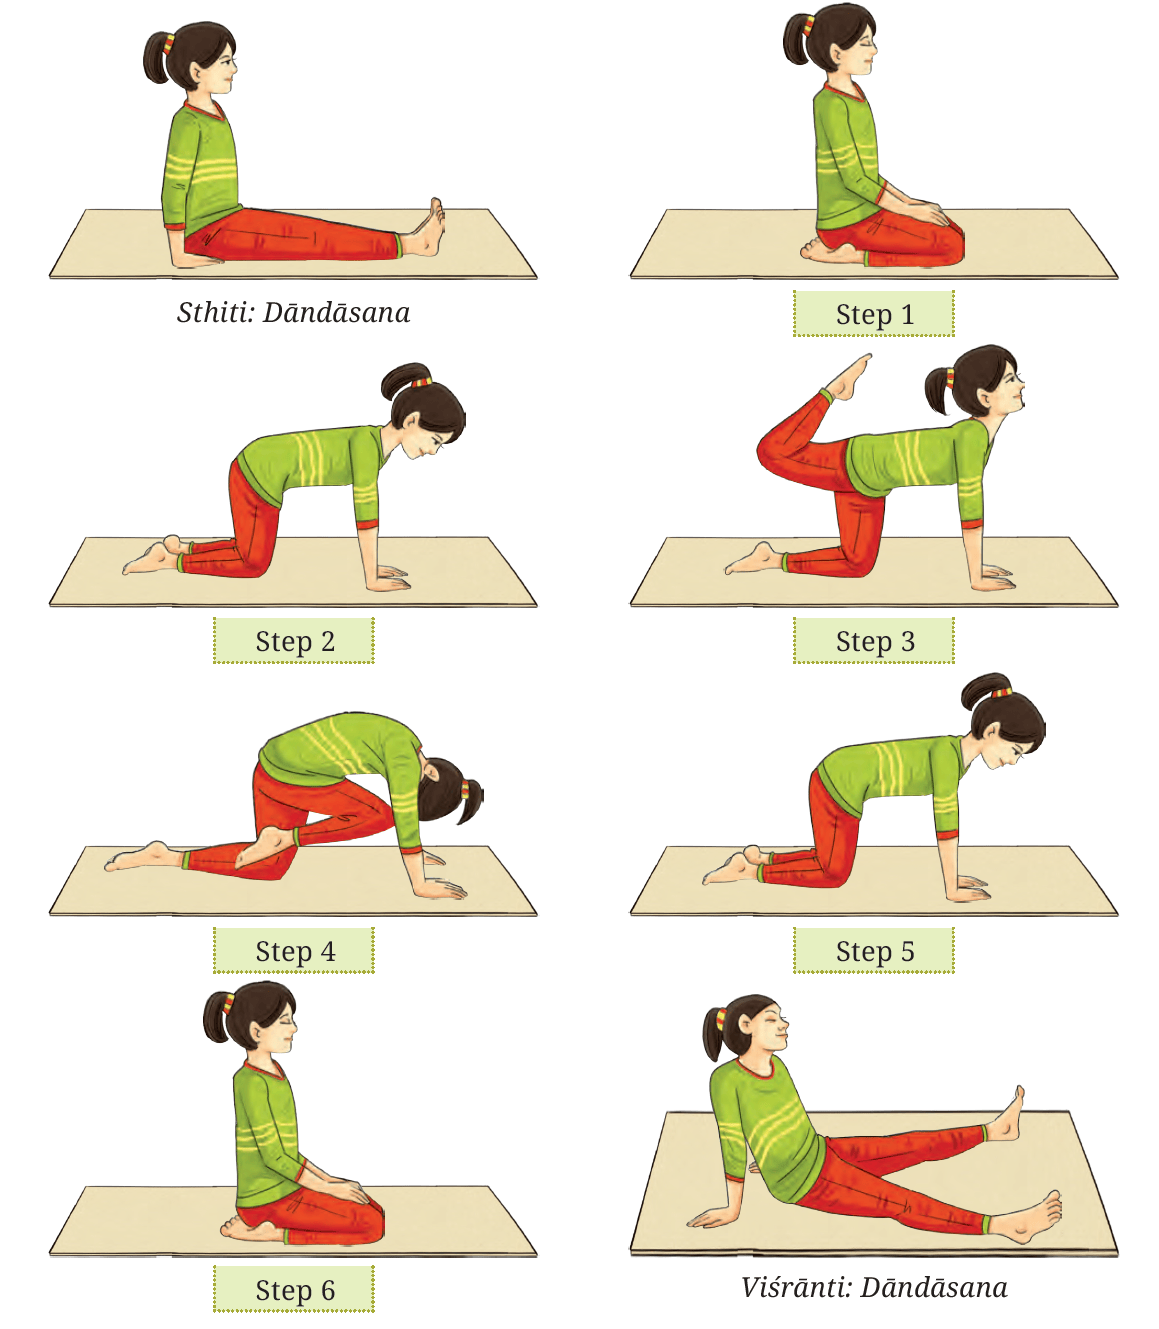
Come to Sthiti Dāndāsana
Step 1: Sit in Vajrāsana by folding the right leg and the left leg.
Step 2: Lean forward and place the hands flat on the floor in line with the shoulders with fingers pointing forward and look forward. Arms, thighs and heels should be about one shoulder width apart. The arms and thighs are perpendicular to the floor.
Step 3: While inhaling, raise the head up and simultaneously raise the right leg stretching up and slightly bend the right knee.
Step 4: While exhaling, bend the knee and swing the leg under the hips. Simultaneously, arch the back and bend the head down bringing the knee towards the nose. This constitutes one round of breathing. Repeat for 3–5 rounds. Repeat the same practice on the left side.
Step 5: Come to the initial posture after the practice.
Step 6: Slowly come to Vajrāsana, stretch your leg forward and relax in shithila Dāndāsana.
Benefits
• Vygrahāsana breathing loosens up the legs and hip joint.
• It stretches the abdominal muscles, promotes digestion and stimulates blood circulation.
• It tones the hip and thighs.
Limitations: Avoid the practice in case of knee injury or pain.
Note for the teacher
• Before starting the practice, see that the students are comfortable standing on both palms and knees.
• After completing the practice, students can relax in Śaśāṅkāsana or child pose for a few seconds.
Chapter 4
Prānāyāma
In this grade let us learn more about breathing through the fourth aspect of Ashtāṅga Yoga which is Prānāyāma.
Prānāyāma is the practice of controlling our breath. In Yoga, our breath is considered a powerful tool. Breathing techniques that promote our life force are Prānāyāma. The word Prānāyāma comes from two words: ‘Prana’ means ‘vital energy’ and ‘Yama’ means ‘to control or extend’. So, Prānāyāma is the way by which we consciously control and direct our breath to make ourselves happier and healthier.
Why is Prānāyāma Important for students?
Just like we need healthy food to stay physically fit, likewise to keep the body energised and calm the mind, we need to do Prānāyāma practices. It’s especially helpful for students because it helps with focus during studies, staying calm during exams, and even feeling more energised for sports or daily activities.
Benefits of Prānāyāma
Improves our concentration
Reduces stress
Feeling more energised
Calms the mind
Try practicing Prānāyāma for a few minutes every morning. You will feel ready to take on your day with more energy and less stress.
In this grade let us practice what we had learnt in the previous grade like
1. Sectional Breathing
Sectional breathing is a preparatory breathing practice for Prānāyāma. It corrects the wrong breathing pattern and increases the vital capacity of the lungs.
2. Nādīśuddhi Prānāyāma
Nādīśuddhi Prāṇāyāma is a simple and powerful technique that balances the flow of Prānā (life force) and cleans the subtle energy channels.
3. Bhrāmarī Prānāyāma
Bhrāmarī Prāṇāyāma is a calming technique, which has a soothing effect on the mind and nervous system.
(Refer to Khel Yatra Grade 6 textbook for the above practices).
Let us learn how to perform Bhrāmarī Prānāyāma by adopting Shanmukhi Mudra:
Shanmukhi means six gates or faces. Shanmukhi mudra involves redirecting the awareness inside by closing the six doors of outer perception, the two eyes, the two ears, the nose and the mouth. This practice promotes a state of Pratyāhāra. In other words, it closes the six gates of perception in the head with the fingers of both hands.
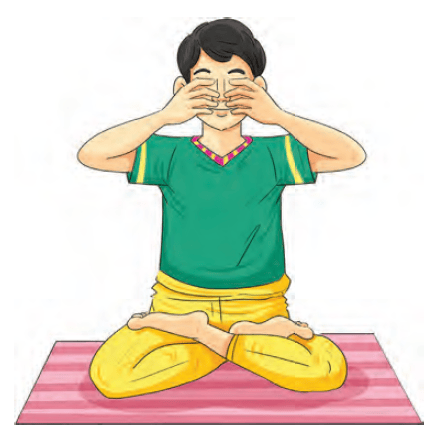
• Sit in Sukhāsana with the spine erect, face smiling and eyes gently closed.
• Now raise both the arms to shoulder level, bend your elbows and close the ears with the thumb.
• Place the index finger gently on the eyelids, middle finger on both the nostrils and ring and small finger above and below the lips as shown in the picture.
• Inhale slowly and deeply and fill the lungs completely.
• As you exhale, make a steady, low-pitched humming sound like a bee. (Makara sound from Omkāra chanting)
• Feel the vibration of the sound resonate throughout your head and body. Repeat the practice five times.
Benefits of Shanmukhi Mudra
• Shanmukhi Mudra calms the mind and nervous system.
• It also balances internal and external awareness.
• It also enhances focus and helps in managing anxiety.
Note for the teacher
• Ask the students whether they could feel the resonance during the practice.
• Ask about their state of mind after the practice.
In this grade let us learn about Bhastrikā Prānāyāma stepwise.
Bhastrikā Prānāyāma
Bhastrikā is a special breathing exercise that gets its name from ‘bellows’, because it's like breathing in and out like a bellows. You can do it slowly or quickly, whichever feels comfortable.
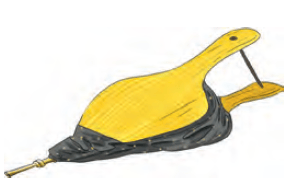
During Bhastrikā, you breathe deeply and fully, so your body gets lots of oxygen. You use your chest like a bellows to breathe in and out strongly.
There are two parts to Bhastrikā — the first part is like a cleansing breath, and the second part is slower and calmer. That’s why Bhastrikā is sometimes called a bridge between cleansing breaths and calmer breathing exercises.
Stepwise practice of Bhastrikā Prānāyāma
Step 1: It in a comfortable posture Sukhāsana or Vajrāsana. Keep the head and spine straight, and close the eyes and relax the whole body.
Step 2: Take a deep breath through both nostrils and fill the lungs with air.
Step 3: After full inhalation, quickly exhale continuously for 5 times. This completes one round of Bhastrika.
Step 4: Continue this practice for 3 rounds.
Benefits
• Bhastrikā Prānāyāma strengthens the lungs and improves blood circulation.
• It relaxes the body and mind and improves concentration.
Note for the teacher
• Ensure the students gently practice this Prānāyāma without any jerks.
Mudras
Introduction to hand mudras
Let us explore hand mudras! Have you ever seen pictures of saints or gods with their hands in special positions? These are called hand mudras.
Mudras are hand gestures that help connect our body, mind and energy. The word ‘mudra’ means ‘gesture’ or ‘seal’ in Sanskrit. They are like special hand signals that can help our energy flow freely.
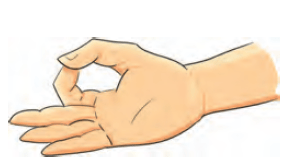
People have been using mudras for a very long time to feel better physically and mentally.
In this grade let us learn about Jnana mudra.
Jnana Mudra is an important and simple mudra which calms the mind.
Stepwise practice of Jnana mudra
1. Sit in a comfortable posture Sukhāsana or Vajrāsana or on a chair with the back straight.
2. Place your hands on thighs with your palm facing upward.
3. Now gently touch the tip of the thumb with the tip of the index finger. Do not press hard.
4. Stretch the other finger straight, let the palm be facing upward.
5. Keep the focus on your breath.
6. Practice it for 10 minutes every day.
Benefits
• Jnana Mudra reduces mental tension, anger and stress.
• It increases memory power.
• It gives energy to the brain and muscles.
We also learnt Shanmukhi Mudra with Bhrāmarī Prānāyāma in the previous chapter.
Note for the teacher
• Encourage students to practice this mudras everyday especially before studies.
Pratyāhāra
Hello students,
Have you heard of Pratyāhāra?
Pratyāhāra is a special tool which helps us to focus. It is a cool way to develop our concentration and remain calm.
Pratyāhāra is the 5th step of Ashtāṅga Yoga, which teaches us how to concentrate deeper and stronger.
So, in this grade let us learn how to reduce distraction by doing the below activity.
Activity to develop focus by engaging your ear to the sound of a bell
• Let us listen to the sound of a temple bell. Listen closely as it starts with a strong 'bong!' and then continues to ring. Notice how the ringing changes — it might be loud at first and then become softer and softer until it finally disappears. Try to feel the vibrations of the sound within you.
Dhārana, Dhyāna and Samādhi
Dhārana means single point concentration and involves keeping the mind study and focus.
Dhārana is like learning to use a focus for your mind. It is about training your mind to pay attention to just one thing, like focusing sunlight with a magnifying glass.
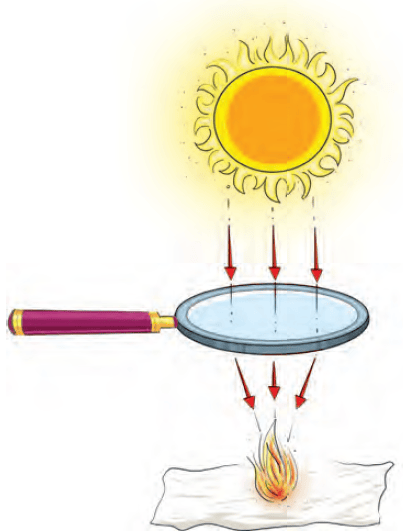
When your mind is focused, it helps you study better, concentrate on tasks and mangae your thoughts. You can practice Dhārana by choosing something to focus on, like your breath or a word, and trying to keep your mind from wandering. This skill, along with Dhyāna, helps you find inner peace and is an important part of Yoga.
In the previous grade, we learnt about jatru trataka, which improves our focus. Let us continue the practice in this grade.
Let us practice Dhārana by focusing on a single point. Jatru Trataka is yogic gazing that helps to bring one pointed concentration or focus. It is a practice where the gaze is fixed on an object or the target. Before starting it is a good idea to cleanse your eyes with cold water.
Cleansing of eyes using the palms:
Wash your hands with soap thoroughly. Make a cup of your right palm and fill it with clean water. Now, immerse your right eyeball in this water. Blink the eyes for few rounds. Repeat the same practice with the left eye.
Jatru trataka
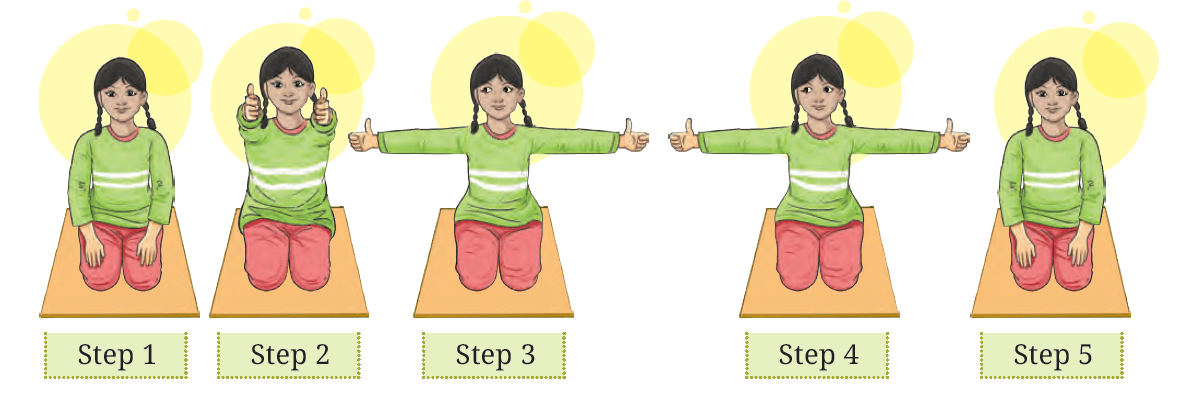
Step 1: Sit in Vajrāsana or Sukhāsana comfortably. Keep your eyes open and hands on the thighs.
Step 2: Now stretch both the hands in front, make fists out of them while the thumbs raised upwards.
Step 3: Move both the hands towards both the shoulders parallel to the ground and keep gazing at the tip of the thumbs. Stretch the hands sideways as far as possible until the reach of the vision.
Step 4: Maintain this position for a while by holding the hands at both the ends. Slowly move the hands back to the original position while gazing at the tip of the thumbs. Do not move the head but move only the eyeballs sideways.
Repeat this practice for 3–5 rounds.Step 5: After the practice do simple palming and relax in Vajrāsana or Sukhāsana.
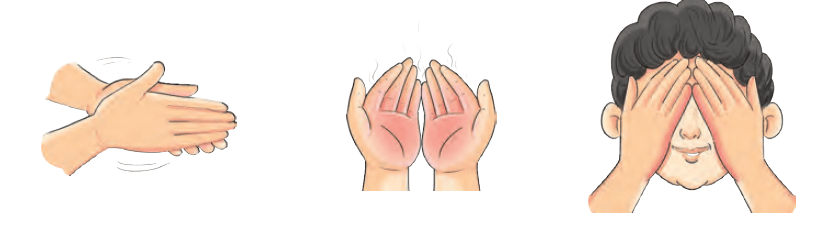
Simple palming procedure
• Rub both palms until they become warm.
• Cup your palms and place them gently over the eyes (do not put pressure on the eyeballs).
• Keep your eyes closed.
• Keep your palms on your eyes for 10–15 seconds, then gently lift them.
Benefits
• Sideways viewing of Jatru trataka relaxes the muscles around the eyes.
• It also prevents and corrects squint.
• It also improves eyesight, vision and concentration.
Limitations: 7
Students with severe headaches should avoid this practice.
Note for the teacher
• Ensure that students remove their glasses and wrist watches.
• Encourage them to sit with the head, neck and spine erect during the practice.
• Always open your eyes with a few blinks.
• Ensure palming is done after each practice.
• For up and down and right and left movement of the Jatru trataka refer to the Khel Yatra Grade 6 textbook.
Dhyāna
Dhyāna means meditation. When we focus really hard on one thing (this is called Dhārana), our mind starts to calm down. This calmness and stillness is Dhyāna.
Dhyāna helps us feel peaceful inside, even when things around us are noisy or chaotic. Imagine training your mind to focus on one thing like a laser beam that’s Dhārana.
Both Dhārana and Dhyāna can help you focus better in school, stay calm during exams, and feel more peaceful in your everyday life.
Activity
Simple Meditation Exercise
Now let us learn simple meditation technique step by step.
• Sit in a comfortable posture Sukhāsanā or Vajrāsanā with spine erect and eyes closed.
• Now slowly move your awareness on your breath. Observe your breathing for a few seconds as you breathe in and breath out.
• If thoughts come into your mind, don’t worry. Just gently bring your attention back to your breath.
• Practice this for a few minutes. This is Dhyāna, where you focus on your breath and let your mind become calm and peaceful.
Panchakosha Meditation
Just like a house has different rooms like the living room, kitchen, and bedroom, our bodies also have different layers. We learned about these layers in Chapter 1.
In this grade, let's go on an inner journey to explore these layers within ourselves through meditation. This inner journey will help us understand ourselves better and feel more peaceful and happy.
Step-by-step practice of Panchakosha meditation
1. Sit comfortably in Sukhāsanā with the head, neck and spine in a straight line. Keep the body relaxed.
2. Now gently close your eyes, become aware of your surroundings and sounds around you. Begin by gently scanning your body, be aware of your head, shoulders, chest, waist, back, abdomen, arms and legs notice any sensation or any areas of tension. Acknowledge these sensations without judgement. This is your Annamaya kosha, the physical body. Observe it for a few seconds and relax the physical body.
3. Now shift your focus to your breath. Bring your awareness between your nostrils and observe the air entering the nostrils as you breathe in and breathe out. Observe your breathing slows down and is more continuous and rhythmic. Be aware of the breath as your lungs expands and contracts. This is your Pranamaya kosha. Observe for a few seconds and enjoy the lightness of the body.
4. Now observe the thoughts that arise in your mind. Notice how they come and go like clouds in the sky. Simply acknowledge them and gently bring your attention back to your breath. Now shift your awareness and become aware of the sensation in your body. You might start feeling uncomfortable sitting in one position for a long time and want to move your legs or you might experience some kind of itching sensation on your skin, nose, etc., This is a reflexive mental chatter that comes from your mind. This is your Manomaya Kosha.
5. Try not to respond to it, but continue to observe your breath. Connect with your inner wisdom and ask yourself “What brings me joy”. Gently listen to the inner guidance that arises. This is your Vijnanamaya Kosha.
6. Now shift your awareness deep in sight. Now centre your awareness to your heart, relax deeply, Keep breathing smoothly and evenly. Now allow yourself to settle in a state of complete tranquility. Enjoy the sense of great joy and gratitude within you. It is a space of perfect stillness, silence and happiness. There is no fear or desire. This is your Anandamaya Kosha. Now simply be aware of your own awareness.
7. Return your awareness to your breath, become aware of your surroundings. Observe that your breathing is slow and continuous. Take a moment to relax and absorb this experience before you get up.
8. Now gently rub your palms, place it on your eyes and open your eyes into your palms.
Benefits
• Panchakosha meditation calms the mind and reduces stress.
• It improves focus and self-awareness.
• It brings peace and happiness.
Note for the teacher
• Encourage students to share their experiences with meditation.
• Let students focus on breath, observe their thoughts and feelings during the practice.
Samadhi
Samadhi is the ultimate state of consciousness. It is a transcending thought. You are only aware of yourself and are connected to your true nature love, joy and strength. This is the ultimate goal that we seek to achieve in life.
Krīdā Yoga
Yoga is a process for all round personality development. Krīdā yoga plays an important part in this process. Krīdā yoga means yoga through games. It is a fun and active way to practise yoga through different kinds of playful activities. Krīdā yogacombines yoga movements with games to help you build flexibility, strength and focus while having fun with your classmates.
These games are easy to learn and play and ensure total participation. These games not only give us an insight into our state of awareness but also help us to develop it.
Here are a few games which you can play with your friends in the class or with members of your family.
Yoga of Reflection
Yoga of reflection is an indoor game, normally played in groups. This game develops focus and mindfulness by copying the movements of the opponents. This game also improves concentration, body awareness and coordination.
How to play
1. Divide the class into two groups,
2. Let the students pair up and face each other.
3. One student leads and performs a Yoga pose or movement slowly, while the other student tries to mirror their movements exactly.
4. Each student maintains the pose for 1 minute. Then, the other student mirrors the pose for 1 minute.
Note for the teacher
• The game is to be played for a maximum of 5 minutes.
• Variations are encouraged to make the game interesting.
• Ensure all students participate in the game.
• Please explain the following takeaways and learnings to the students.
Learnings from this game
• Promotes active engagement and focus
• Promotes physical and mental stability
• Encourages body awareness
• Improves communication skills
• Strengthens trust and cooperation
• Promotes patience and resilience
Assessment for Yoga Unit
1. Yoga for Daily Life
Match the following
1. Annamaya Kosha - (a) Mind Sheath
2. Pranamaya Kosha - (b) Wisdom Sheath
3. Manomaya Kosha - (c) Physical Sheath
4. Vijnanamaya Kosha - (d) Bliss Sheath
5. Anandamaya Kosha - (e) Energy Sheath
Answer the following
|
S.No. |
Riddles |
List the practices you were able to do for each kosha |
|
1. |
Annamaya Kosha |
|
|
2. |
Pranamaya Kosha |
|
|
3. |
Manomaya Kosha |
|
|
4. |
Vijnanamaya Kosha |
|
|
5. |
Anandamaya Kosha |
Teachers’ evaluation
|
Criteria |
Excellent (4 points) |
Good (3 points) |
Fair (2 points) |
Needs Improvement (1 point) |
Points Earned |
Teacher’s Comments |
|
Understanding of Koshas and their functions |
Demonstrates deep understanding and provides detailed, accurate answers. |
Shows good understanding with accurate answers and examples. |
Demonstrates basic understanding but with some inaccuracies or lack of detail. |
Struggles to understand the concepts |
||
|
Connecting practices and personal insights |
Clearly connects practices to Koshas |
Connects few practices to Koshas |
Makes some connections |
Struggles to connect practices |
2. Yoga Sadhana
Yoga Riddles
|
S.No. |
Riddles |
Answer |
|
1. |
In this pose, you pretend to sit, with strength in your thighs, you will benefit. Named after a chair but without one in sight, Which yoga pose am I right? |
|
|
2. |
I stand tall like a tree, With my arms reaching high, My legs are firm and strong, I am a pose; can you tell me why? |
|
|
3. |
I am a pose that makes you strong, Like a brave warrior, all day long. Kneeling down with legs spread wide, My name is spoken with pride. |
|
|
4. |
I have two heads but only one face. I give strength and grace to your shoulders. My name comes from a cow's head; it's true, But I help you stretch and feel brand new. |
|
|
5. |
I stretch your back, Like a bow, you bend without any crack. Your hands hold your feet with a strong grip, What am I? Be careful, you can quickly slip! |
|
|
6. |
I stand on my shoulders with the head resting on the ground, A pose of strength and balance all around. In Sanskrit, my name means "every part," What am I, young friend? Speak from your heart. |
|
|
7. |
I am a pose that makes you calm and free, Like a fish in water, that's the key. My name comes from the Sanskrit word for fish, Can you guess what pose I wish? |
|
1. Utkaṭāsana 2. Gomukhasana 3. Sarala Dhanurasana 4. Sarvāṅgāsana 5. Matsyāsana
Evaluation for Āsana
|
Criteria |
Excellent (4 points) |
Good (3 points) |
Fair (2 points) |
Needs Improvement (1 point) |
Points Earned |
Teacher’s Comments |
|
Correct identification of asanas |
Correctly identifies all asanas. |
Correctly identifies 5–6 asanas. |
Correctly identifies 3–4 asanas. |
Correctly identifies 2 or fewer asanas. |
||
|
Understanding of Asana Descriptions |
Demonstrates clear comprehension of all riddle clues and connects them to the correct asanas. |
Demonstrates good comprehension of most riddle clues and makes accurate connections. |
Demonstrates basic comprehension but struggles with some clues. |
Demonstrates limited comprehension of the riddle clues. |
||
|
Participation and Engagement |
Shows strong engagement and enthusiasm in solving the riddles. |
Shows good engagement and participates actively. |
Shows moderate engagement and participates passively |
Shows limited engagement and minimal participation. |
PrāṆāyāma Riddles
|
S.No. |
Riddles |
Answer |
|
1. |
I am a breathing practice known to calm the mind. |
|
|
2. |
I am a breathing exercise known for its buzzing sound. |
|
1. Nadi Shuddhi Prāṇāyāma 2. Bhramari Prāṇāyāma
Evaluation for Prānāyāma
|
Criteria |
Excellent (4 points) |
Good (3 points) |
Fair (2 points) |
Needs Improvement (1 point) |
Points Earned |
Teacher’s Comments |
|
Correct identification of Prāṇāyāma |
Correctly identifies both Prāṇāyāma practices. |
Correctly identifies one Prāṇāyāma practice. |
Attempts to answer but both answers are incorrect. |
Does not attempt to answer. |
||
|
Understanding of Prāṇāyāma Descriptions |
Demonstrates clear comprehension of all riddle clues and connects them to the practices. |
Demonstrates good comprehension of most riddle clues and makes accurate connections. |
Demonstrates basic comprehension but struggles with some clues. |
Demonstrates limited comprehension of the riddle clues. |
||
|
Participation and Engagement |
Shows strong engagement and enthusiasm in solving the riddles. |
Shows good engagement and participates actively. |
Shows moderate engagement and participates passively. |
Shows limited engagement and minimal participation. |
Suggested Session Plans for Teachers
Session plan for Yoga
|
Month 1 |
||||
|
3rd period |
6th period |
9th period |
12th period |
|
|
Yoga for Daily Life |
Introduction to Yoga (10 mins) |
Introduction to Panchakosha (10 mins) |
Introduction to Panchakosha (10 mins) |
Introduction to Panchakosha (10 mins) |
|
Yoga Sādhana |
Sukshma Vyayama (10 mins) |
Sukshma Vyayama (10 mins) |
Sukshma Vyayama (10 mins) |
Shithilikarna vyayama (10 mins) |
|
Krīḍā Yoga (15 mins) |
Shithilikarna vyayama (10 mins) |
Krida yoga (15 mins) |
Introduction to Suryanamaskara (10 mins) |
|
|
|
Mudra (5 mins) |
|
Relaxation (5 mins) |
|
|
Month 2 |
||||
|
15th period |
18th period |
21th period |
24th period |
|
|
Yoga for Daily Life |
Activity related to Panchakosha (10 mins) |
Test 1 Assessment (10 mins) |
Introduction to Ashtanga Yoga (10 mins) |
Introduction to Yama (10 mins) |
|
Yoga Sādhana |
Sithilikarna vyayama (10 Mins) |
Sukshma Vyayama (10 mins) |
Sukshma Vyayama (5 mins) |
Shithilikarna vyayama (5 mins) |
|
Suryanamaskara (10 mins) |
Krida yoga (15 mins) |
Breathing practices (10 mins) |
Suryanamaskara (5 mins) |
|
|
Relaxation (5 mins) |
|
Introduction of Asana (Revision of previous class asanas) (10 mins) |
Introduction to Prāṇāyāma (revision of previous class) (15 mins) |
|
|
Month 3 |
||||
|
27th period |
30th period |
33rd period |
36th period |
|
|
Yoga for Daily Life |
Introduction to Niyama (10 mins) |
Iswara Pranidhana – Story (10 mins) |
Activity (10 mins) |
MID - TERM ASSESSMENT |
|
Yoga Sādhana |
Sukshma vyayma (5 mins) |
Sithilikarna vyayama (5 Mins) |
Sithilikarna vyayama (5 mins) |
|
|
Breathing practices (10 mins) |
Suryanamaskara (5 mins) |
Suryanamaskara (5 mins) |
||
|
Introduction to Utkatasana (10 mins) |
Revision of Utlatasana (10 mins) |
Introduction to Gomukasana (10 mins) |
||
|
|
Relaxation (5 mins) |
Relaxation (5 mins) |
||
|
Month 4 |
||||
|
39th period |
42nd period |
45th period |
48th period |
|
|
Yoga for Daily Life |
Pratyahara (10 mins) |
Activity related to Pratyahara (10 mins) |
Revision of Asthanga Yoga (10 mins) |
Revision (10 mins) |
|
Yoga Sādhana |
Sukshma vyayama (10 mins) |
Sithilikarna vyayama (5 mins) |
Sithilikarna vyayama (5 mins) |
Sukshma vyayama (5 mins) |
|
Prāṇāyāma- Naadishuddi, Brahmari, Introduction to Jnana Mudra (15 mins) |
Suryanamaskara (5 mins) |
Breathing practices (10 mins) |
Suryanamaskara (5 mins) |
|
|
|
Introduction to Sarala Dhanurasana (15 Mins) |
Introduction to Bhastrika (10 mins) |
Relaxation (5 mins) |
|
|
|
|
|
Bhastrika (10 mins) |
|
|
Month 5 |
||||
|
51st period |
54th period |
57th period |
60th period |
|
|
Yoga for Daily Life |
Revison of Panchakosha (10 mins) |
Test-2 Assessment (10 mins) |
Revision of Ashtanga Yoga (10 mins) |
|
|
Yoga Sādhana |
Sithilikarna vyayama (5 mins) |
Sithilikarna vyayama (5 mins) |
Sukshma vyayama (5 mins) |
Sithilikarna vyayama (5 mins) |
|
Suryanamaskara (5 mins) |
Suryanamaskara (5 mins) |
Suryanamaskara (5 mins) |
Suryanamaskara (5 mins) |
|
|
Sarala Dhanurasana (10 mins) |
Introduction to Jatru Trataka – Revision of previous grade (15 mins) |
Introduction to Sarvagasana and Matyasana (10 mins) |
Revision of Sarvagasana and Matyasana (10 mins) |
|
|
Introduction to Simple Meditation (5 mins) |
|
Relaxation (5 mins) |
Introduction to Panchakosha meditation (15 mins) |
|
|
Month 6 |
||||
|
63rd period |
66th period |
69th period |
72th period |
|
|
Yoga Sādhana |
Sithilikarna vyayama (5 mins) |
Sithilikarna vyayama (5 mins) |
Sithilikarna vyayama (5 mins) |
|
|
Suryanamaskara (5 mins) |
Suryanamaskara (5 mins) |
Suryanamaskara (5 mins) |
||
|
Revision of Asanas (10 mins) |
Relaxation (5 mins) |
Revision of Asana (10 mins) |
||
|
Nadishuddi Prāṇāyāma and Brahmari Prāṇāyāma with Shanmukhi Mudra (10 mins) |
Nadishuddi Prāṇāyāma and Brahmari Prāṇāyāma with Shanmukhi Mudra (10 mins) |
Relaxation (5 mins) |
||
|
Introduction to Panchakosha Meditation (5 mins) |
Jatru Trataka (10 mins) |
Pankosha Meditation (10 mins) |
||
Yoga module for practice at home - Duration 30 minutes
|
YMPH - 2 |
Duration in minutes |
YMPH - 2 |
Duration in minutes |
|
Opening Prayer |
2 |
Opening Prayer |
2 |
|
Loosening Practices (Sūkshma Vyāyāma and Śithalīkarana Vyāyāma) |
|
Loosening Practices (Sūkshma Vyāyāma and Śithalīkarana Vyāyāma) |
|
|
Aṅgulī Śakti Vikāsaka |
1 |
Forward-backward bending |
1 |
|
Maṇi Bandha Śakti Vikāsaka |
1 |
Side bending |
1 |
|
Maṇi Bandha chakra |
1 |
Bending and twisting |
1 |
|
Kehuni Śakti Vikāsaka |
1 |
Twisting |
1 |
|
Skandha Chakra |
1 |
Breathing Practices |
|
|
Greevasanchālana |
1 |
Vygrahāsana |
2 |
|
Breathing Practices |
|
Suryanamaskar |
5 |
|
Marjariasana |
1 |
Asanas |
|
|
āsanas |
|
Gomukhāsana |
1 |
|
Utkatāsana |
1 |
Sarala Dhanurāsana |
1 |
|
Sarala Dhanurāsana |
1 |
Sarvāṅgasana |
1 |
|
Sarvāṅgasana |
1 |
Matsyāsana |
1 |
|
Matsyāsana |
5 |
Relaxation |
5 |
|
Relaxation |
5 |
Prāṇāyāma |
|
|
Prāṇāyāma |
|
Bhastrika |
1 |
|
Sectional Breathing |
5 |
Nādīśuddhi Prāṇāyāma |
2 |
|
Dhyana |
|
Bhrāmarī Prāṇāyāma |
1 |
|
Simple Meditation |
5 |
Dhyana |
|
|
Closing Prayer |
2 |
Simple Meditation |
2 |
|
|
|
Closing Prayer |
2 |
Suggestive Annual Session Plan
Three sports are introduced in Grade 7— Teachers has to opt any two as per the administrative feasblity.
| Period | Unit No. | Session Type | Activity Name | Activity Number | C'lative |
|---|---|---|---|---|---|
| 1 | Unit 1 | Type 2 | The Ball Progression Game | PE - 1 | PE - 1 |
| 2 | Unit 1 | Type 2 | Ghorpadiche Shepoot | PE - 2 | PE - 2 |
| 3 | Unit 6 | Yoga | Yoga for Daily Life | YG - 1 | YG - 1 |
| 4 | Unit 1 | Type 2 | Nalugu Rallu Ata | PE - 3 | PE - 3 |
| 5 | Unit 1 | Type 2 | Gidhada Gudkavan | PE - 4 | PE - 4 |
| 6 | Unit 6 | Yoga | Panchakosha | YG - 2 | YG - 2 |
| 7 | Unit 1 | Type 2 | Stand Up, Speak Out | PE - 5 | PE - 5 |
| 8 | Unit 1 | Type 2 | Harassment Prevention Skit | PE - 6 | PE - 6 |
| 9 | Unit 6 | Yoga | Activity on Panchakosha | YG - 3 | YG - 3 |
| 10 | Formative Assessment | FA-1 | FA-1 | ||
| 11 | Unit 2 | Type 1 | Set It Up, Knock It Down | MF - 1 | MF - 1 |
| 12 and 13 | Unit 2 | Type 1 | Dhaan Ki Bori | MF - 2 | MF - 3 |
| 13 | Unit 6 | Yoga | Yama | YG - 4 | YG - 4 |
| 14 | Unit 2 | Type 1 | Stand Up, Speak Out | MF - 3 | MF - 4 |
| 15 | Unit 2 | Type 1 | Harassment Prevention Skit | MF - 4 | MF - 5 |
| 16 | Unit 6 | Yoga | Niyama | YG - 5 | YG - 5 |
| 17 | Unit 2 | Type 1 | Skipping Race | MF - 5 | MF - 6 |
| 18 and 19 | Unit 2 | Type 1 | Atya-patya | MF - 6 | MF - 8 |
| 19 | Unit 6 | Yoga | A Journey of Oneness | YG - 6 | YG - 6 |
| 20 | Unit 2 | Type 1 | Food for Health | MF - 7 | MF - 9 |
| 21 and 22 | Unit 2 | Type 1 | Dapo Nyarka Sunam | MF - 8 | MF - 10 |
| 23 | Unit 6 | Yoga | Activity on Yama and Niyama | YG - 7 | YG - 7 |
| 24 | Unit 2 | Type 1 | Madhu and Manu | MF - 9 | MF - 11 |
| 25 | Unit 2 | Type 1 | Skipping Song | MF - 10 | MF - 12 |
| 26 | Formative Assessment | FA-2 | FA-2 | ||
| 27 | Unit 6 | Yoga | Yoga Sādhana | YG - 8 | YG - 8 |
| 28 and 29 | Unit 3 / Unit 4 | Type 3 | Forehand Grip and Air Toss / Kicking the Ball with the Inside of the Foot | FSA 1 | FSA 2 |
| 30 and 31 | Unit 3 / Unit 4 | Type 3 | Backhand Grip and Air Toss / Receiving by the Inside of the Foot | FSA 2 | FSA 4 |
| 32 | Unit 6 | Yoga | Sūkṣma Vyāyāma | YG - 9 | YG - 9 |
| 33 and 34 | Unit 3 / Unit 4 | Type 3 | Footwork Skills / Passing the Rolling Ball | FSA 3 | FSA 6 |
| 35 and 36 | Unit 3 / Unit 4 | Type 3 | Backhand Low Serve / Step Trapping | FSA 4 | FSA 8 |
| 37 | Unit 6 | Yoga | Śīthalikarana Vyāyāma | YG - 10 | YG - 10 |
| 38 and 39 | Unit 3 / Unit 4 | Type 3 | Backhand Lift / Dribble | FSA 5 | FSA 10 |
| 40 and 41 | Unit 3 / Unit 4 | Type 3 | Forehand Lift / Feinting | FSA 6 | FSA 12 |
| 42 and 43 | Unit 6 | Yoga | Sūrya Namaskāra | YG - 11 | YG - 12 |
| 44 and 45 | Unit 3 / Unit 4 | Type 3 | Forehand High Serve / Kicking the Ball for Accuracy | FSA 7 | FSA 14 |
| 45 and 46 | Unit 3 / Unit 4 | Type 3 | Forehand Low Serve / Passing the Ball in the Air | FSA 8 | FSA 16 |
| 47 | Unit 6 | Yoga | Āsana | YG - 12 | YG - 13 |
| 48 and 49 | Unit 3 / Unit 4 | Type 3 | Forehand Drive / Pass and Move Relay Drill | FSA 9 | FSA 18 |
| 50 and 51 | Unit 3 / Unit 4 | Type 3 | Backhand Drive / Interception | FSA 10 | FSA 20 |
| 52 | Unit 6 | Yoga | Utkaṭāsana | YG - 13 | YG - 14 |
| 53 and 54 | Unit 3 / Unit 4 | Type 3 | Forehand Overhead Clear / Front Block Tackling | FSA 11 | FSA 22 |
| 55 and 56 | Unit 3 / Unit 4 | Type 3 | Forehand Overhead Drop / Goal Keeping | FSA 12 | FSA 24 |
| 57 | Unit 6 | Yoga | Gomukhāsana | YG - 14 | YG - 15 |
| 58 | Formative Assessment | FA-3 | FA-3 | ||
| 59 and 60 | Unit 3 / Unit 4 | Type 4 | Badminton Match / 5-a-side Match | FSA 13 | FSA 26 |
| 61 and 62 | Unit 5 | Type 3 | Raiding Foot Work | KB - 1 | KB - 2 |
| 63 | Unit 6 | Yoga | Dhanurāsana | YG - 15 | YG - 16 |
| 64 and 65 | Unit 5 | Type 3 | Hand Touch | KB - 2 | KB - 4 |
| 65 and 66 | Unit 5 | Type 3 | Toe Touch | KB - 3 | KB - 6 |
| 67 | Unit 6 | Yoga | Sarvāṅgasana | YG - 16 | YG - 17 |
| 68 and 69 | Unit 5 | Type 3 | Kick | KB - 4 | KB - 8 |
| 70 and 71 | Unit 5 | Type 3 | Ankle-hold | KB - 5 | KB - 10 |
| 72 | Unit 6 | Yoga | Matsyāsana | YG - 17 | YG - 18 |
| 73 and 74 | Unit 5 | Type 3 | Thigh-hold | KB - 6 | KB - 12 |
| 75 and 76 | Unit 5 | Type 3 | Knee-hold | KB - 7 | KB - 14 |
| 77 | Unit 6 | Yoga | Breathing Practices | YG - 18 | YG - 19 |
| 78 and 79 | Unit 5 | Type 3 | Wrist-hold | KB - 8 | KB - 16 |
| 80 and 81 | Unit 5 | Type 3 | Waist-hold | KB - 9 | KB - 18 |
| 82 | Unit 6 | Yoga | Breathing Practices | YG - 19 | YG - 21 |
| 83 - 85 | Unit 5 | Type 3 | Chain-hold | KB - 10 | KB - 21 |
| 86 | Unit 6 | Yoga | Prāṇāyāma | YG - 20 | YG - 22 |
| 87 | Formative Assessment - FA-4 | FA-4 | FA-4 | ||
| 88 | Unit 6 | Yoga | Mudrās and Pratyāhāra | YG - 21 | YG - 23 |
| 89 | Unit 6 | Yoga | Dhāraṇa, Dhyāna and Samādhi | YG - 22 | YG - 24 |
| 90 - 95 | Unit 3 / Unit 4 | Type 3 | Revision of all the fundamental skills | FSA 1 - FSA 12 | FSA 31 |
| 96 and 97 | Unit 3 / Unit 4 | Type 4 | Badminton Game / 5-a-side Match | FSA 13 | FSA 33 |
| 98 - 105 | Unit 5 | Type 3 | Revision of all the fundamental skills | KB 1 - KB 10 | KB - 28 |
| 105 and 106 | Unit 5 | Kabaddi Game | - | KB - 30 | |
| 107-120 | Summative Assessment | SA-1 | FA-5 | ||
Summative-Assessment
Read the statement and tick the most suitable answer for you.
Safety on the Ground
|
1 |
2 |
3 |
4 |
5 |
|
I think the games could be safer. |
Some games are safer than others. |
Most of the games are safe. |
All the games are safe. |
If the games are not safe, we change them to make them safe. |
Caring Attitude
|
1 |
2 |
3 |
4 |
5 |
|
I like to play alone. |
Sometimes, I like to play with my classmates. |
I like to play in the group most of the time. |
I always like to play in a group. |
I like playing in a group because I can understand the benefits of playing with others. |
Understand Bullying
|
1 |
2 |
3 |
4 |
5 |
|
Bullying does not happen around me. |
Bullying happens around me, and I am able to identify bullying. |
I am able to identify bullying, and I speak up when it happens. |
I am able to identify bullying and sympathise with the victim. |
I am able to stand against bullying if it happens around me. |
Understand Harassment
|
1 |
2 |
3 |
4 |
5 |
|
Harassment does not happen around me. |
Harassment happens, and I am able to identify it. |
I am able to identify harassment, and I speak up when it happens. |
I am able to identify harassment and sympathise with the victim. |
I am able to stand against harassment if it happens around me. |
Emotion Control
|
1 |
2 |
3 |
4 |
5 |
|
I find it difficult to control my emotions. |
I get frustrated only when things are not going my way. |
Occasionally, I lose control and get frustrated, but I recover very soon. |
I am able to stay calm during the game. |
I am able to stay calm and help others to calm down. |
Agility
Test: T - Test
• Time: ................ seconds
Cardiovascular Endurance
Test: 600-m Run/Walk
• Time: ................ minutes
or
Test: 3-Minute Step Test (Measure heart rate after)
• HR: ................ bpm
Strength and Muscular Endurance
Push-Ups (Max in 1 Min)
• Count: ................ reps
Squats (Max in 1 Min)
• Count: ................ reps
Plank Hold (Time)
• Time: ................ seconds
Flexibility
Sit-and-Reach Test (Measure reach in inches past toes)
• Inches: ................
Speed
50-Meter Sprint
• Time: ................ seconds
Badminton Assesment
Serve (Backhand low Serve, Forehand High Serve and Forehand low serve)
|
1 |
2 |
3 |
4 |
5 |
|
Student is learning how to control the racket and shuttle as they serve. |
Student is making simple serves and working on accuracy and consistency |
Student can occasionally change up serves and have a moderate level of accuracy. |
Student can modify their technique as per the requirement and serve consistently with good placement. |
Student use a variety of serves with accuracy, control, and strategy. |
Lift (Backhand Lift and Forehand Lift)
|
1 |
2 |
3 |
4 |
5 |
|
Student is learning how to control lifts in order to get the shuttle over the net |
Student has trouble with consistency, height, and distance of the lifts |
Student raises the shuttle with a respectable height and depth with control |
Student lifts the shuttle to the backcourt consistently and precisely |
Student use strategically positioned lifts in rallies and execute them with accuracy. |
Drive (Forehand and Backhand)
|
1 |
2 |
3 |
4 |
5 |
|
Student is able to hit the drive with improvement in timing and control |
Student can hit drives, but lacks consistency, speed, and direction. |
Control has improved as the student hits the drives with respectable speed and accuracy. |
Can keep opponent under pressure by executing quick and controlled drives. |
Confidently executes strong, accurate drives and intelligently employ them throughout rallies. |
Football Assesment
Passing and receiving the ball while looking to the partner
|
1 |
2 |
3 |
4 |
5 |
|
The student tries to spot the teammate while learning how to pass and receive the ball. |
Can pass and receive the ball, but occasionally have trouble with awareness and accuracy. |
Student is getting better at passing and receiving while searching for a teammate. |
Searches the field for options while making accurate passes, and receiving the ball. |
Passes and receives with confidence and accuracy while keeping teammate’s position in mind. |
Dribble
|
1 |
2 |
3 |
4 |
5 |
|
Student is getting better at controlling the ball while dribbling. |
Can dribble the ball but needs to work on awareness and control. |
Can dribble fairly well and occasionally look up to check the field. |
Can use both feet while keeping head up to make decisions and maintaining strong ball control. |
Can use both feet to dribble with confidence and full control while keeping the head up. |
Goalkeeping
|
1 |
2 |
3 |
4 |
5 |
|
Student is learning the basics of goalkeeping, with a focus on positioning and simple saves. |
Student is getting better at placement while being able to make regular saves. |
Communicates with the defence, distributes the ball well, and handles the majority of shots with assurance. |
Regularly makes difficult saves, controls the area during set pieces, and initiates attacks with well- placed strikes. |
Excel in all aspects of goalkeeping, including shot-stopping, distribution, and leadership |
Kabbadi Assessment
Touch (Hand Touch and Toe Touch)
|
1 |
2 |
3 |
4 |
5 |
|
Student is learning how to balance while attempting to touch with hands and toes. |
Student can do simple hand and toe touches but have trouble with speed and precision. |
Occasionally avoids defenders and perform hand and toe touches with respectable control. |
Student is agile and aware on how to make rapid, calculated touches. |
Confidently makes accurate hand and toe movements, avoiding opponents with agility and planning. |
Hold (Ankle Hold, Knee Hold and Thigh Hold)
|
1 |
2 |
3 |
4 |
5 |
|
Student is getting better at controlling grip on the raider's leg, knee, or ankle. |
Tries holds, but occasionally have trouble with timing and grip strength. |
Using holds with respectable strength and skill the student slowdowns the raider. |
Successfully halts the raider with powerful, well-timed holds. |
Uses strategy and control to secure the raider with strong, accurate holds executed with assurance. |
Hold (Wrist Hold and Waist Hold)
|
1 |
2 |
3 |
4 |
5 |
|
Student is becoming better at controlling grip on the raider's waist or wrist. |
Tries waist and wrist holds, but needs to improve timing and grip strength. |
Using holds with respectable strength and skill the student makes it difficult for the raider to get away. |
Successfully halts the raider's movement with firm, well-timed holds. |
Executes solid, well-planned holds with assurance, keeping the raider from getting away. |
Self-Assessment Questionnaire – 1
1. Yoga for Daily Life
Match the following
1. Annamaya Kosha - (a) Mind Sheath
2. Pranamaya Kosha - (b) Wisdom Sheath
3. Manomaya Kosha - (c) Physical Sheath
4. Vijnanamaya Kosha - (d) Bliss Sheath
5. Anandamaya Kosha - (e) Energy Sheath
Answer the following
|
S. no. |
Riddles |
List the practices you were able to do for each kosha |
|
1. |
Annamaya Kosha |
|
|
2. |
Pranamaya Kosha |
|
|
3. |
Manomaya Kosha |
|
|
4. |
Vijnanamaya Kosha |
|
|
5. |
Anandamaya Kosha |
|
Teachers’ evaluation
|
Criteria |
Excellent (4 points) |
Good (3 points) |
Fair (2 points) |
Needs Improvement (1 point) |
Points Earned |
Teacher’s Comments |
|
Under standing of Koshas and their Functions |
Demon strates deep understand ing and provides detailed, accurate answers. |
Shows good understand ing with accurate answers and exam ples. |
Demonstrates basic under standing but with some inaccuracies or lack of detail. |
Struggles to understand the concepts |
|
|
|
Connecting Practices and Personal Insights |
Clearly connects practices to Koshas |
Connects few practices to Koshas |
Makes some connections |
Struggles to connect practices |
|
|
2. Yoga Sadhana
YOGA RIDDLES
|
S.No. |
Riddles |
Answer |
|
1. |
In this pose, you pretend to sit, with strength in your thighs. Named after a chair but without one in sight, Which Yoga pose am I? |
|
|
2. |
I have two heads but only one face. I give strength and grace to your shoulders. My name comes from a cow’s head; it’s true, But I help you stretch and feel brand new. |
|
|
3. |
I stretch your back, Like a bow, you bend without any crack. Your hands hold your feet with a strong grip, Be careful, you can quickly slip! What am I? |
|
|
4. |
I stand on my shoulders with the head resting on the ground. A pose of strength and balance all around. In Sanskrit, my name means “every part,” What am I, young friend? |
|
|
5. |
I am a pose that makes you calm and free. Like a fish in water, that’s the key. My name comes from the Sanskrit word for fish, Can you guess what pose am I? |
|
1. Utkaṭāsana 2. Gomukhasana 3. Sarala Dhanurasana 4. Sarvāṅgāsana 5. Matsyāsana
Evaluation for Āsana
|
Criteria |
Excellent (4 points) |
Good (3 points) |
Fair (2 points) |
Needs Improvement (1 point) |
Points Earned |
Teacher’s Comments |
|
Correct Identifi cation of Asanas |
Correctly identifies all asanas. |
Correctly identifies 5–6 asanas. |
Correctly identifies 3–4 asanas. |
Correctly identifies 2 or fewer asanas. |
|
|
|
Understand ing of Asana Descriptions |
Demonstrates clear compre hension of all riddle clues and connects them to the correct asanas. |
Demon strates good comprehen sion of most riddle clues and makes accurate connections. |
Demonstrates basic compre hension but struggles with some clues. |
Demonstrates limited com prehension of the riddle clues. |
|
|
|
Participa tion and Engagement |
Shows strong engagement and enthu siasm in solving the riddles. |
Shows good engagement and partici pates active ly. |
Shows mod erate engage ment and participates passively. |
Shows limited engagement and minimal participation. |
|
|
Prā āyāma Riddles
|
S.No. |
Riddles |
Answer |
|
1. |
I am a breathing practice known to calm the mind. I clear the air passages, leaving worries behind. I balance the energies with each inhale and exhale. |
|
|
2. |
I am a breathing exercise known for its buzzing sound. I help calm the mind and bring peace around. My name is derived from a buzzing bee, What am I, can you tell, and set your mind free? |
|
1. Nadi Shuddhi Prāṇāyāma 2. Bhramari Prāṇāyāma
Evaluation for Prānāyāma
|
Criteria |
Excellent (4 points) |
Good (3 points) |
Fair (2 points) |
Needs Improvement (1 point) |
Points Earned |
Teacher’s Comments |
|
Correct Identifi cation of Prāṇāyāma |
Correctly identi f ies both Prāṇāyāma practices. |
Correctly identi f ies one Prāṇāyāma practice. |
Attempts to answer but both answers are incorrect. |
Does not attempt to answer. |
|
|
|
Under standing of Prāṇāyāma Descrip tions |
Demon strates clear comprehen sion of all riddle clues and connects them to the practices. |
Demon strates good comprehen sion of most riddle clues and makes accurate connections. |
Demonstrates basic compre hension but struggles with some clues. |
Demonstrates limited com prehension of the riddle clues. |
|
|
|
Participa tion and Engagement |
Shows strong engagement and enthu siasm in solving the riddles. |
Shows good engagement and partici pates active ly. |
Shows mod erate engage ment and participates passively. |
Shows limited engagement and minimal participation. |
|
|
Annexure
T-Test for Agility (Fitness Test Procedure)
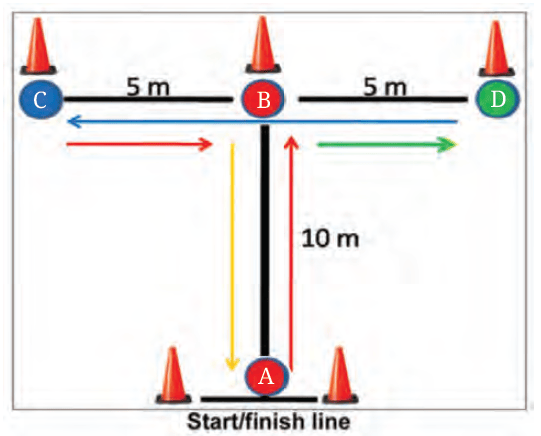
Purpose
The T-Test measures agility, speed, and body control, which are important for sports and overall fitness.
Equipment Needed
• Four cones or markers
• A stopwatch
• A flat surface (like a gym floor or open field)
Setup
1. Place the cones in a T-shape as follows:
• Cone A (starting line)
• Cone B (10 meters straight ahead of A)
• Cone C (5 meters to the left of B)
• Cone D (5 meters to the right of B)
Procedure
1. Start at Cone A in a ready position.
2. Sprint forward to Cone B and touch it with your right hand.
3. Side-shuffle left to Cone C and touch it with your left hand.
4. Side-shuffle right to Cone D and touch it with your right hand.
5. Side-shuffle back to Cone B and touch it again.
6. Run backward to Cone A as fast as possible.
7. Stop the timer when the participant crosses Cone A.
Scoring
• Record the time (in seconds) taken to complete the test.
• Faster times indicate better agility.
Guidelines for Accuracy
• Keep feet parallel during side shuffles.
• Ensure proper hand touches at each cone.
• Perform 3 trials and take the best time.
Cardiovascular Endurance
Meter Run/Walk Test
The 600-Meter Run/Walk Test measures cardiovascular endurance and assesses how well a person can sustain moderate to high-intensity activity over a short distance.
Equipment Needed
• Stopwatch
• Measuring tape (if the track is not pre-marked)
• Flat running surface (track or open field)
• Cones or markers (to indicate start and finish points)
Procedure
1. Warm-up: Perform 5-10 minutes of light jogging and stretching.
2. Starting Position: Stand behind the start line in a ready position.
3. Go! Start running or walking as fast as possible when the instructor gives the signal.
4. Maintain a steady pace and try to complete the 600 meters without stopping.
5. Finish Line: Stop the timer as soon as the participant crosses the finish line.
6. Record the total time taken to complete the 600 meters.
Scoring
• The time is recorded in minutes and seconds.
• Faster times indicate better endurance.
• Compare improvement over time instead of using fixed benchmarks.
Guidelines for Accuracy
• Encourage steady pacing—don’t sprint too fast at the start.
• Use the same track and conditions for retests to ensure consistency.
3-Minute Step Test
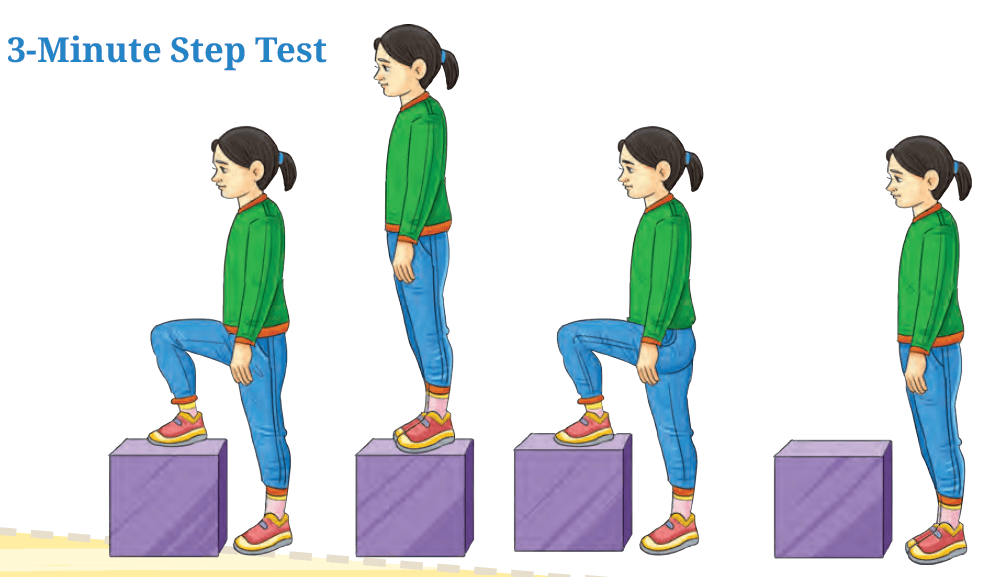
Purpose
The 3-Minute Step Test measures cardiovascular endurance by evaluating how quickly the heart recovers after exercise.
Equipment Needed
• A 12-inch (30 cm) step or bench
• Stopwatch
• Metronome or music with a 96 beats-per-minute (bpm) rhythm
• Heart rate monitor (optional) or manual pulse counting
Procedure
1. Warm-up: Perform light stretching and jogging for 5 minutes.
2. Step Pattern:
• Step up with one foot.
• Step up with the other foot.
• Step down with one foot.
• Step down with the other foot.
• Maintain a steady up-up-down-down rhythm.
3. Step to the Beat:
• The pace should be 96 steps per minute (24 complete steps per minute).
• Continue stepping for 3 minutes without stopping.
4. After 3 Minutes:
• Sit down immediately.
• Wait 5 seconds, then measure your pulse for 1 full minute.
• Count beats at the wrist (radial artery) or neck (carotid artery).
5. Record your heart rate (beats per minute).
Scoring
• Lower heart rates indicate better cardiovascular fitness.
• Compare results with previous tests to track improvement.
Guidelines for Accuracy
• Use a consistent stepping speed.
• No extra movements—keep the upper body relaxed.
• Use the same step height for all tests.
• Ensure proper posture and breathing throughout.
Strength and Muscular Endurance
Push-Ups Test (Maximum Reps in 1 Minute)
Purpose
The Push-Up Test measures upper body strength and endurance, focusing on the chest, shoulders, and triceps.
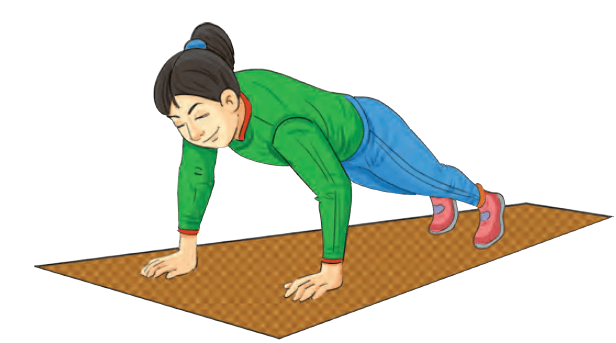
Equipment Needed
• Flat surface (gym floor or mat for comfort)
• Stopwatch
• Partner or instructor to count reps and check form
Procedure
1. Starting Position:
• Place hands shoulder-width apart on the floor.
• Keep your body straight from head to heels.
• Feet should be together or slightly apart.
2. Performing the Push-Up:
• Lower your chest until it’s about 90 degrees at the elbows or until it nearly touches the ground.
• Push back up to full arm extension.
• Keep a steady pace—no stopping!
3. Counting Reps:
• Only correct form counts.
• If the body sags or hips rise too much, that rep does not count.
4. Test Duration:
• Perform as many push-ups as possible in 1 minute.
Scoring
• Record the total number of correct push-ups.
• Compare results over time to track improvement.
Guidelines for Accuracy
• No faulty movements—only full push-ups count!
• Keep body straight (avoid sagging or bending knees).
• Use the same testing method for all students (standard push-up or modified knee push-up for those who need it).
Squat Test (Maximum Reps in 1 Minute)
Purpose
The Squat Test measures lower body strength and endurance, targeting the quadriceps, hamstrings, glutes, and core.
Equipment Needed
• Flat surface (gym floor or mat for comfort)
• Stopwatch
• Partner or instructor to count reps and check form
Procedure
1. Starting Position:
• Stand with feet shoulder width apart.
• Keep your chest up and back straight.
• Hands can be on hips or extended forward for balance.
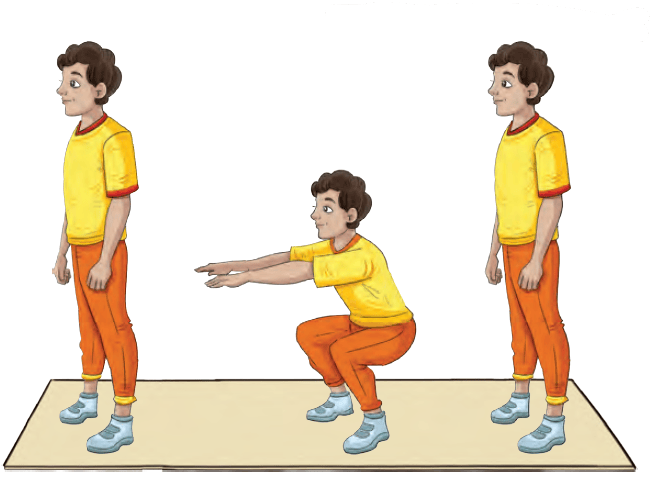
2. Performing the Squat:
• Lower your body until thighs are parallel to the ground (90-degree angle at knees).
• Keep knees aligned with toes (avoid knees collapsing inward).
• Push back up to the starting position.
• Maintain a steady rhythm—no pausing!
3. Counting Reps:
• Only correct squats count.
• If depth is too shallow or form is incorrect, the rep does not count.
4. Test Duration:
• Perform as many squats as possible in 1 minute.
Scoring
• Record the total number of correct squats.
• Compare results over time to track improvement.
Guidelines for Accuracy
• Keep heels on the ground—no tiptoeing.
• No bouncing or half-squats—thighs must reach parallel.
• Use the same testing conditions for consistent results.
Plank Hold Test (Maximum Time)
Purpose
The Plank Hold Test measures core strength and endurance, engaging the abdominal muscles, lower back, shoulders, and legs.
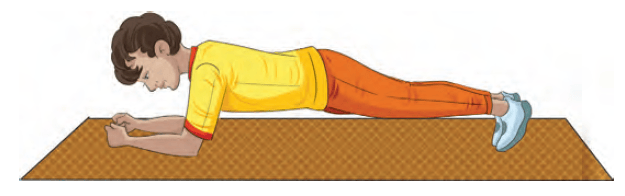
Equipment Needed
• Flat surface (gym floor or mat for comfort)
• Stopwatch
• Partner or instructor to track time and check form
Procedure
1. Starting Position:
• Get into a forearm plank position:
• Elbows directly under shoulders.
• Arms bent at 90 degrees.
• Keep your body straight from head to heels.
• Feet should be hip-width apart.
2. Performing the Plank:
• Hold the plank position for as long as possible.
• Maintain proper form—no sagging hips or raised buttocks.
• Breathe normally throughout.
3. Ending the Test:
• The test ends when the participant can no longer hold proper form or chooses to stop.
• Record the total time held (in seconds or minutes).
Scoring
• Record the longest time the plank is held.
• Compare results over time to track improvement.
Guidelines for Accuracy
• Keep the body in a straight line—no arching or drooping.
• Ensure elbows remain under shoulders for balance.
• Use the same testing conditions each time for consistency.
Flexibility
Sit-and-Reach Test (Flexibility Measurement)
Purpose
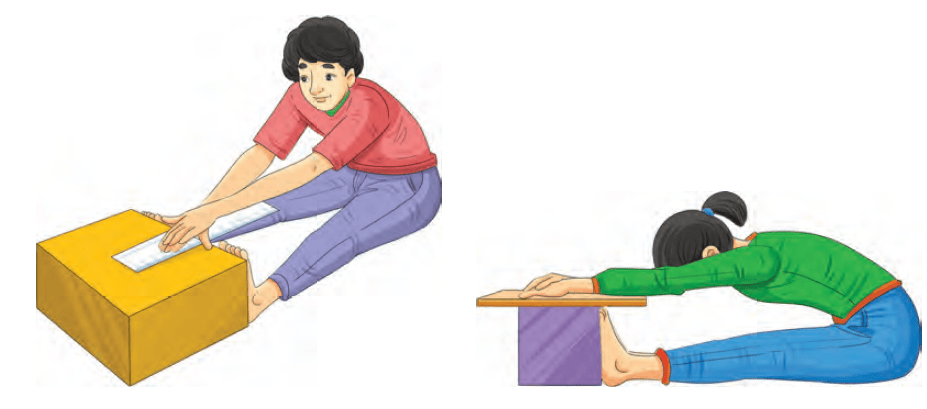
The Sit-and-Reach Test measures hamstring and lower back flexibility. Good flexibility in these areas helps with posture, injury prevention, and overall mobility.
Equipment Needed
• Sit-and-reach box (or a ruler/tape measure placed on the floor)
• Flat, non-slippery surface
• Partner or instructor to measure the reach
Procedure
1. Starting Position:
• Sit on the floor with legs fully extended and feet flat against the box (or with heels 12 inches apart if using a ruler).
• Keep knees straight and feet flexed (toes pointing upward).
2. Performing the Test:
• Reach forward slowly and steadily with both hands.
• Keep hands one on top of the other and palms facing downward.
• Hold the stretch for at least 2 seconds at the farthest point.
• No bouncing or jerky movements—it must be a smooth reach.
3. Measuring the Reach:
• Measure the distance from the starting point (toes = 0 inches) to the farthest reach.
• If the fingertips do not reach the toes, record a negative score (e.g., -3 inches).
• If the fingertips go beyond the toes, record a positive score (e.g., +4 inches).
4. Best of Three Attempts:
• Perform three trials and record the best score.
Guidelines for Accuracy
• No bending knees—they must stay straight throughout.
• Ensure a smooth reach—no bouncing.
• Use the same testing method for accurate comparison over time.
Speed
Purpose
The 50-Meter Sprint Test measures speed and acceleration, assessing how quickly a person can cover a short distance.
Equipment Needed
• Flat, non-slippery running surface (track or field)
• Measuring tape (to mark 50 meters)
• Cones or markers (for start and finish lines)
• Stopwatch
• Partner or instructor to time the sprint
Procedure
1. Warm-Up: Perform dynamic stretching and light jogging for 5–10 minutes.
2. Starting Position:
• Stand behind the starting line in a ready sprint stance.
• One foot should be slightly in front of the other.
• Arms bent at 90 degrees and body leaning slightly forward.
3. Sprint Execution:
• Run as fast as possible from start to finish.
• Maintain good sprinting form (knees high, arms swinging).
4. Timing the Sprint:
• Stopwatch starts when the runner begins moving.
• Stopwatch stops when the runner torso crosses the finish line.
5. Recording the Time:
• Record the best time from two trials (allowing enough rest between attempts).
Guidelines for Accuracy
• Ensure a standing start (no rolling starts).
• Use the same timing method for all students.
• Run in proper footwear to avoid slipping.