
UNIT 3
Fundamental Skills of Sports
Athletics
Athletics have a positive impact on human development throughout the physical training phase of education. The appropriate operation and physical development of the human body is assured by carefully chosen activities and their application in all age groups and physical education fields. Running, jumping, throwing, and walking all contribute to the growth and development of the physiological system as well as fundamental physical and technical skills.
Furthermore, athletics is a way to develop character and willpower during training and competition. Physical education teachers may assist in development characteristics like willpower, determination, resoluteness, self-discipline, team spirit, and awareness to succeed by observing how athletes behave throughout practice and competition.
Running
Running is a method of terrestrial locomotion by which humans and other animals move quickly on foot. Running is an aerial gait in which the feet are above the ground. Running is one of the most essential athletic skills, requiring proper technique, speed, endurance, and coordination.
TECHNIQUES TO START THE RACE
There are two types of starts:
-
Crouch start or Sitting start: This is used for all running events up to 400-metre. It allows the runner to react to the sound and start the race as fast as possible by properly positioning their centre of gravity in the ‘set’ position. In a short-distance race, the outcome is decided by a quick start and an increased acceleration capacity. Modern starting techniques use three different types of starting positions, which are outlined below:
(a) Bunch or Bullet start
(b) Medium start
(c) Elongated start
- Standing start: This type of start is commonly used in middledistance and long-distance races. The athlete begins in an upright position, with one foot slightly ahead of the other, and starts running smoothly when the race begins. This start allows for better pacing and control over longer distances. In this Grade you will only learn about Crouch or Sitting Start.

Crouch or Sitting Start
The crouch start is an essential technique for sprinting events, allowing athletes to generate maximum acceleration.
Block Placement and Adjustment
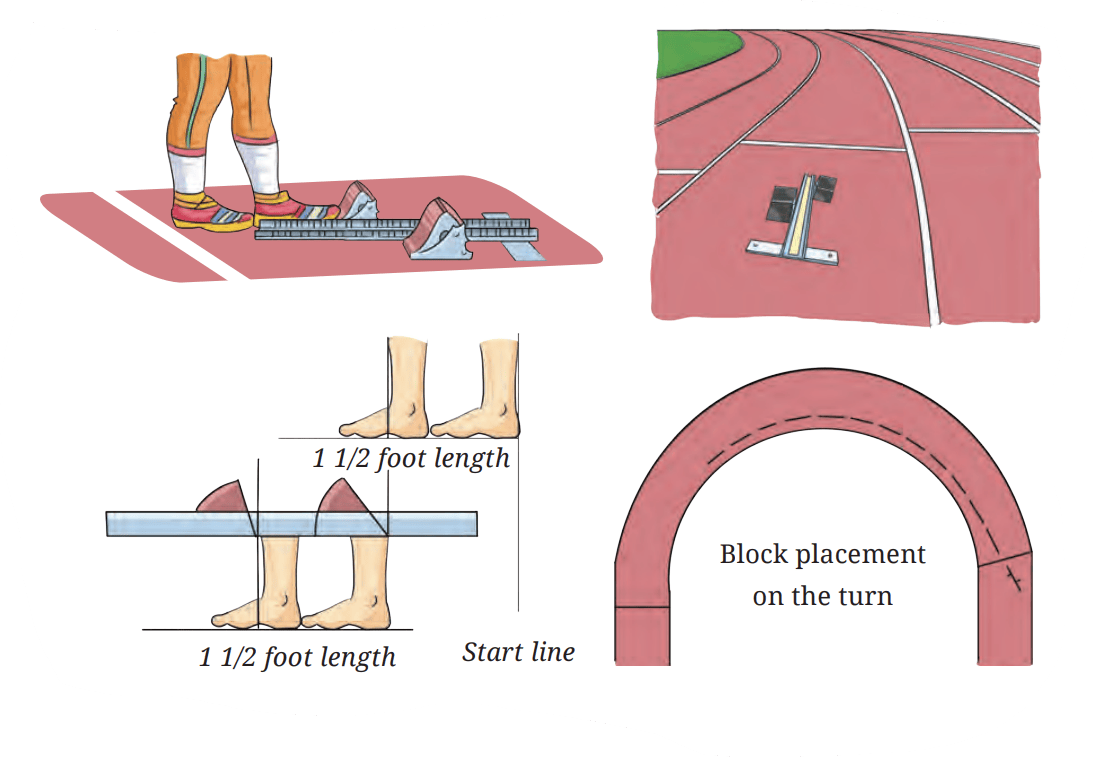
1. ON YOUR MARKS POSITION
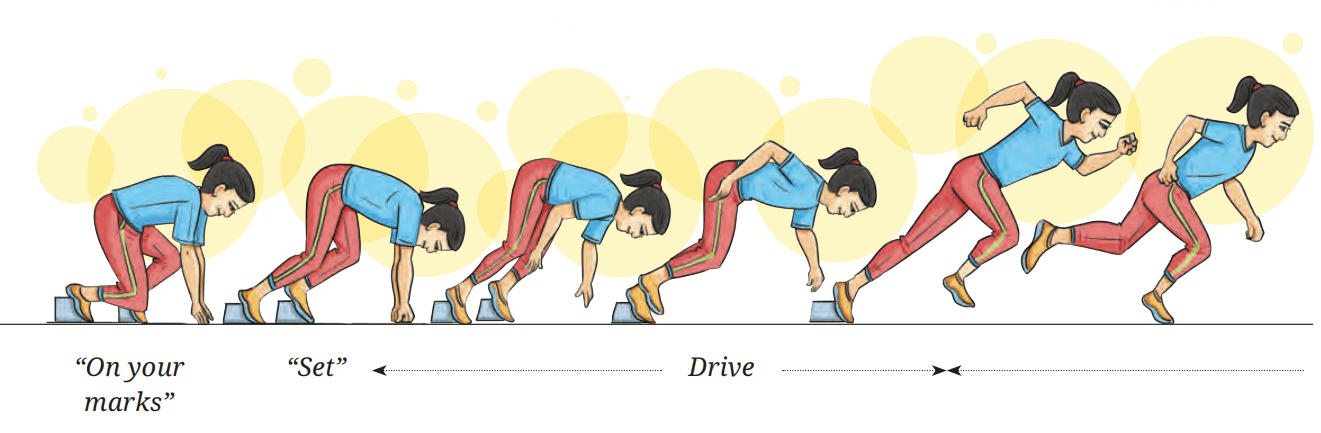
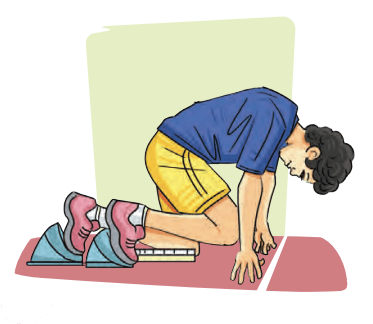
- On the command “On your marks”, the runners assume the position for the crouch start.
- They take a position directly in front of the starting blocks.
- The foot of the stronger leg is placed on the front block and the foot of the other leg on the rear block.
- Care should be taken that only the tip of the foot touches the ground and that the rear foot is pressed firmly against the block.
- The knee of the rear leg is now placed on the ground. Both hands (shoulder width apart) contact the ground with the thumbs.
- The thumb and the index finger are spread so that they form a high bridge.
- Head carriage is relaxed, and the eyes are focused on a point on the ground.
Teachers should
- Ensure that the blocks are appropriately set up for the runner.
- Observe the runner’s posture including the head position.
- Check that the hand position is comfortable and correctly placed.
2. SET POSITION
- At “set”, the runners raise their hips by lifting the knee of the rear leg off the ground.
- The body weight is distributed almost evenly over the four supporting areas.
- The head remains in a natural, relaxed position.
- The ‘set’ position conveys to the runner’s body the preliminary tension necessary for a powerful start from the blocks.
- In order to achieve a high initial speed, the angles of both legs are of particular importance. An angle of about 90° at the front knee and of about 110° to 130° at the rear knee is appropriate.
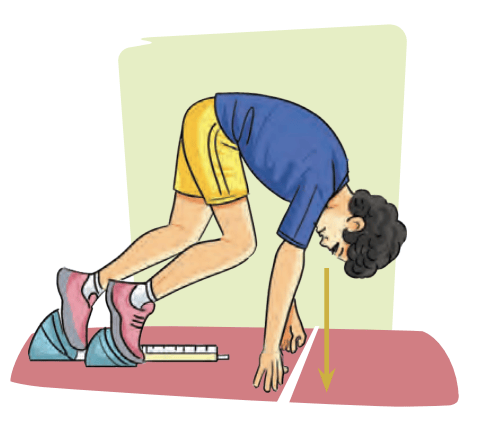
Teachers should
- Observe from the front and side.
- Observe the position of the trunk and the limbs.
- Ensure that runners are stable.
- Confirm that the runner’s focus is on sprinting from the blocks.
3. DRIVE PHASE
- At “go”, the sprinter starts without any delay.
- A quick response to the gun is of major importance for a fast start.
- The power exerted on the blocks when starting will transmit the highest possible initial velocity to the runner’s body.
- This is brought about by an explosive pushing of both legs against the blocks.
- The main technical skills in the leg action are:
- After coming off the rear starting block, the push-off leg starts to drive forward, that is, the thigh is rapidly drawn forward and upward.
- The leading leg should remain in an approximately horizontal position.
- Proper arm action:
- The arms have an important function in helping to produce the starting acceleration.
- Pay special attention to the action of the arms.
- The movement of the swinging leg requires that the respective arm swings forward and upward.
- The arm tends to bend increasingly at the elbow until it reaches an angle of about 90° in the final phase of the movement.
Teachers should
- Observe the speed of reaction to the gun and the sequence of movement.
- Observe the speed and extension of the knee and hip joints.
- Ensure that the athlete optimises the drive from the blocks.
- Observe that the arms move quickly so that there is a coordinated leg balance.
- In this process, at the first swing towards the forehead, the elbow has a slight outward spread.
- The opposite arm performs a corresponding countermovement backwards.
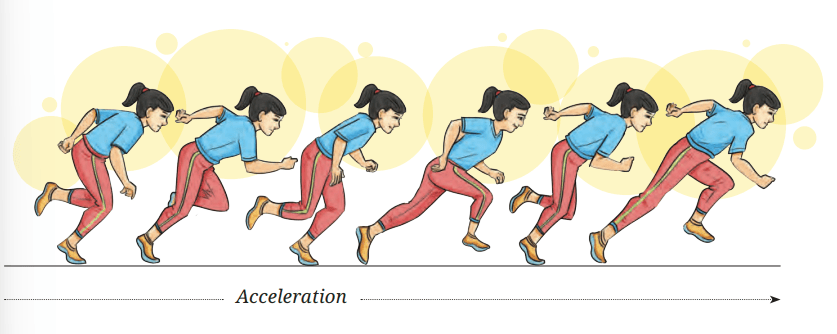
4. ACCELERATION PHASE
- At the beginning of the acceleration phase, the runner has a marked forward body lean.
- With an increasing rate and length of stride, the angle of inclination gradually decreases, so that after 20m the runner reaches the normal sprinting position.
- The forward body lean should be at its maximum when the front foot comes off the starting block and during the initial strides.
- A good body lean is a function of the power exerted by the push-off force during the first few strides.
- The greater this force, the smaller the angle between the runner’s body and the ground.
- Runners with a poor push-off force will come to an upright position sooner.
- In some cases, runners with a good push-off force prematurely assume an upright position because they raise their heads immediately after the start in order to look up to the finish.
- Upon the command “on your marks”, the body weight is either distributed over both legs or is already over the front leg.
- Upon the command “set”, the flexion of the front knee is in most cases increased and in all runners, the body weight is now over the front leg.
- The upper body is bent forward.
- If the time lag between the commands “set” and “go” is long, it will result in the danger of a false start due to a further forward shift of the body’s centre of gravity.
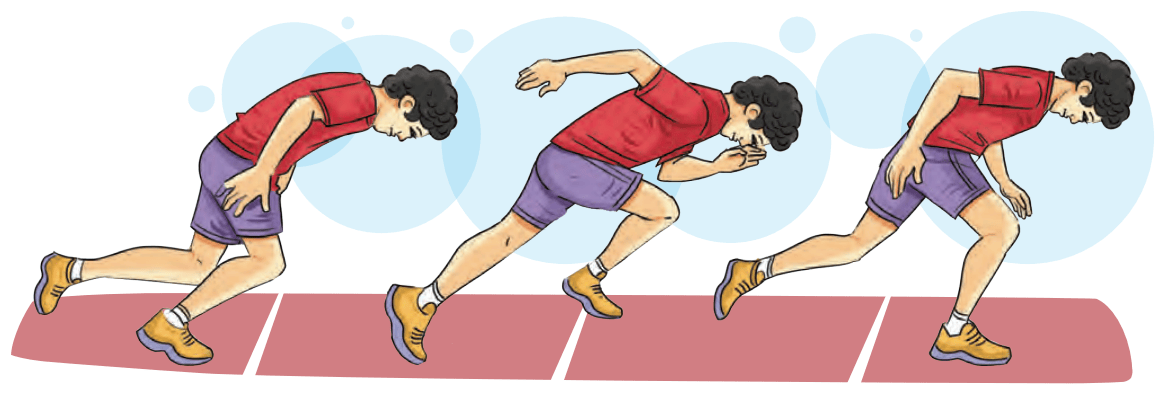
Teachers should
- Observe the action of the limbs and position of the trunk and head.
- Observe the increase in stride length and frequency.
- Ensure that the runner’s transition into the sprinting action is smooth.
5. FINISH PHASE
- The runner maintains top speed through the finish line.
- The runner leans forward slightly to break the finish line faster.
- The runner uses proper arm drive and stride control to sustain momentum.
- The runner avoids decelerating too soon to ensure the best possible time.
- The following techniques can be used to attain optimal finishing position
- Run Through: This technique involves maintaining full speed beyond the finish line to ensure the best possible race time.
- Lunge: In a close race, an athlete may extend one leg forward and lean their upper body towards the finish line to break the tape first.
- Shoulder Shrug: Moving one shoulder forward at the finish line can help an athlete gain an advantage in a very close race by crossing the line first.
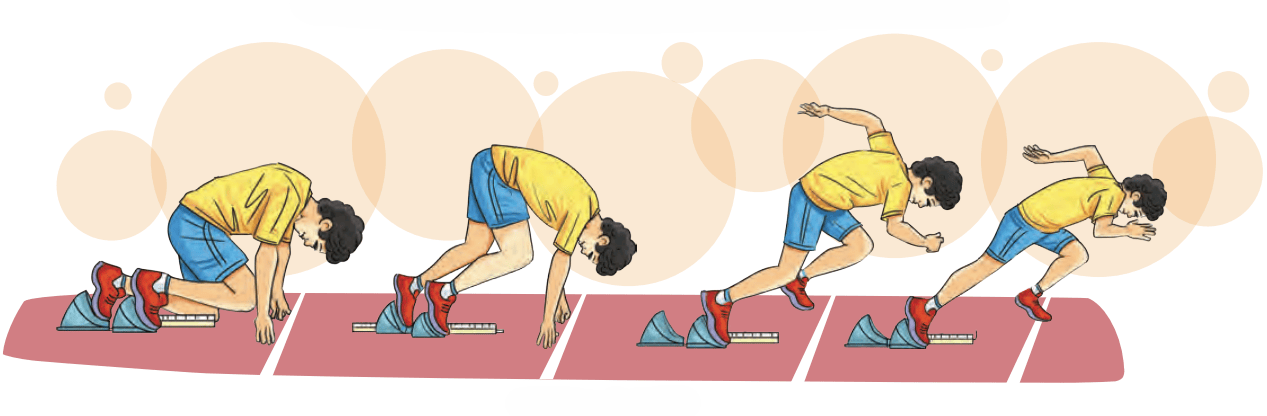
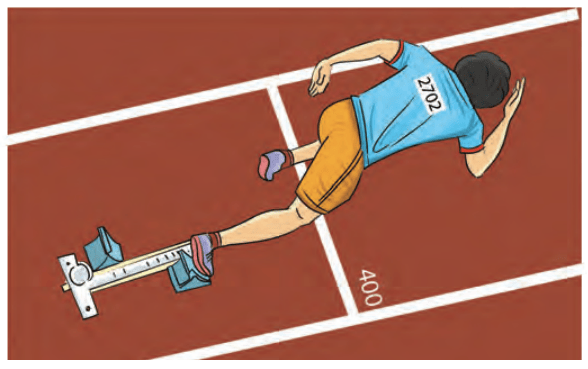
Crouch shuttle run
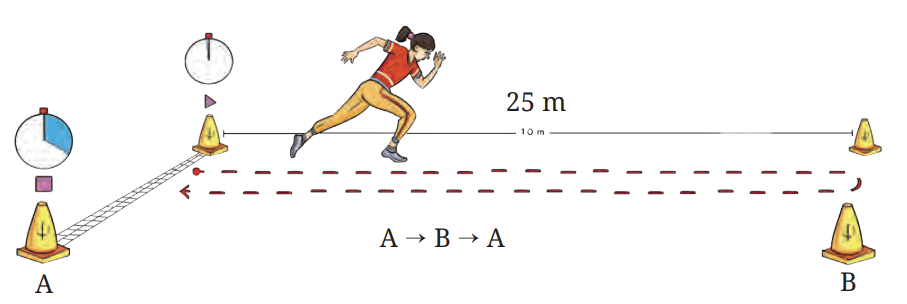
- Mark two lines 25 metres away from each other.
- Name the lines A and B.
- On the command ‘‘On your Mark’’, take the crouch position behind the starting line A to start the shuttle run.
- On the command ‘‘Set’’, take the four-touch position as explained in ‘‘Start’’.
- On the command ‘‘Go’’ or the whistle sound, start running to the other line B, touch the line and come back to the starting line A.
- Touch the starting line A and start running to the other line B again, and repeat it.
- First one to cover the distance 4 times from A to B, B to A, A to B and B to A will be the winner.
Circle time — Awareness of the reaction time, acceleration and balance
- Discuss how awareness of the distance between the starting line and your step length can be beneficial for your start.
- Discuss how the distance between the starting line and your foot can affect your balance.

Chase and Tag
- Make two groups, ‘A’ and ‘B’.
- All members of Group A will slowly run/walk towards a line 15 m ahead.
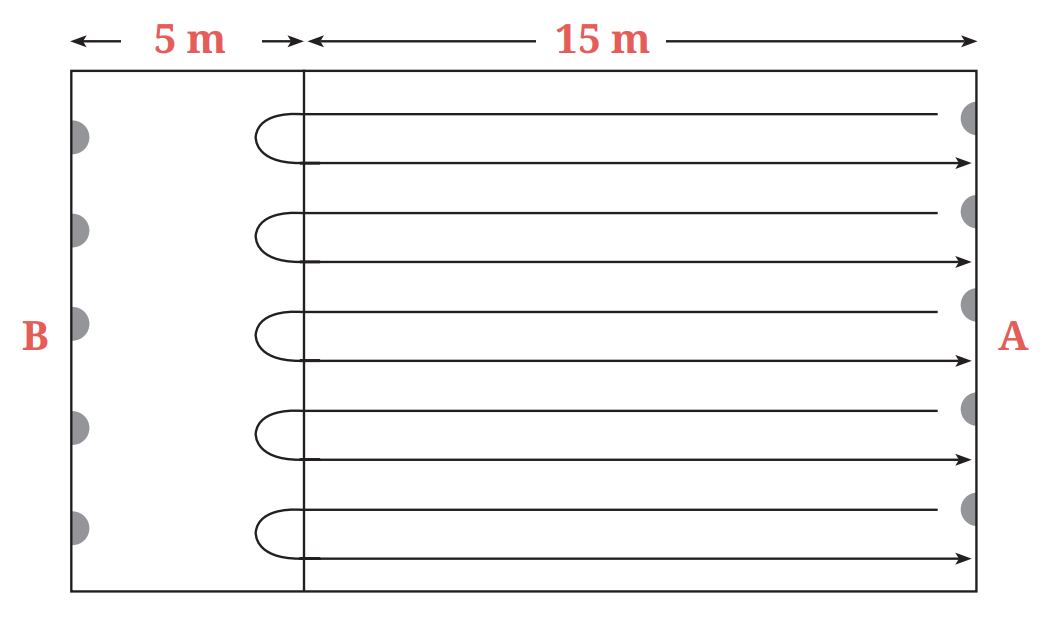
- The runners will touch the line 15 m ahead and accelerate back to the starting line.
- Members of Group B should be 5 metres away from the 15 m line.
- Once a member of Group A touches the line and runs back towards the starting line, members of Group B will attempt to tag the members of Group A.
Circle time — Proper technique
Discuss how using the proper technique was important for saving timeDid You Know
Cadence: Number of steps taken per minute or the
rate at which a person walks or runs.
Calculate your cadence.

Reaction Game
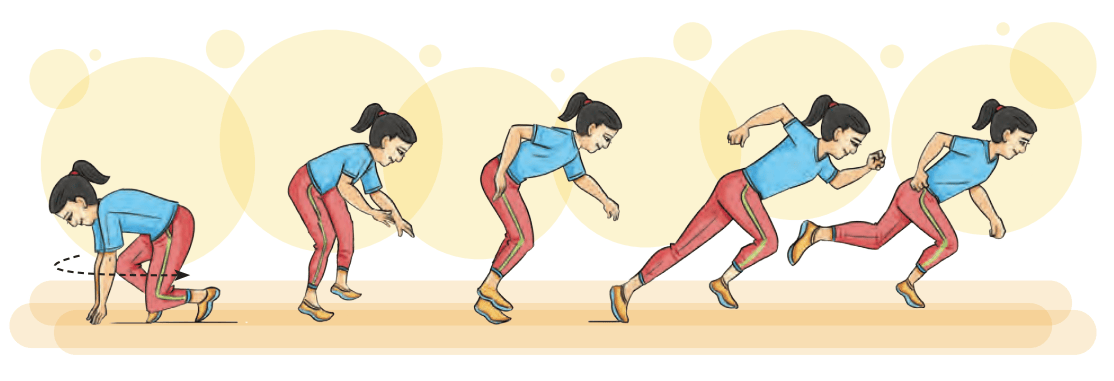
- Mark the ground with a Start and a Finish line 20-25 metres from each other.
- Sit on the ground with legs straight behind the Start line with your back towards the Finish line.
- On the command ‘go’ or the sound of the whistle stand up and turn from either side and run towards the Finish line.
Circle time — Strategy and winning
Discuss how strategising the position of players affected the outcome.Jumping
Jumping is an essential skill in athletics, defined as the act of propelling oneself into the air using one or both legs. It requires power, coordination, and technique. From a technical perspective, jumping events vary in complexity, ranging from the simple Long Jump to the High Jump and Triple Jump, with the Pole Vault appearing more intricate. The primary objective in these events is to achieve the greatest possible height or distance. In the Triple Jump, athletes aim to maximise the total distance of three successive jumps, while in the Pole Vault, they utilise a pole to assist in clearing greater heights. The key components of jumping are:
- Approach run
- A controlled run to generate momentum.
- Athletes must maintain speed and balance before takeoff.
- Take-off
- The athlete pushes off from the ground using one or both legs.
- Proper body alignment is essential for maximising height and distance.
- Flight phase
- The body remains in motion after take-off.
- Proper posture and leg movement are crucial to maintaining balance.
- Landing
- Athletes should land with bent knees to absorb impact.
- Athletes should maintain a balanced position to avoid fouls.

Long Jump
The long jump is divided into the following phases- approach, take-off, flight, and landing.
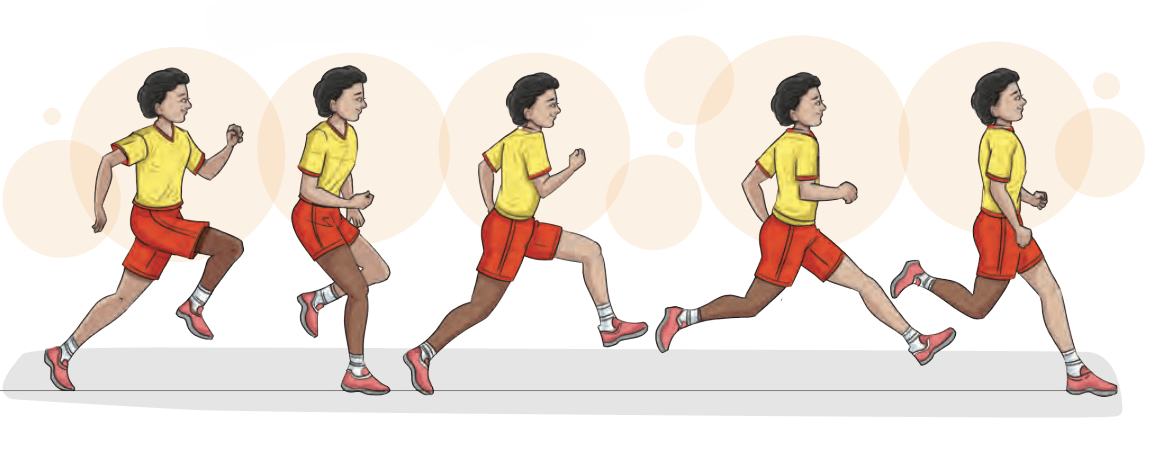
1. APPROACH PHASE
- Approach length varies from 10 strides for beginners to over 20 strides for elite jumpers.
- The running technique is similar to sprinting, with speed gradually increasing until take-off.
- The jumper accelerates to its maximum controllable speed.
- Maintaining a consistent stride pattern is crucial for an optimal take-off position.
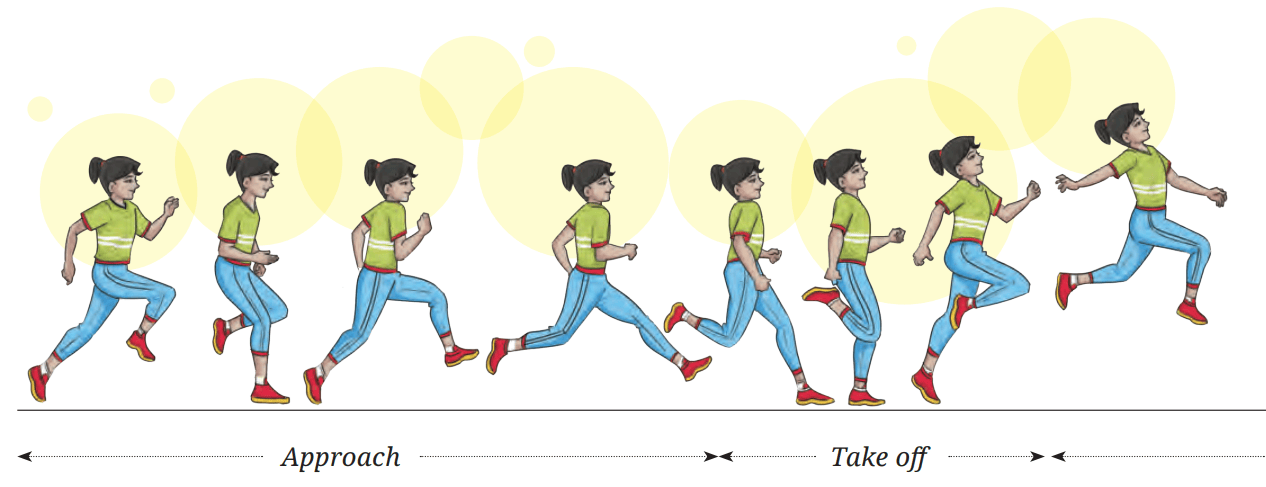
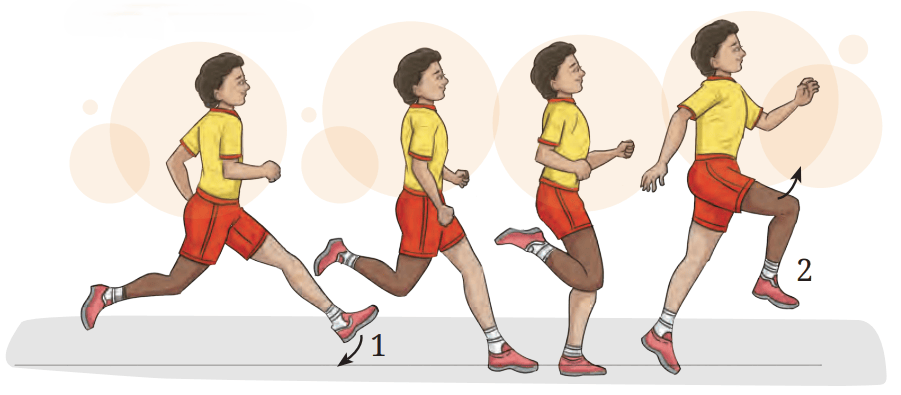
2. TAKE-OFF PHASE
- The foot plant is quick and executed with a ‘down and back’ motion. (1)
- Take-off time is kept to a minimum, with the take-off leg bending as little as possible.
- The free leg’s thigh is propelled to a horizontal position. (2)
- The ankle, knee, and hip joints are fully extended during take-off.
- The jumper generates upward momentum while reducing the loss of forward speed.
- A powerful push-off from the take-off board enhances jump distance.
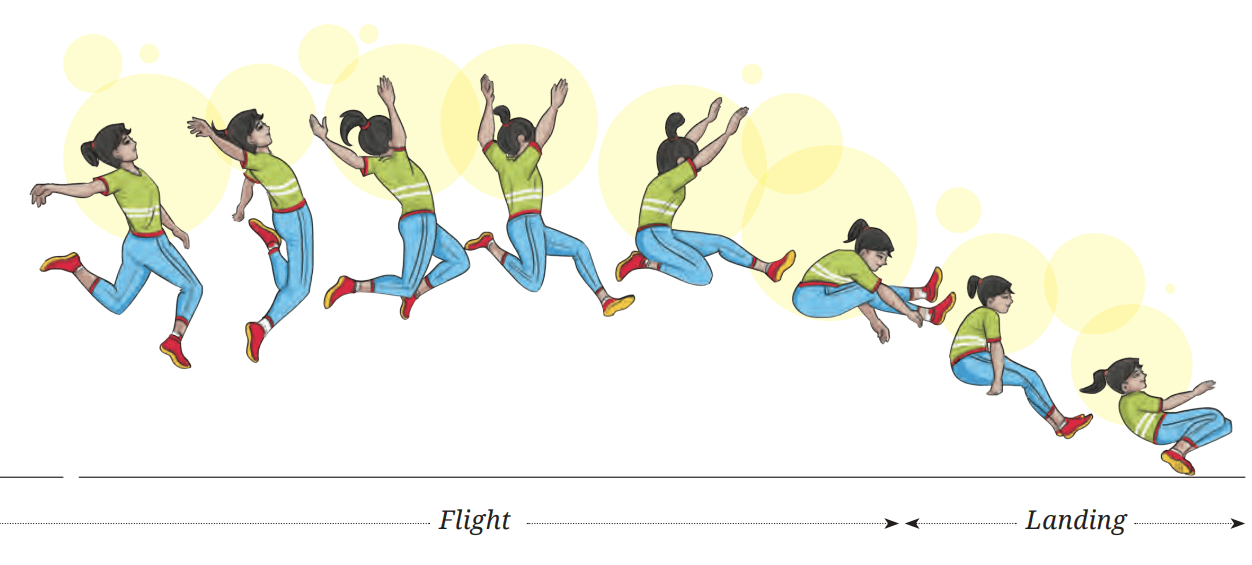
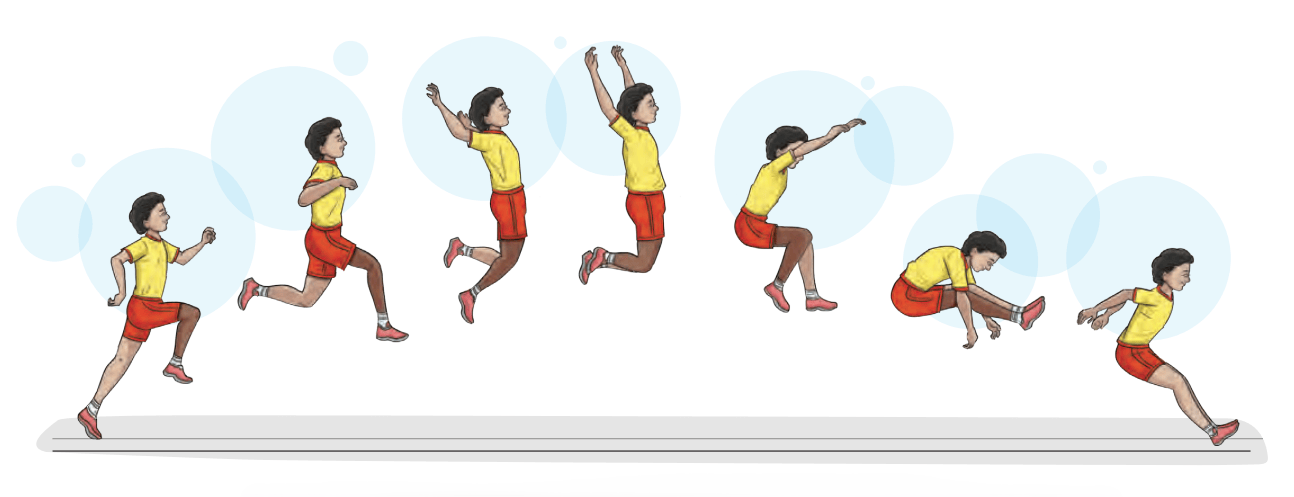
3. FLIGHT PHASE
- The jumper prepares for landing while maintaining balance and control in the air.
- Three different techniques can be used: Sail, Hang, and Hitch-Kick.
- In this, players will be learning only Sail and Hang.
- Sail: The simplest technique, where the jumper extends their legs forward.
- The free leg is maintained in the take-off position.
- The trunk stays upright and vertical.
- The take-off leg trails for most of the flight.
- Near the end of the flight, the take-off leg bends and moves forwards and upwards.
- Both legs extend forward for landing.
- Hang: The jumper stretches arms and legs backwards before bringing them forward.
- The free leg lowers through hip joint rotation.
- The hips are pushed forward.
- The take-off leg aligns parallel to the free leg.
- The arms are positioned upward and backward.
4. LANDING PHASE
- The legs are nearly fully extended.
- The trunk leans forward.
- The arms are pulled backward.
- The hips are pushed forward towards the touchdown point.
- The jumper strives to maximise the distance of the flight path.
- Landing with the feet first while avoiding backward movement prevents distance loss.
- Proper body positioning minimises impact and enables a smooth transition after landing.
Circle time — Strategy
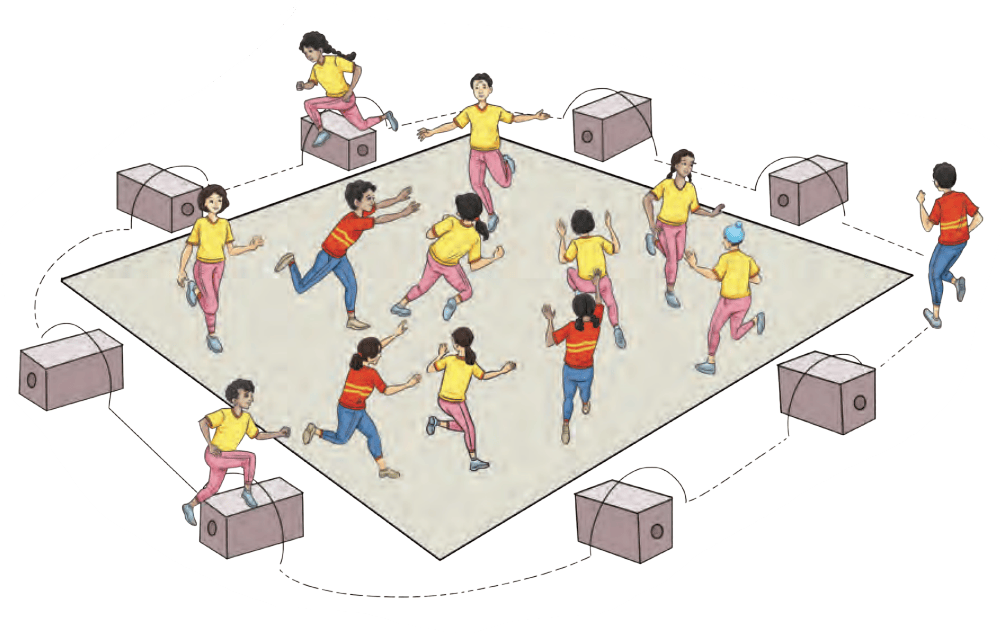
Discuss their strategies, teamwork, and challenges faced during the lead-up activity.- An obstacle course is set up around a square area, with a designated group of Hunters whose goal is to capture other athletes.
- Captured athletes must complete a lap of the obstacle course before re-entering the square.
- The aim of the Hunters is to remove all athletes from the square simultaneously to win.
- If at least one athlete remains in the square by the end of all rounds, the non-Hunters win.
- The game is played in limited rounds to prevent fatigue.
- A new team of Hunters is assigned at the start of each round to ensure fairness and rotation.

Standing Broad Jump
- Make multiple teams of 5 members each who will be standing behind the starting line.
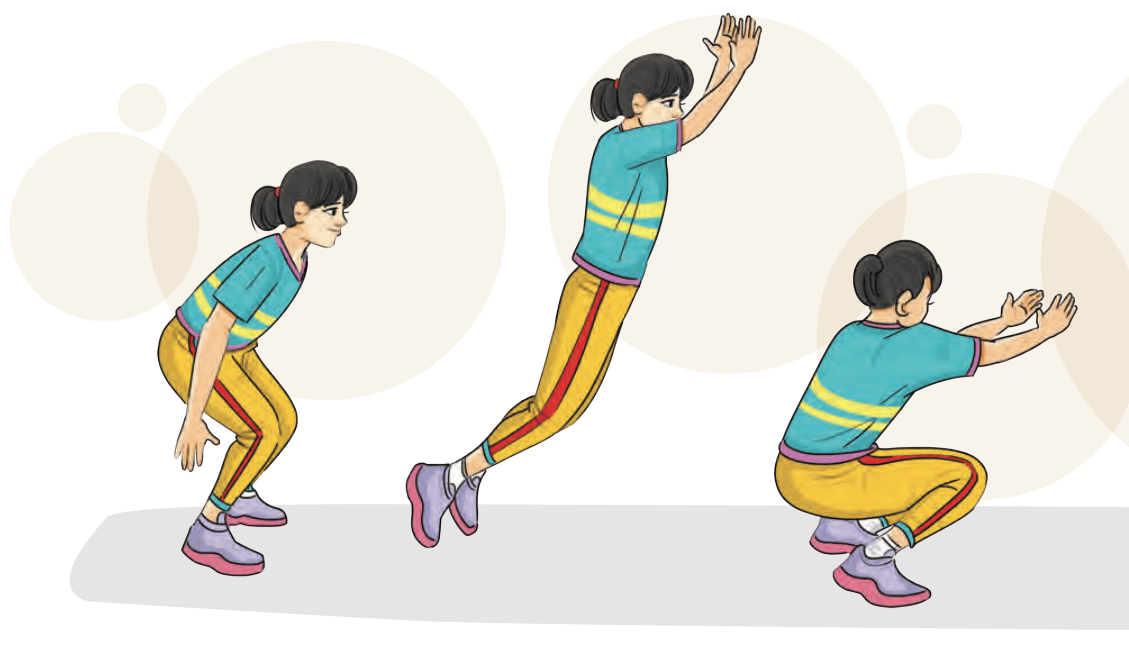
- The first member will perform a standing broad jump from the starting line and the second member will start their standing broad jump from the end point of the first member, and so on.
- The combined distance covered by the standing broad jumps of all 5 members will be marked.
- The team to cover the maximum distance will be the winner.
Circle time — Dependency on others
Discuss other exercises to improve jumping ability and the conversion of kinetic energy into potential energy that you developed during the ‘approach run’ and its significance.
Hopping
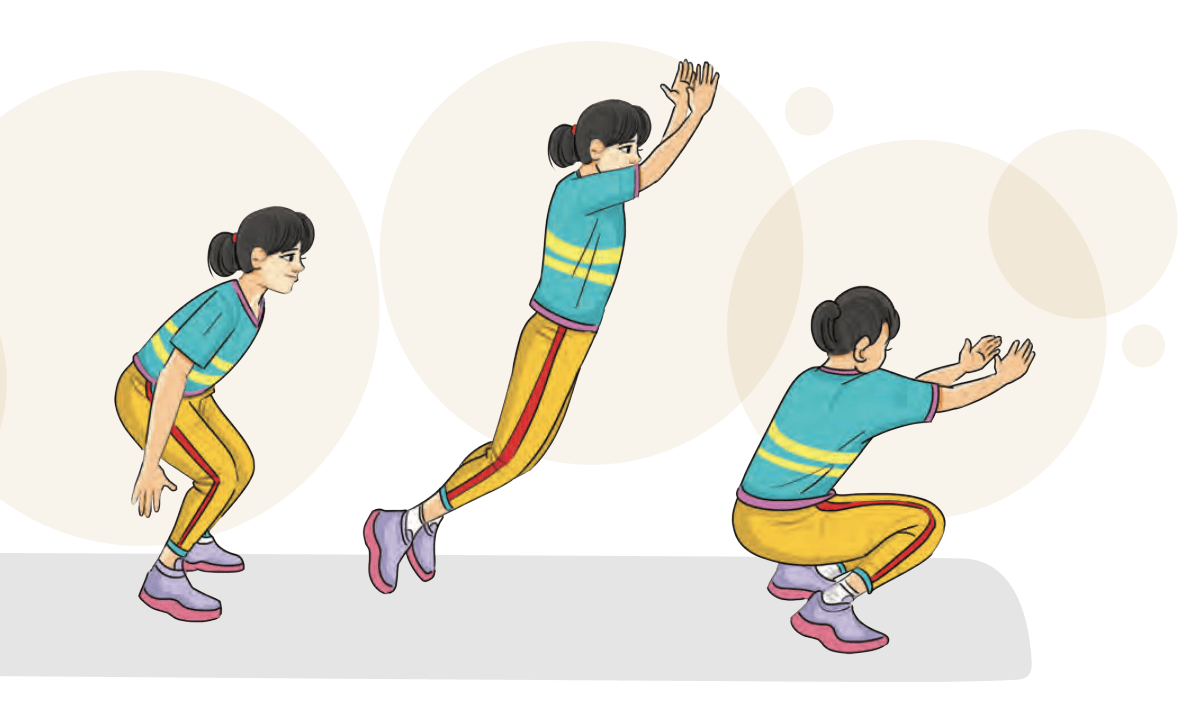
- Mark 2 lines 15 metres apart from each other.
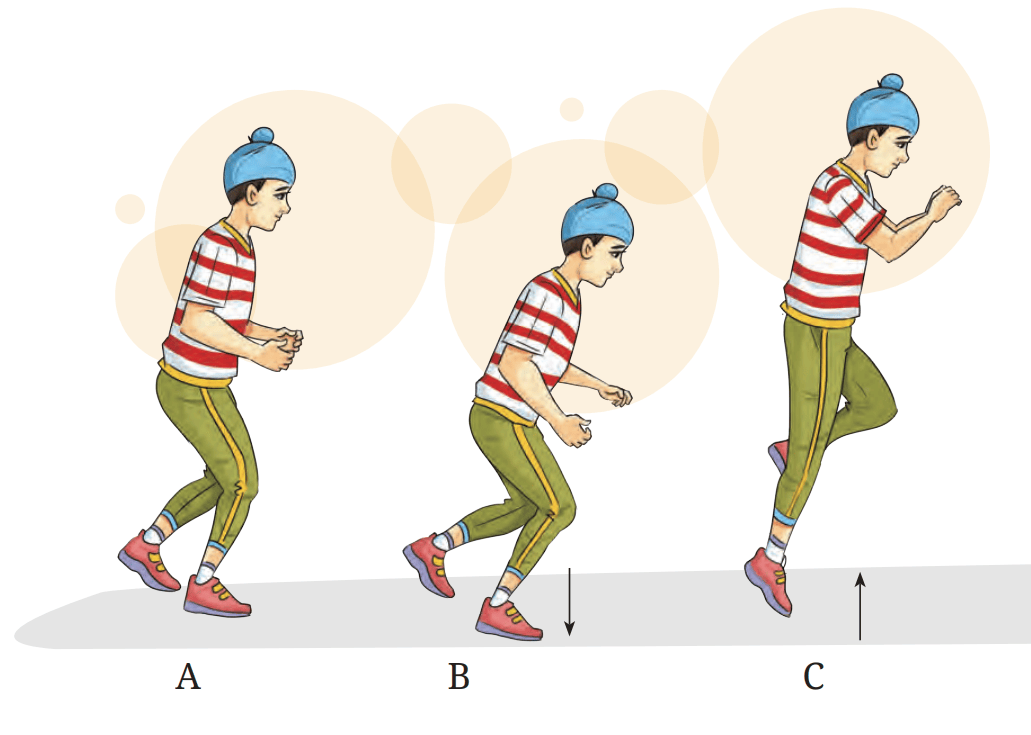
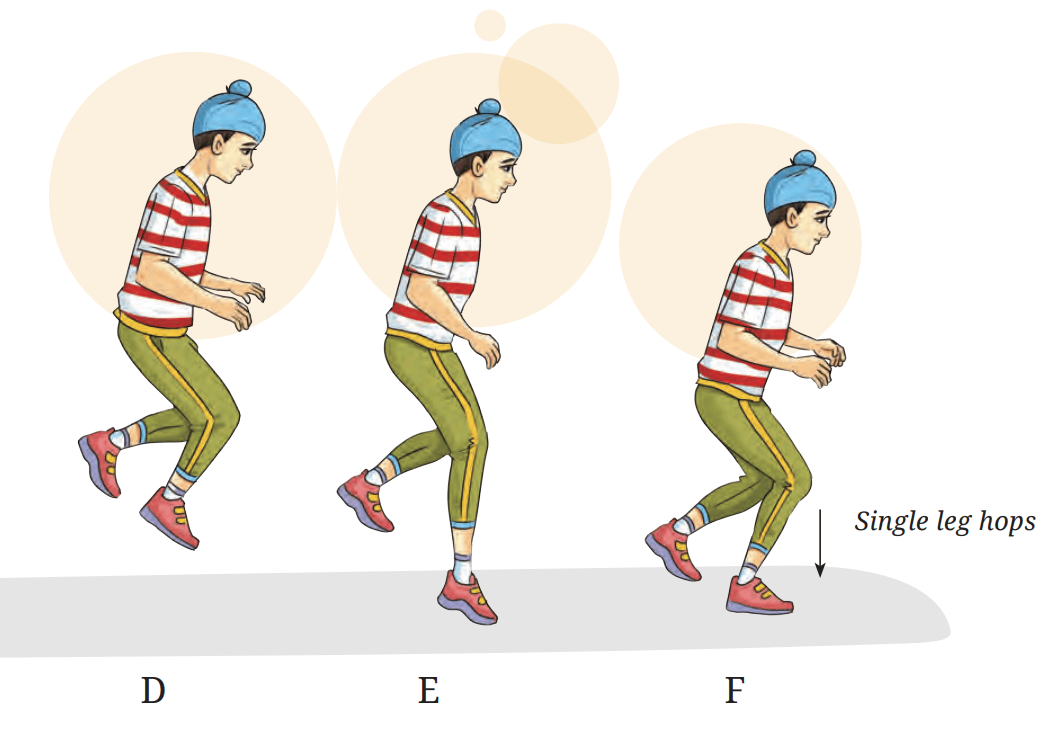
- Stand behind the starting line and start hopping as shown in the figure. Once you reach the other line, turn around and repeat with the other leg. Try to finish the distance in the shortest time possible.
- Multiple players will do this activity together as a race; the first one to finish will be the winner.
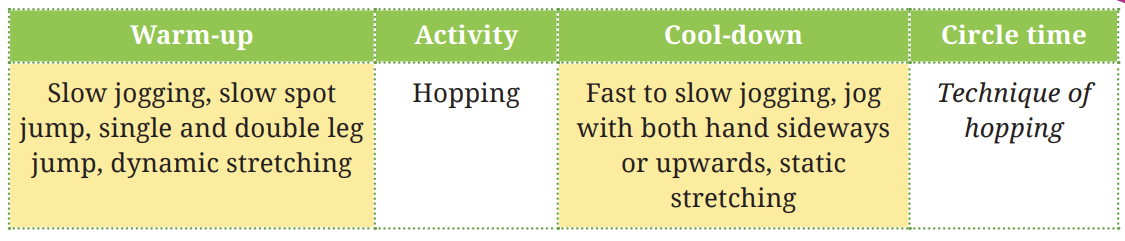
Circle time — Technique of hopping
Discuss the significance of barefoot hopping versus hopping with shoes in relation to body weight and the effects of gravitational force. Also, discuss how injury can be prevented with the use of protective gear.
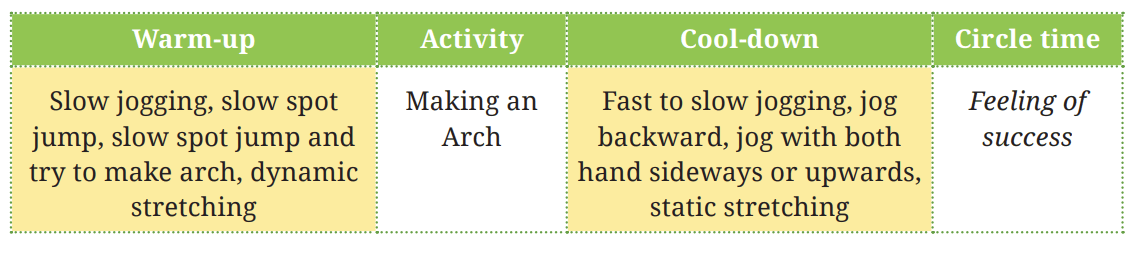
Making an Arch
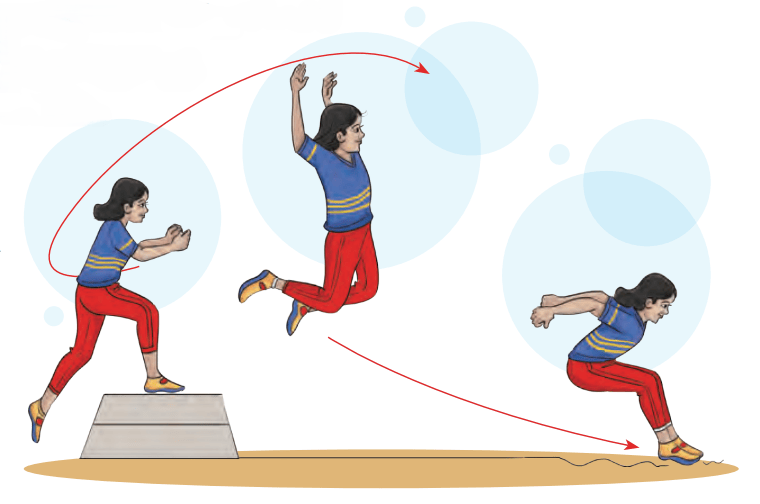
- Put a block a few steps away.
- Run and put your strong foot on the block.
- Push yourself upwards and jump while making a backward arch in the air, as shown in the figure.
- Land on the ground and repeat this 10 times.
Circle time — Feeling of success
- Discuss the difference in the technique used by different players.
- Discuss how you felt when you were able to do the jump with proper technique.
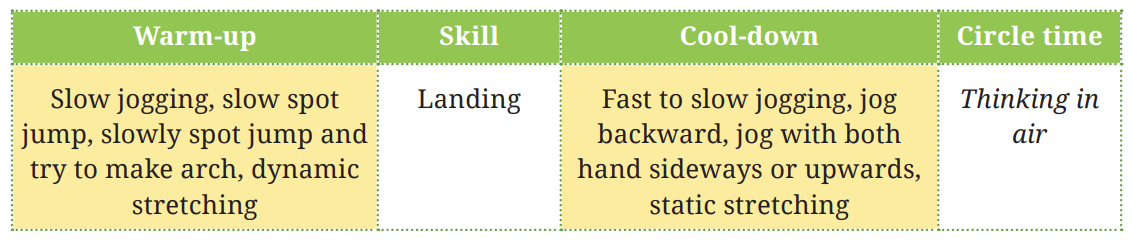
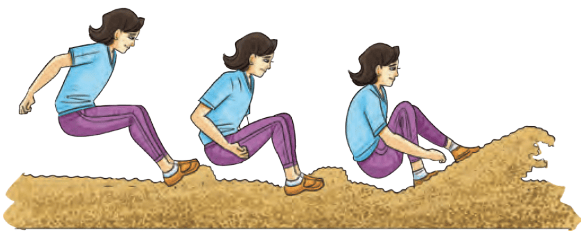
Landing
- Take a few steps behind the take-off board and jump off.
- Land on the pit using the following technique
- Step into the sand pit from the take-off board.
- Make an effort to stretch your legs and land with your body slightly forward and your feet together.
- When you land, try bending forward and extending your arms past your legs.
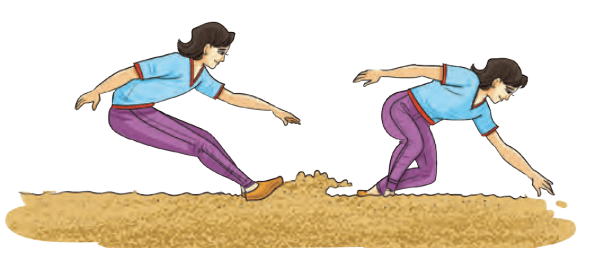
Circle time — Thinking in air
Discuss what you were thinking to ensure that the landing is proper and discuss how injury can be prevented with the use of proper landing techniques.
High Jump
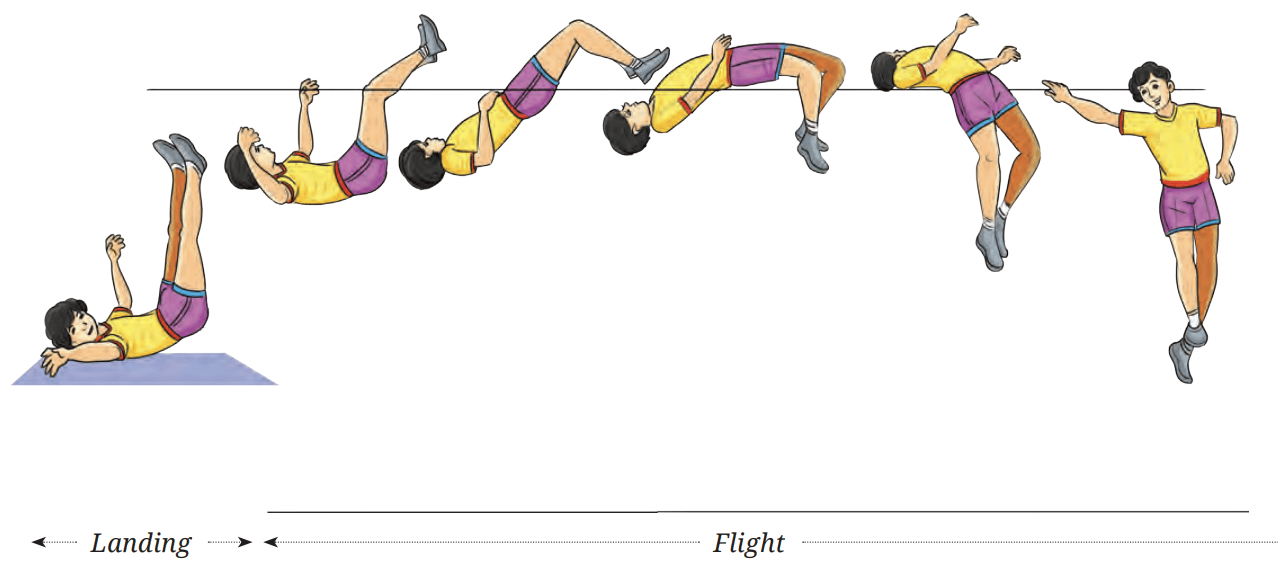
The high jump is divided into the following phases: approach, take-off, flight, and landing.
1. APPROACH PHASE
- Initially,
- The approach run is J-shaped: straight at first (3-6 strides), then curved (4 –5 strides).
- Foot plant for the initial strides is on the ball of the foot.
- Body lean is moderately forward for the initial strides.
- Velocity is increased continuously throughout the approach.
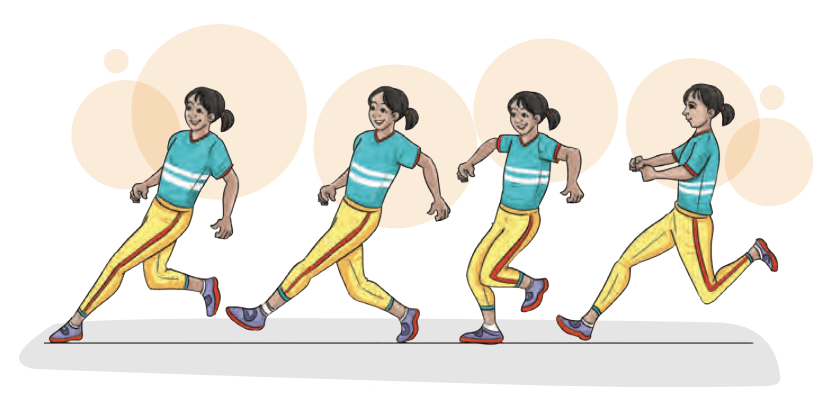
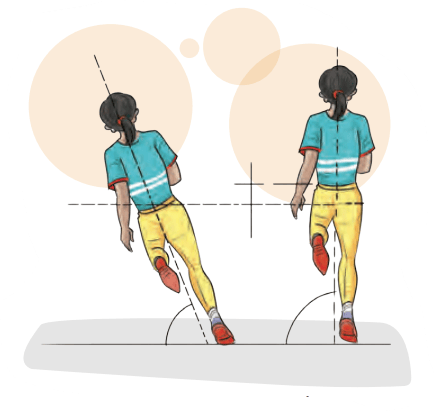
- Final:
- Stride frequency is increased continuously.
- Body leans inward, the angle is dependent on the approach speed.
- Forward lean is reduced and the body is upright.
- The centre of mass is lowered moderately in the penultimate stride.
- Active drive of the right foot in the penultimate stride.
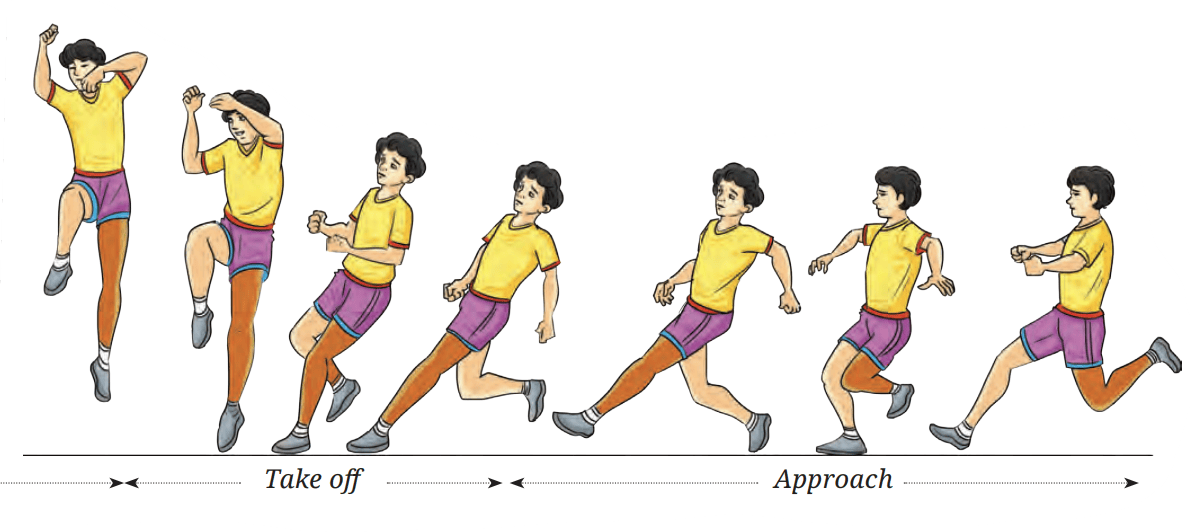
2. TAKE-OFF PHASE
- Foot plant is active, quick and flat with a ‘down and back’ motion. (1)
- The take-off foot points towards the landing area.
- The time on ground and the bending of the take-off leg are both minimised.
- The knee of the free leg is driven up until the thigh is parallel with the ground.
- The body is vertical at the end of the take-off. (2)
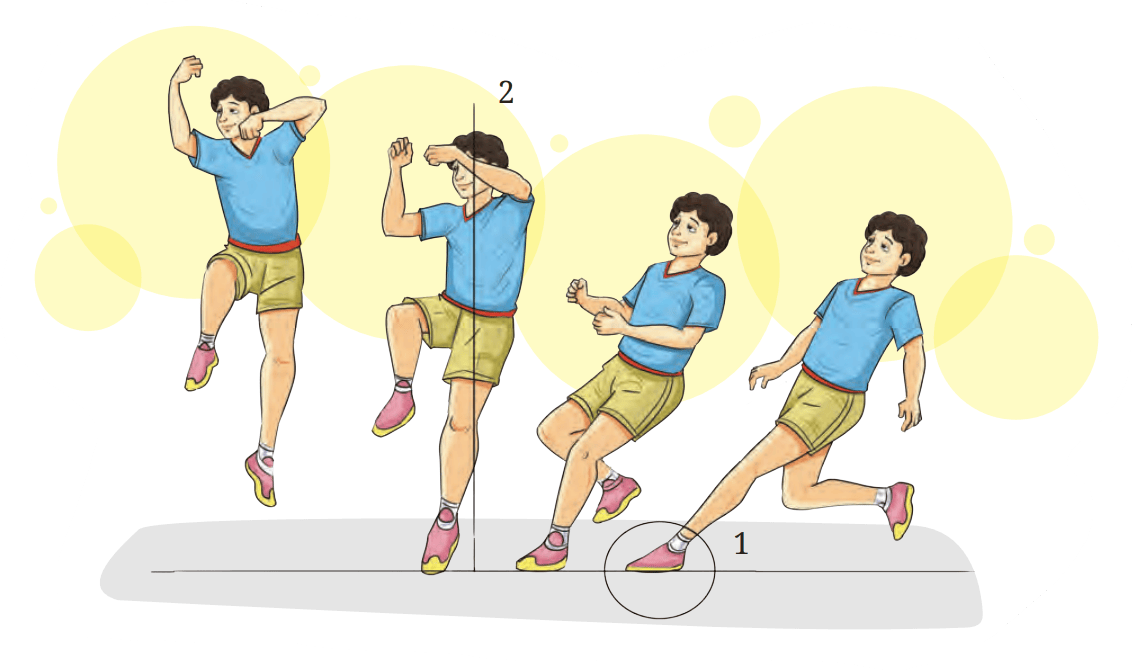
3. FLIGHT PHASE
- The jumper uses one of the two main techniques: Straddle or Fosbury Flop.
- We will discuss only Straddle in this class:
- Straddle Technique
- The jumper clears the bar facing downwards.
- The take-off leg extends first over the bar, followed by the trailing leg.
- The body remains parallel to the bar with the head and shoulders leading the clearance.
4. LANDING PHASE
- The jumper's head is drawn towards the chest.
- Landing is on the shoulders and back.
- Knees are apart for touch down.
Each pair stands in front of a soft high-jump bar. One partner gently throws a small ball above the bar, and the other must jump, clear the bar, and catch the ball before it lands. Partners switch roles after each attempt. The pair with the most successful catches wins.
Circle time — Reflection
Discuss in pairs and share their highest cleared height, discuss what worked well in their approach, and identify areas for improvement. What factors will you consider while setting the next goal for clearing the height?
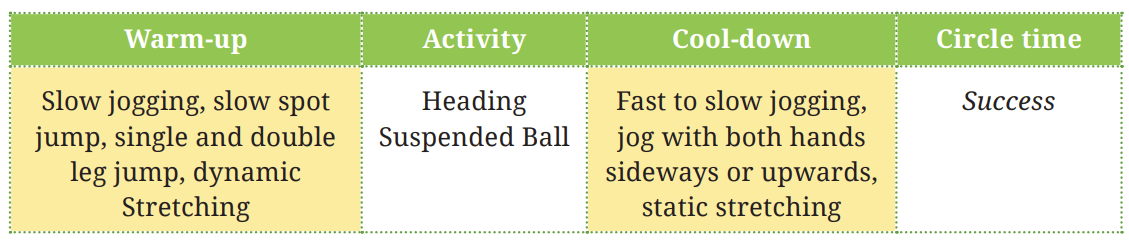
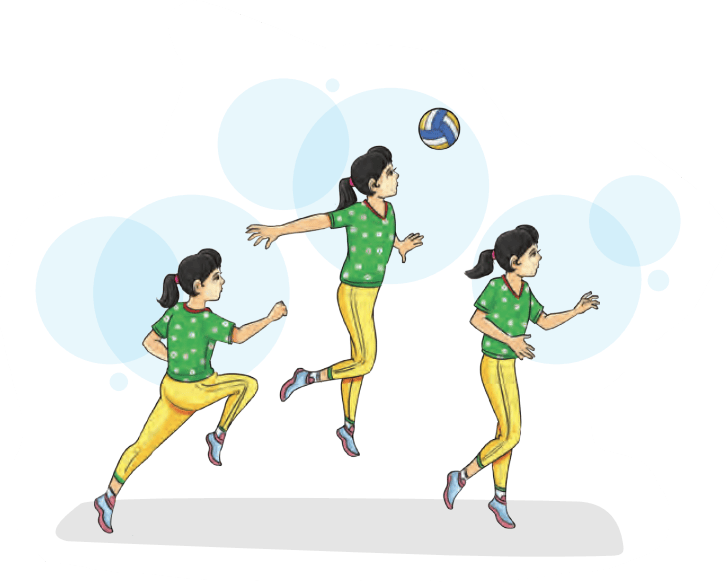
Heading Suspended Ball
- Suspend different balls from ropes at different heights.
- Take a 3-step run-up and hit the ball with your head.
- After successfully hitting the ball with your head, move to the next highest ball.
- Repeat it 4 to 5 times.
Circle time — Success
- Discuss and identify the qualities of other players which you would like to imbibe.
- What did you feel when you were unable to touch the ball with your head? How did you overcome this feeling?
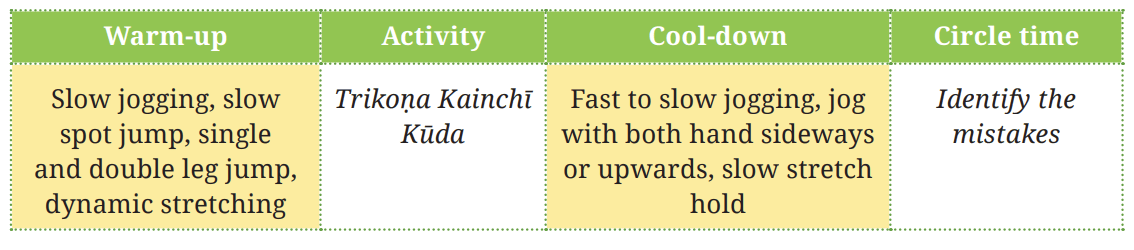
Trikoṇa Kainchī Kūda
- Mark the playing area in the form of a triangle with points A, B & C placed 10m apart from each other.
- Place 3 boxes between points A and B at equal distance from each other, 5 cones of 6 inches between points B & C in the first 5 metres and an obstacle, hurdle or pole at point C in a way that it is not too high for the kids to jump over.
- The objective of the Trikoṇa Kainchī Kūda is to finish this obstacle course as soon as possible.
- The player will run from Point A to point B while jumping on the box in between the points and then jumping off the box trying to go as high as possible.
- Once the player reaches point B, they will run from point B to point C in a way that they will jump over the cones and run towards the pole at point C.
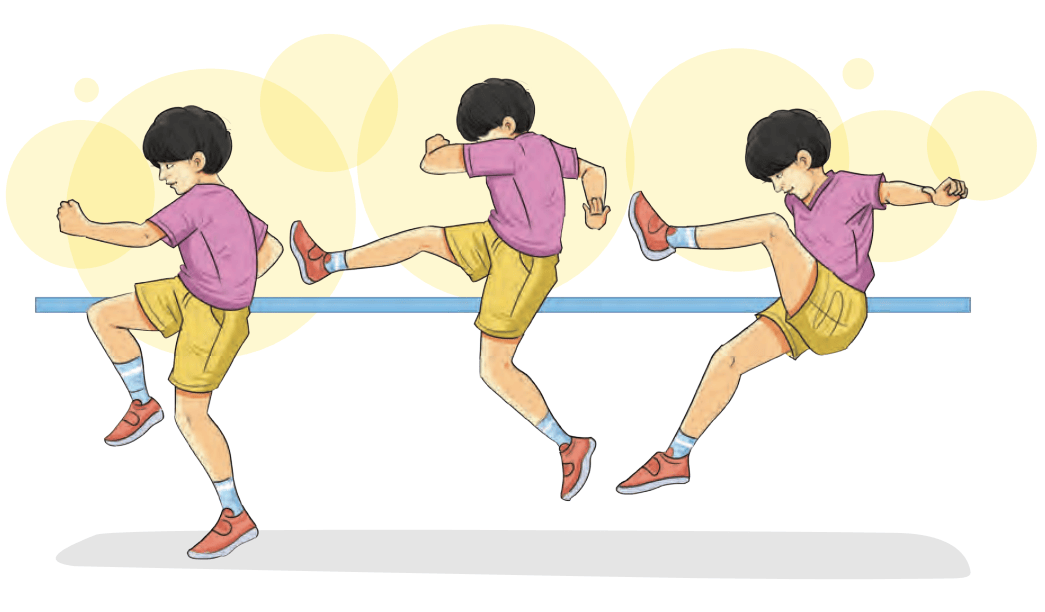
- The players will then jump over the pole at point C using the scissor technique of high jump.
- Once the jump is completed, the players will run from Point C to Point A as fast as possible.
Circle time — Identify the mistakes
Discuss how, by changing the rules, you can modify the activity to make it harder or easier.

How to play?
- Mark 2 throwing lines 15 metres apart.
- Make multiple pairs of players.
- One player will stand behind one line, and another player will stand behind the other line, facing each other.
- Put a medicine ball near your neck and lock it as shown in the figure on the next page.
- Throw the ball as far as possible in the direction of the other player.
- The other player will pick the ball and throw it to the first player in the same way.
- Remember to extend your leg and lift your chest as you throw the ball.
- Mark 2 throwing lines 15 metres apart.
- Make multiple pairs of players.
- One player will stand behind one line, and another player will stand behind the other line, facing each other.
- Put a medicine ball near your neck and lock it as shown in the figure on the next page.
- Throw the ball as far as possible in the direction of the other player.
- The other player will pick the ball and throw it to the first player in the same way.
- Remember to extend your leg and lift your chest as you throw the ball.
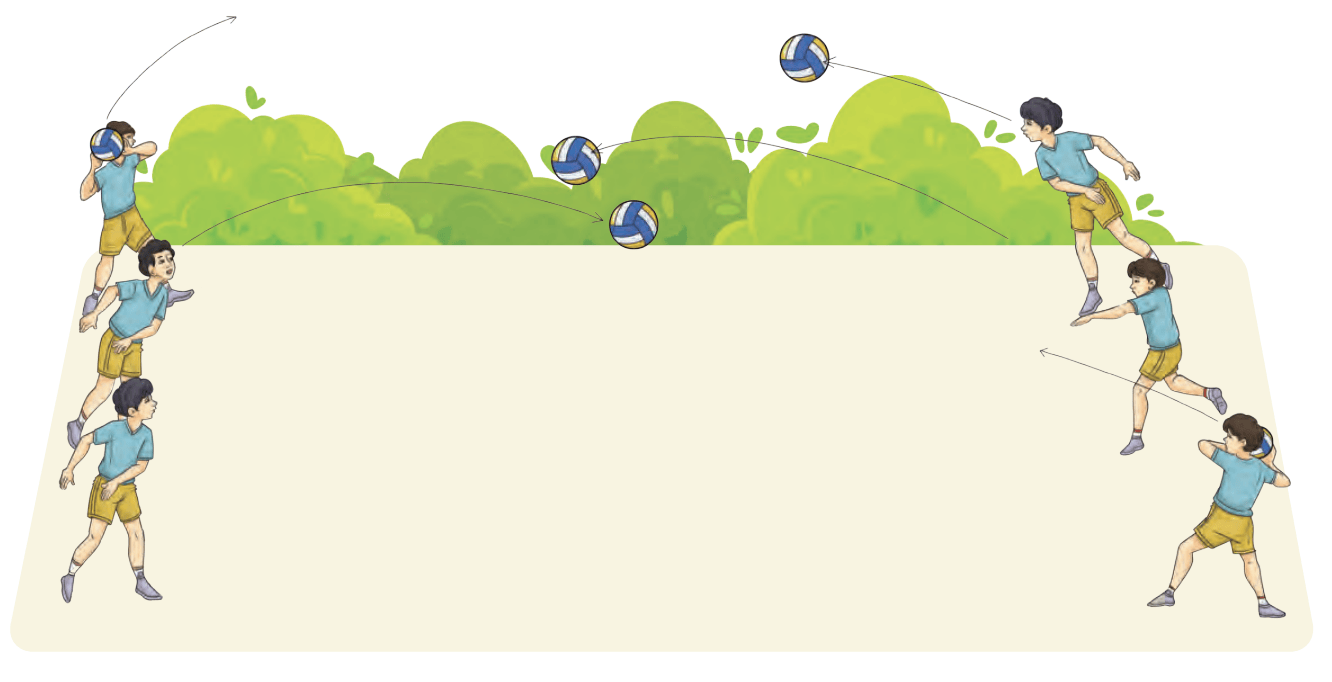
Circle time — Injuries in shot put
Discuss the difference you felt while putting the balls of different weights and sizes.
Assessment by Teacher
STARTS
| 1 | 2 | 3 | 4 | 5 |
|---|---|---|---|---|
| The student needs more practise of starts to comfortably perform it. | The student is able to demonstrate start positions with minor mistakes. | The student is able to correctly perform start position with help. | The student is able to perform start position without any help. | The student is able to correctly start the race under pressure. |
RUNNING
| 1 | 2 | 3 | 4 | 5 |
|---|---|---|---|---|
| The student needs more practise of running. | The student is able to run properly. | The student is able to correctly perform running with efforts. | The student is able to run without any distress. | The student is able to assess and appreciate a good performance by the opponent. |
LONG JUMP
| 1 | 2 | 3 | 4 | 5 |
|---|---|---|---|---|
| The student needs more practise of techniques to jump. | The student is able to demonstrate jumping using right technique. | The student is able to correctly perform jumping using right technique. | The student is able to decide which technique should be used for jumping. | The student is able to assess and appreciate a good jump by the opponent. |
HIGH JUMP
| 1 | 2 | 3 | 4 | 5 |
|---|---|---|---|---|
| The student needs more practise of techniques to jump. | The student is able to demonstrate jumping using right technique. | The student is able to correctly perform jumping using right technique. | The student is able to decide which technique should be used for jumping. | The student is able to assess and appreciate a good jump of the opponent. |
SHOT PUT
| 1 | 2 | 3 | 4 | 5 |
|---|---|---|---|---|
| The student needs more practise of putting the ball/shot. | The student is able to demonstrate putting the ball/shot using right technique. | The student is able to correctly perform putting the ball/shot using right technique. | The student is able to correctly perform putting the ball/shot in the right direction and desired space. | The student is able to assess and appreciate a good put of the opponent. |
OVERCOMING SELF-DISTRESS
| 1 | 2 | 3 | 4 | 5 |
|---|---|---|---|---|
| The student reacts emotionally or impulsively without attempting to reduce distress. | The student struggles to solve problems and avoids self-reflection. | The student makes simple attempts to think and solve problems, but with little success. | The student tries to think about issues thoroughly and find solutions, but occasionally reacts emotionally. | The student learns from upsetting experiences and approaches problems with composure. |