Table of Contents
7
Getting to Know Plants
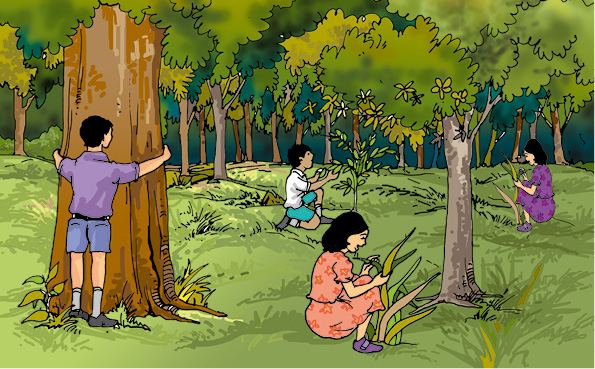
Go outside and observe all the plants around you (Fig. 7.1). Do you see that some plants are small, some very big, while some are just patches of green on the soil? Some have green leaves, while some others have reddish ones. Some have huge red flowers, some have tiny blue ones, while some have none. We do see a variety of plants existing all around us — near our homes, in the school ground, on the way to the school, in the parks and gardens, isn’t it?
7.1 Herbs, Shrubs and Trees
Activity 1
Look closely at the stem and branches of:
1. Plants much smaller than you.
2. Plants that are about your size, and
3. Plants which are much taller than you.
Feel their stem and try to bend them gently to see if they are tender or hard. Take care that the stem does not break. Hug the tall plants to see how thick their stems are!
Table 7.1 Categories of plants
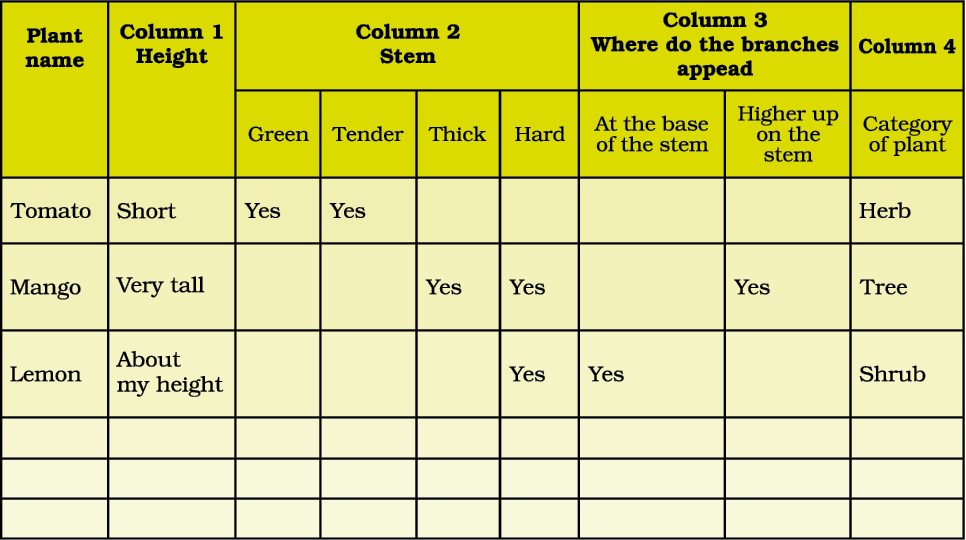
We also need to notice from where the branches grow in some plants — close to the ground or higher up on the stem.
We will now group all the plants we observed, in Table 7.1. Some examples are shown. You can fill the Columns 1, 2 and 3 for many more plants. Fill Column 4 later after studing the section.
Suggestion: Student can work in groups of 4-5 so that a minimum number of plants are harmed/damaged.
You may also use weeds with soft stems for the activities. Do you know what weeds are? In crop fields, lawns, or in pots, often some unwanted plants or weeds start growing. Have you seen farmers removing these weeds from their fields?
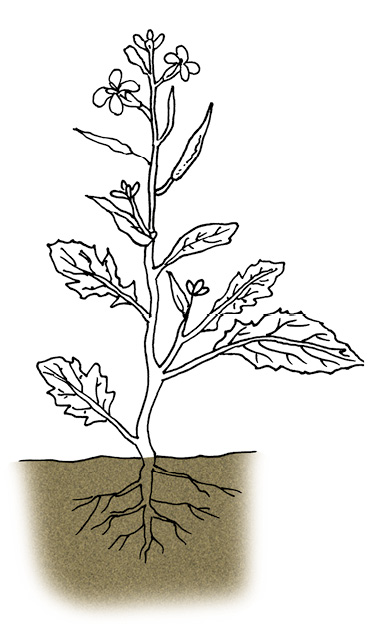
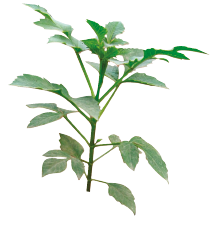
Based on these characters most plants can be classified into three categories: herbs, shrubs and trees. An example of each is shown in Fig.7.3.
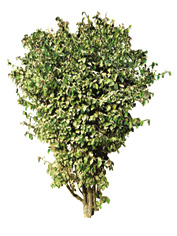
Some plants develop branches near the base of stem. The stem is hard but not very thick. Such plants are called shrubs [Fig .7.3(b)].
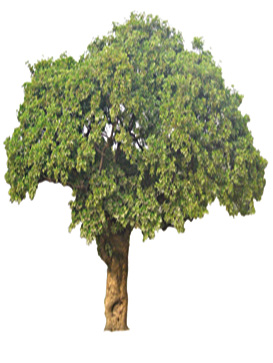
Some plants are very tall and have hard and thick stem. The stems have branches in the upper part, much above the ground. Such plants are called trees [Fig.7.3(c)].
Based on the above characteristics can you now classify the plants listed by you and complete column 4 in Table 7.1?

Plants with weak stems that cannot stand upright but spread on the ground are called creepers (Fig.7.4), while those that take support and climb up are called climbers(Fig.7.5). These are different from the herbs, shrubs and trees.
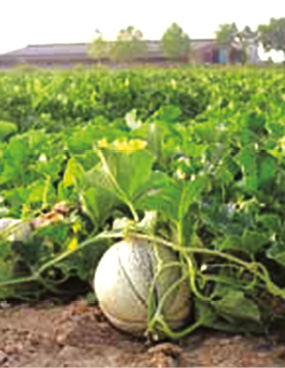
Fig. 7.4 Creepers
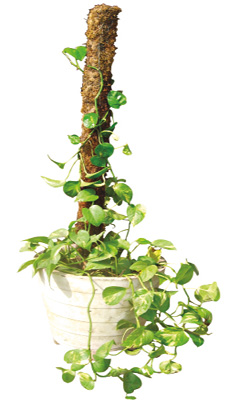
Fig. 7.5 Climbers
Perhaps there are some plants in your school or at home that you take care of. Write down the names of any two trees, shrubs, herbs or creepers growing in your house or school.
7.2 Stem
Observe closely the stems of different plants around you. Note down different structures/parts borne by the stem. Compare you observations with the that of your friends. What do you find? Stems bear leaves, branches, buds, flowers and fruits.
Activity 2
We would require a glass, water, red/blue ink and a soft stem. Pour water to fill one-third of the glass. Add a few drops of red/blue ink to the water. Cut the base of the stem and put it in the glass as shown in Fig.7.6.
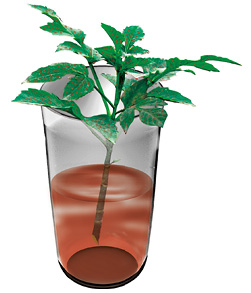
Fig. 7.6 Stem in a glass with coloured water
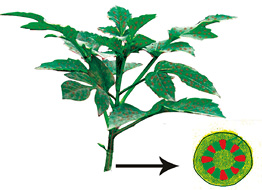
Observe the set-up. Does the colour appear in the stem? You will find that the colour rises in the stem. If this is kept for a longer period, the colour appears in the veins of leaves also. How do you think the colour reached there?
(a) (b)
Fig. 7.7 (a) Water moves up the stem and reaches leaves (b) Enlarged view of open end of stem
From this activity, we see that the stem helps in upward movement of water. The water and minerals go to leaves and other plant parts attached to the stem.
7.3 Leaf
Observe the leaves of some plants around you and draw them in your notebook. Are all the leaves of same size, shape and colour?
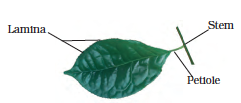
How are leaves attached to the stem? The part of leaf by which it is attached to the stem is called petiole. The broad, green part of the leaf is called lamina (Fig. 7.8). Can you identify these parts of the leaves in plants around you? Do all the leaves have petioles?
Let us get to know the leaf better by taking its impression! If you thought that leaves cannot sign, here is an activity which will make you think again.
Activity 3
Put a leaf under a white sheet of paper or a sheet in your notebook. Hold it in place as shown in Fig. 7.9. Hold your pencil tip sideways and rub it on the portion of the paper having the leaf below it. Did you get an impression with some lines in it? Are they similar to those on the leaf?
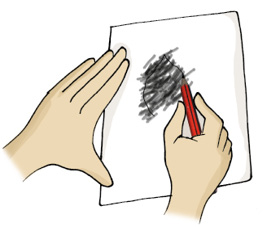
Fig. 7.9 Taking an impression of a leaf
These lines on the leaf are called veins. Do you see a prominent line in the middle of the leaf? This is called the midrib. The design made by veins in a leaf is called the leaf venation. If this design is net-like on both sides of midrib, the venation is reticulate [Fig. 7.10 (a)]. In the leaves of grass you might have seen that the veins are parallel to one another. This is parallel venation [(Fig. 7.10 (b)]. Observe the venation in as many leaves as you can without removing them from the plant. Draw the pattern and write names of some plants having reticulate and parallel venation.
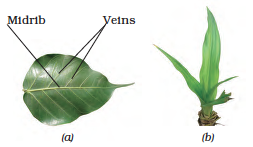
Fig. 7.10 Leaf venation (a) reticulate and (b) parallel
Shall we now find out some of the functions of a leaf?
Activity 4
We will require a herb, two transparent polythene bags and thread.
Do this activity during day time on a sunny day. Use a healthy, well watered plant that has been growing in the sun. Enclose a leafy branch of the plant in a polythene cover and tie up its mouth as shown in Fig. 7.11. Tie up the mouth of another empty polythene cover and keep it also in the sun.
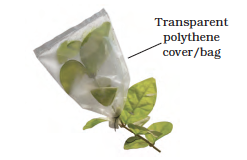
Fig. 7.11 What does the leaf do?
After a few hours, observe the inner surface of the covers. What do you see? Are there any droplets of water? How do you think they got there? [Don’t forget to remove the polythene bag after the activity!]
Water comes out of leaves in the form of vapour by a process called transpiration. Plants release a lot of water into the air through this process. We will learn more about this in Chapter 14.
Why did we tie a cover around the leaves? Would we have seen the water evaporate if we had not tied a polythene cover? What makes the water appear on the polythene bag? In Chapter 5, we noticed water changing into different forms in some of our activities. Can you think of these and name the process that makes water drops appear on the polythene cover?
Leaves also have another function. Let us study this.
Activity 5
We would require a leaf, spirit, a beaker, test tube, burner, water, a watch glass and iodine solution for this activity.
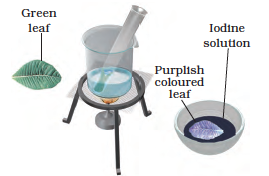
Fig. 7.12 What does the leaf contain?
Take a leaf in a test tube and pour spirit to completely immerse the leaf. Now, place the test tube in a beaker half filled with water. Heat the beaker till all the green colour from the leaf comes out into the spirit in the test tube. Take out the leaf carefully and wash it in water. Place it on a watch glass and pour some iodine solution over it (Fig. 7.12).
Note: Since the activity involves the use of spirit and heating, it is advised that it is demonstrated by the teacher in the class
What do you observe? Compare your observations with those done in Chapter 2, when you tested food for presence of different nutrients. Does this mean that the leaf has starch in it?
In Chapter 2, we saw that a slice of raw potato also shows the presence of starch. Potatoes get this starch from their leaves and store it. Leaves prepare their food in the presence of sunlight and a green coloured substance present in them. For this, they also use water and carbon dioxide. This process is called photosynthesis. Oxygen is given out in this process. The food prepared by leaves ultimately gets stored in different parts of plant.
We have seen that the stem supplies leaf with water. The leaf uses the water to make food. The leaves also lose water through transpiration. How do the stem and leaves get water? That is where the roots come in!
7.4 Root
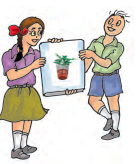
Look at Fig. 7.13. Who do you think is watering their plant correctly, Paheli or Boojho? Why?
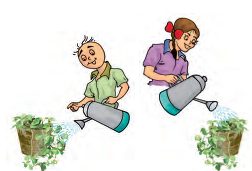
Fig. 7.13 Watering the plants
Which part of the plant is in the soil? Let us learn more about this part from the following activities.
Activity 6
You would require two pots, some soil, khurpi (for digging), blade or a pair of scissors and water. This activity is to be done in groups of 4-5 students.
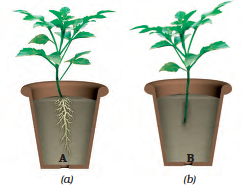
Fig. 7.14 (a) Plant with roots, and (b) without roots
Select two plants of the same kind from an open ground and dig them out with roots. Take care that their roots do not break. Plant one of them in pot A [Fig. 7.14 (a)]. Cut off the roots from the other plant and plant it in pot B [Fig. 7.14 (b)]. Water them regularly. Observe the plants after a week. Are both plants healthy?
Both the plants are watered regularly, but, one is without roots, isn’t it? Does this activity help you understand an important function of the root?
Let us do an activity to study another function of root.
Activity 7
We would require seeds of gram and maize, cotton wool, katori (bowl) and some water.
Take two katoris (bowl). Place some wet cotton in them. Put 3 or 4 seeds of gram in one and maize in the other. Keep the cotton wet by sprinkling water every day, until the sprouts have grown into young plants. After a week try to separate the young plants from the cotton (Fig. 7.15).
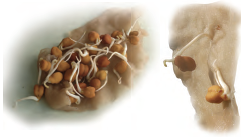
Fig. 7.15 Young plants grown on cotton
Was it easy to separate the cotton from the roots? Why?
In Activity 6, we could not pull out the plants from the soil, right? We dug them out. This is because roots help in holding the plant firmly to the soil. They anchor the plant to the soil.
You have seen that there are different kinds of stems and leaves. Do the roots also show a variety? Let us find out.
Activity 8
Study Fig. 7.16 (a) and (b) carefully. Now, look at the roots of the gram plants you have pulled out from the cotton in the previous activity. Do they look like the roots shown in Fig. 7.16 (a) or those in Fig. 7.16 (b)? How about the roots of maize plant? Write ‘gram’ or ‘maize’ in the blank spaces in the figure after matching the roots with the figures.
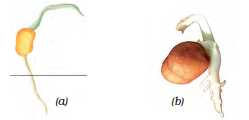
Fig 7.16 (a) Roots of_______________ (b) Roots of_______________
In what way are the roots of gram and maize similar? In what way are they different? There seem to be two different types of roots, isn’t it? Are there also other types of roots? Let us find out.
Activity 9
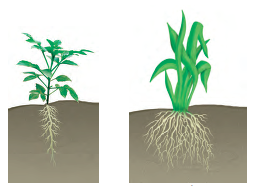
Go to an open ground where many wild plants are growing. Dig out a few, wash the soil off the roots and observe them. Do you find that all of them have either the kind of roots shown in Fig. 7.17 (a) or as in Fig. 7.17 (b)?
For roots of the kind shown in Fig.7.17 (a), the main root is called tap root and the smaller roots are called lateral roots. Plants with roots as shown in Fig. 7.17 (b) do not have a main root. All roots seem similar and these are called fibrous roots.
(a) (b)
Fig. 7.17 (a) Taproot and (b) fibrous roots
Separate the plants you have collected into two groups. In group (a) put those that have tap roots and in group (b) those that have fibrous roots. Look at the leaves of the plants in Group (a). What kind of venation do they have? What kind of venation do you see for plants of Group (b)?
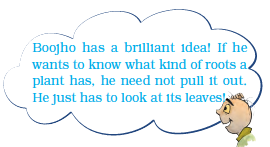
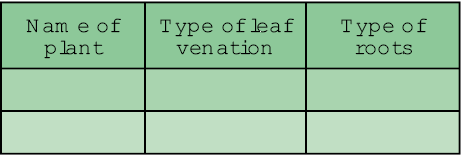
Do you notice that leaf venation and the type of roots in a plant are related in a very interesting way? In Table 7.2, can you match the type of leaf venation and the type of roots for some plants you have studied in all the activities so far?
Table 7.2 Types of roots and types of leaf venation
We have learnt that roots absorb water and minerals from the soil and the stem conducts these to leaves and other parts of the plant. The leaves prepare food. This food travels through the stem and is stored in different parts of plant. We eat some of these as roots— like carrot, radish, sweet potato, turnip and tapioca. We also eat many other parts of a plant where food is stored.
Do you agree that stem is like a street with two way traffic (Fig. 7.18)? Write the name of material that goes up in the stem and that which comes down.
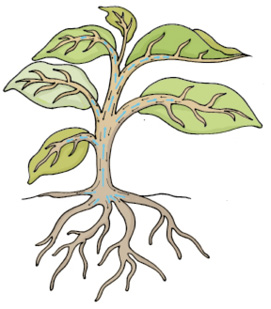
Fig. 7.18 Stem as two-way traffic street
In the next section, we will study about the structure of a flower.
7.5 Flower
You are shown three branches of a rose in Fig 7.19 (a), (b) and (c). Which one will help you best to recognise the plant?
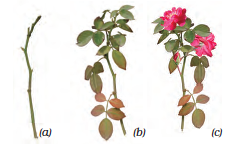
Fig 7.19 Rose: (a) A leafless branch (b) A branch with leaves (c) A branch with leaves and flowers
Which colour did you use for the flower in Fig. 7.19 (c)? Are all flowers colourful? Have you ever seen flowers on grass, wheat, maize, mango or guava? Are those brightly coloured?
Let us study a few flowers.
When choosing flowers to study, avoid using marigold, chrysanthemum or sunflower. You will learn in higher classes that they are not single flowers, but groups of flowers.
Activity 10
Observe Fig. 7.20 carefully. Look at the prominent parts of the open flower. These are the petals. Different flowers have petals of different colours.
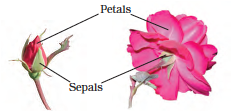
Fig. 7.20 Bud and flower
Where do you think the petals are in a closed bud? Which is the most prominent part in a bud? Did you see that this part is made of small leaf-like structures? They are called sepals. Take a flower and observe its petals and sepals. Now, answer the following questions:
How many sepals does it have?
Are they joined together?
What are the colours of the petals and the sepals?
How many petals does the flower have?
Are they joined to one another or are they separate?
Do the flowers with joint sepals have petals that are separate or are they also joined together?
Fill the table based on the observations of the whole class (Table 7.3). Add observations to this table, from a field trip to a locality where there are plants with flowers. Fill the last two columns later.
Table 7.3 Observations on flowers

To see the inner parts of the flower clearly, you have to cut it open, if its petals are joined. For example, in datura and other bell-shaped flowers, the petals have to be cut lengthwise and spread out so that the inner parts can be seen clearly (Fig. 7.21).
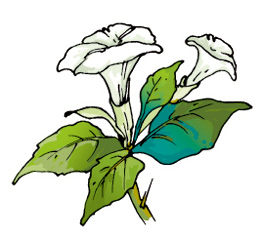
Fig. 7.21 A bell-shaped flower
Remove the sepals and petals to see the other parts. Study the Fig. 7.22 carefully, compare your flower with the illustration and identify the stamens and pistil in your flower.
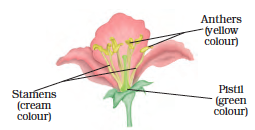
Fig. 7.22 Parts of a flower
Look at Fig 7.23 carefully. It shows different kinds of stamens present in different flowers. Can you recognise the two parts of the stamens in your flower? How many stamens are there in your flower? Draw one stamen and label its parts.
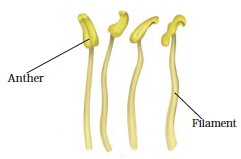
Fig. 7.23 Parts of a stamen
The innermost part of flower is called the pistil. If you cannot see it completely, remove the remaining stamens. Identify the parts of the pistil with the help of Fig. 7.24.
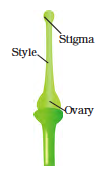
Fig. 7.24 Parts of a pistil
Draw a neat, labelled diagram of the pistil of your flower.
Activity 11
Let us now study the structure of ovary (Fig. 7.24). It is the lowermost and swollen part of the pistil. We will cut this part to study what is inside! Look at Fig. 7.25 (a) and (b) carefully to understand how to cut the ovary of a flower.
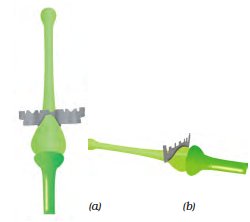
Fig. 7.25 Cutting an ovary (a) longitudinal cut and (b) transverse cut
Cut the ovary in two different ways as shown in Fig. 7.25. To prevent them from drying, put a drop of water on each of the two pieces of the ovary, you have cut.
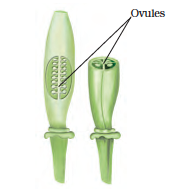
Fig. 7.26 Inner structure of an ovary (a) longitudinal cut, (b) transverse cut
Observe the inner parts of the ovary using a lens (Fig. 7.26). Do you see some small bead like structures inside the ovary? They are called ovules. Draw and label the inner parts of the ovary in your notebook.
Try to find out the names of as many flowers as you can by asking the gardener or any other person. Remember, not to pluck more flowers than you need. Based on what you have filled in Table 7.3, answer the following questions.
Do all flowers have sepals, petals, stamens and pistils? Are there flowers that do not have one or more of these? Are there flowers which have parts other than these?
Did you find any flower which has no difference between sepals and petals?
Did you find any flower in which the number of stamens is different from the number of petals?
Do you now agree that the structure of the flower is not always the same? The number of sepals, petals, stamens and pistils may also be different in different flowers. Some of these parts may even be absent at times!
We have studied some features and functions of leaves, stems and roots. We studied the structure of different flowers. We will learn about the function of flowers in higher classes. We will also learn about fruits in higher classes.
KeyWords
Climbers
Conduct
Creepers
Fibrous roots
Herbs
Lamina
Lateral roots
Midrib
Ovule
Parallel Venation
Petal
Petiole
Photosynthesis
Pistil
Reticulate venation
Sepal
Shrubs
Stamen
Taproot
Transpiration
Trees
Veins
Summary
- Plants are usually grouped into herbs, shrubs and trees based on their height, nature of stem and branches.
- The stem bears leaves, flowers and fruits.
- Leaf usually has a petiole and lamina.
- The pattern of veins on the leaf is called venation. It can be reticulate or parallel.
- Leaves give out water vapour through the process of transpiration.
- Green leaves make their food by the process of photosynthesis using carbon dioxide and water in the presence of sunlight.
- Roots absorb water and minerals from the soil. They also anchor the plant firmly in the soil.
- Roots are mainly of two types: tap root and fibrous root.
- Plants having leaves with reticulate venation have tap roots while plants having leaves with parallel venation have fibrous roots.
- The stem conducts water from roots to the leaves (and other parts) and food from leaves to other parts of the plant.
- The parts of a flower are sepals, petals, stamens and pistil.
Exercises
1. Correct the following statements and rewrite them in your notebook.
(a) Stem absorbs water and minerals from the soil.
(b) Leaves hold the plant upright.
(c) Roots conduct water to the leaves.
(d) The number of petals and stamens in a flower is always equal.
(e) If the sepals of a flower are joined together, its petals are also joined together.
(f) If the petals of a flower are joined together, then the pistil is joined to the petal.
2. Draw (a) a leaf, (b) a taproot and (c) a flower, you have studied for Table 7.3.
3. Can you find a plant in your house or in your neighborhood, which has a long but weak stem? Write its name. In which category will you place it?
4. What is the function of a stem?
5. Which of the following leaves have reticulate venation?
Wheat, tulsi, maize, grass, coriander (dhania), China rose
6. If a plant has fibrous root, what type of venation do its leaves have?
7. If a plant has leaves with reticulate venation, what kind of roots will it have?
8. Is it possible for you to find out whether a plant has taproot or fibrous roots by looking at the impression of its leaf on a sheet of paper?
9. What are the parts of a flower.
10. From the following plants, which of them have flowers?
Grass, maize, wheat, chilli, tomato, tulsi, peepal, shisham, banyan, mango, jamun, guava, pomegranate, papaya, banana, lemon, sugarcane, potato, groundnut
11. Name the part of plant which produces food. Name the process.
12. In which part of a flower, you will find the ovary?
13. Name two plants in which one has joined sepals and the other has separate sepals.
Suggested project and Activities
1. Become a leaf expert
Do this activity with a number of leaves over a period of few weeks. For every leaf that you wish to study, pluck it and wrap it in a wet cloth and take it home. Now, place the leaf between the folds of a newspaper and place a heavy book on it. You can also put it under your mattress or a trunk! Take out the leaf after a week. Paste it on a paper and write a poem or story about it. With your leaf collection pasted in a book, you can become an expert about leaves!
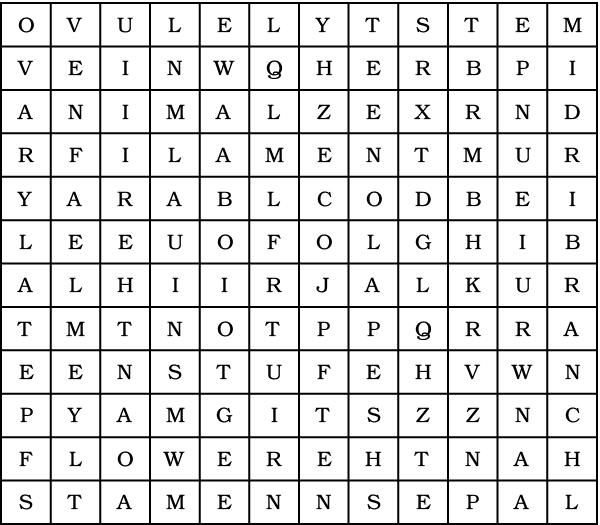
2. Names of plant parts are hidden in this grid. Search them by going up, down, diagonally, forward or backward. Have fun!
