Table of Contents

13
Fun with Magnets
Paheli and Boojho went to a place where a lot of waste material was piled into huge heaps. Something exciting was happening! A crane was moving towards the heap of junk. The long hand of the crane lowered a block over a heap. It then began to move. Guess, what? Many pieces of iron junk were sticking to the block, as it moved away (Fig. 13.1)!

You might have seen magnets and have even enjoyed playing with them. Have you seen stickers that remain attached to iron surfaces like almirahs or the doors of refrigerators? In some pin holders, the pins seem to be sticking to the holder. In some pencil boxes, the lid fits tightly when we close it even without a locking arrangement. Such stickers, pin holders and pencil boxes have magnets fitted inside (Fig. 13.2). If you have any one of these items, try to locate the magnets hidden in these.

Fig. 13.2 Some common items that have magnets inside them
How Magnets Were Discovered
It is said that, there was a shepherd named Magnes, who lived in ancient Greece. He used to take his herd of sheep and goats to the nearby mountains for grazing. He would take a stick with him to control his herd. The stick had a small piece of iron attached at one end. One day he was surprised to find that he had to pull hard to free his stick from a rock on the mountainside (Fig. 13.3).
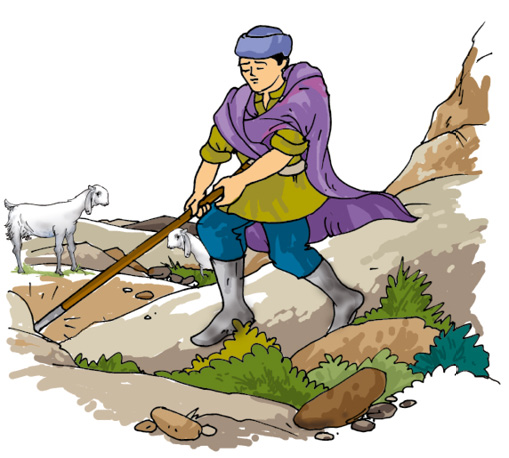
It seemed as if the stick was being attracted by the rock. The rock was a natural magnet and it attracted the iron tip of the shepherd’s stick. It is said that this is how natural magnets were discovered. Such rocks were given the name magnetite, perhaps after the name of that shepherd. Magnetite contains iron. Some people believe that magnetite was first discovered at a place called Magnesia. The substances having the property of attracting iron are now known as magnets. This is how the story goes.
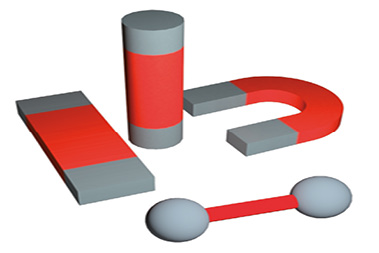
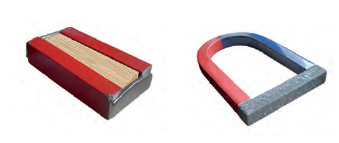
In any case, people now have discovered that certain rocks have the property of attracting pieces of iron. They also found that small pieces of these rocks have some special properties. They named these naturally occurring materials magnets. Later on the process of making magnets from pieces of iron was discovered. These are known as artificial magnets. Nowadays artificial magnets are prepared in different shapes. For example, bar magnet, horse-shoe magnet, cylindrical or a ball-ended magnet. Fig.13.4 shows a few such magnets.
Activity 1
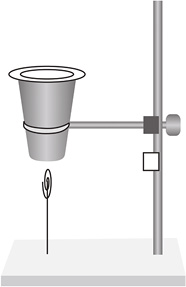
Take a plastic or a paper cup. Fix it on a stand with the help of a clamp as shown in Fig. 13.5. Place a magnet inside the cup and cover it with a paper so that the magnet is not visible. Attach a thread to a clip made of iron. Fix the other end of the thread at the base of the stand. (Mind you, the trick involved here, is to keep the length of the thread sufficiently short.) Bring the clip near the base of the cup. The clip is raised in air without support, like a kite.
13.1 Magnetic and Non-magnetic Materials
Activity 2
Let us walk in the footsteps of Magnes. Only, this time, we will change the positions of the magnet and the iron. There will be a magnet at the end of our shepherd’s stick. We can attach a small magnet to a hockey stick, walking stick or a cricket wicket with a tape or some glue. Let us now go out on a “Magnes walk” through the school playground. What does our “Magnes stick” pick up from the school ground? What about objects in the classroom?
Collect various objects of day-to-day use from your surroundings. Test these with the “Magnes stick”. You can also take a magnet, touch these objects with it and observe which objects stick to the magnet. Prepare a table in your notebook as shown in Table 13.1. and record your observations.
Table 13.1 Finding the objects attracted by magnet
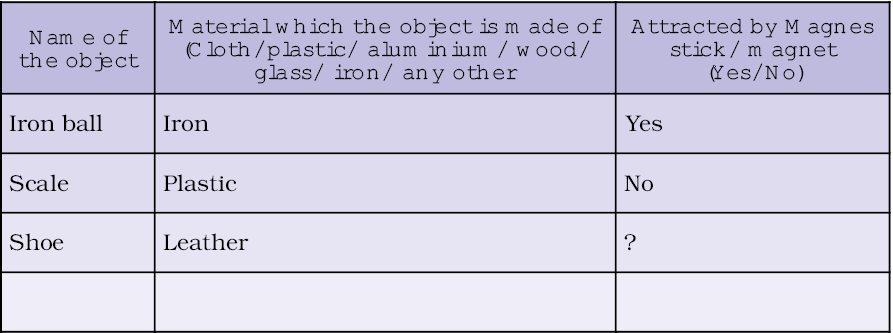
Look at the last column of Table 13.1 and note the objects that are attracted by a magnet. Now, make a list of materials from which these objects are made. Is there any material common in all the objects that were attracted by the magnet?
We understand that magnet attracts certain materials whereas some do not get attracted towards magnet. The materials which get attracted towards a magnet are magnetic – for example, iron, nickel or cobalt. The materials which are not attracted towards a magnet are non-magnetic. What materials did you find to be non-magnetic from Table 13.1? Is soil a magnetic or a non-magnetic material?
Activity 3
Rub a magnet in the sand or soil. Pull out the magnet. Are there some particles of sand or soil sticking to the magnet? Now, gently shake the magnet to remove the particles of sand or soil. Are some particles still sticking to it? These might be small pieces of iron (iron filings) picked up from the soil.
Through such an activity, we can find out whether the soil or sand from a given place contains particles that have iron. Try this activity near your home, school or the places you visit on your holidays. Does the magnet with iron filings sticking to it, look like any one of those shown in Fig. 13.6?
Make a table of what you find.
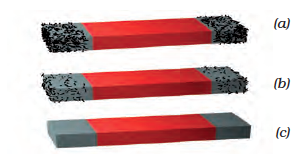
Fig. 13.6 Magnet with (a) many iron filings (b) few iron filings and (c) no iron filings sticking to it.
Table 13.2 Magnet rubbed in sand. How many iron filings?
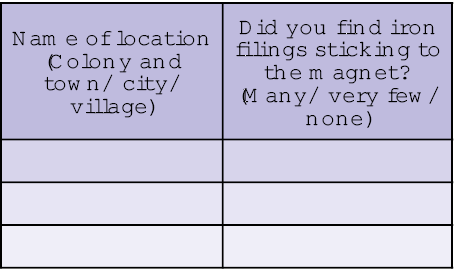
If you fill this table and send it to Paheli and Boojho, they can compare the amount of iron filings found in soil from different parts of the country. They can share this information with you.
13.2 Poles of Magnet
We observed that iron filings (if they are present) stick to a magnet rubbed in the soil. Did you observe anything special about the way they stick to the magnet?
Activity 4
Spread some iron filings on a sheet of paper. Now, place a bar magnet on this sheet. What do you observe? Do the iron filings stick all over the magnet? Do you observe that more iron filings get attracted to some parts of the magnet than others (Fig. 13.7)? Remove the iron filings sticking to the magnet and repeat the activity. Do you observe any change in the pattern with which the iron filings get attracted by different parts of the magnet? You can do this activity using pins or iron nails in place of iron filings and also with magnets of different shapes.
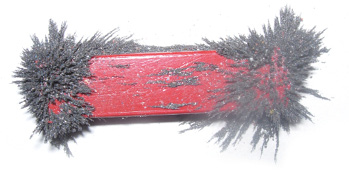
Fig. 13.7 Iron filings sticking to a bar magnet
Draw a diagram to show the way iron filings stick to the magnet. Is your drawing similar to that shown in Fig. 13.6 (a)?
We find that the iron filings are attracted more towards the region close to two ends of a bar magnet. Poles of a magnet are said to be near these ends. Try and bring a few magnets of different shapes to the classroom. Check for the location of the poles on these magnets using iron filings. Can you now mark the location of poles in the kind of magnets shown in Fig. 13.4?
13.3 Finding Directions
Magnets were known to people from ancient times. Many properties of magnets were also known to them. You might have read many interesting stories about the uses of magnets. One such story is about an emperor in China named Hoang Ti. It is said that he had a chariot with a statue of a lady that could rotate in any direction. It had an extended arm as if it was showing the way (Fig. 13.8). The statue had an interesting property. It would rest in such a position that its extended arm always pointed towards South. By looking at the extended arm of the statue, the Emperor was able to locate directions when he went to new places on his chariot.
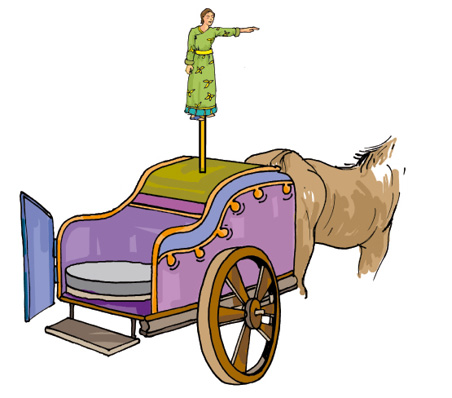
Fig. 13.8 The chariot with direction finding statue
Let us make such a direction finder for ourselves.
Activity 5
Take a bar magnet. Put a mark on one of its ends for identification. Now, tie a thread at the middle of the magnet so that you may suspend it from a wooden stand (Fig. 13.9). Make sure that the magnet can rotate freely. Let it come to rest. Mark two points on the ground to show the position of the ends of the magnet when it comes to rest. Draw a line joining the two points. This line shows the direction in which the magnet was pointing in its position of rest. Now, rotate the magnet by gently pushing one end in any direction and let it come to rest. Again, mark the position of the two ends in its position of rest. Does the magnet now point in a different direction? Rotate the magnet in other directions and note the final direction in which it comes to rest.
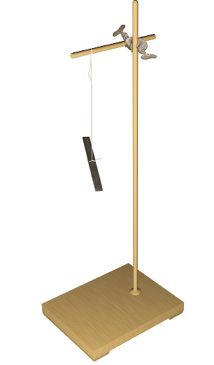
Fig. 13.9 A freely suspended bar magnet always comes to rest in the same direction
Do you find that the magnet always comes to rest in the same direction? Now can you guess the mystery behind the statue in the Emperor’s chariot?
Repeat this activity with an iron bar and a plastic or a wooden scale instead of a magnet. Do not use light objects for this activity and avoid doing it where there are currents of air. Do the other materials also always come to rest in the same direction?
We find that a freely suspended bar magnet always comes to rest in a particular direction, which is the North-South direction. Use the direction of the rising sun in the morning to find out the rough direction towards east, where you are doing this experiment. If you stand facing east, to your left will be North. Using the Sun for finding directions may not be very exact, but, it will help to make out the direction North from the South, on your line. Using this you can figure out which end of the magnet is pointing to the North and which points to the South.
The end of the magnet that points towards North is called its North seeking end or the North pole of the magnet. The other end that points towards the South is called South seeking end or the South pole of the magnet. All magnets have two poles whatever their shape may be. Usually, north (N) and south (S) poles are marked on the magnets.

This property of the magnet is very useful for us. For centuries, travellers have been making use of this property of magnets to find directions. It is said that in olden days, travellers used to find directions by suspending natural magnets with a thread, which they always carried with them.
Later on, a device was developed based on this property of magnets. It is known as the compass. A compass is usually a small box with a glass cover on it. A magnetised needle is pivoted inside the box, which can rotate freely (Fig. 13.10). The compass also has a dial with directions marked on it. The compass is kept at the place where we wish to know the directions. Its needle indicates the north-south direction when it comes to rest. The compass is then rotated until the north and south marked on the dial are at the two ends of the needle. To identify the north-pole of the magnetic needle, it is usually painted in a different colour.
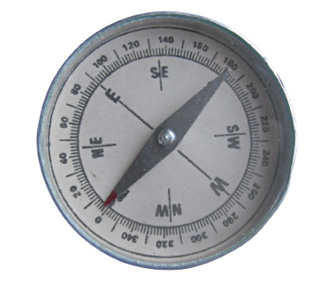
Fig. 13.10 A compass
13.4 Make your own Magnet
There are several methods of making magnets. Let us learn the simplest one. Take a rectangular piece of iron. Place it on the table. Now take a bar magnet and place one of its poles near one edge of the bar of iron. Without lifting the bar magnet, move it along the length of the iron bar till you reach the other end. Now, lift the magnet and bring the pole (the same pole you started with) to the same point of the iron bar from which you began (Fig. 13.11). Move the magnet again along the iron bar in the same direction as you did before. Repeat this process about 30-40 times. Bring a pin or some iron filings near the iron bar to check whether it has become a magnet. If not, continue the process for some more time. Remember that the pole of the magnet and the direction of its movement should not change. You can also use an iron nail, a needle or a blade and convert them into a magnet.
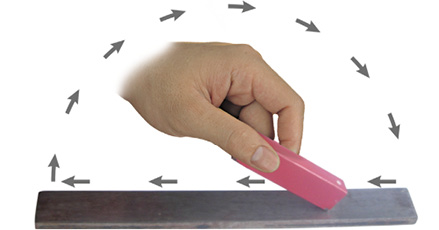
Fig.13.11 Making your own magnet
You now know how to make a magnet. Would you like to make your own compass?
Activity 6
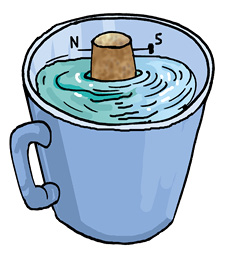
Magnetise an iron needle using a bar magnet. Now, insert the magnetised needle through a small piece of cork or foam. Let the cork float in water in a bowl or a tub. Make sure that the needle does not touch the water (Fig. 13.12). Your compass is now ready to work. Make a note of the direction in which the needle points when the cork is floating. Rotate the cork, with the needle fixed in it, in different directions. Note the direction in which the needle points when the cork begins to float again without rotating. Does the needle always point in the same direction, when the cork stops rotating?
13.5 Attraction and Repulsion Between Magnets
Let us play another interesting game with magnets. Take two small toy cars and label them A and B. Place a bar magnet on top of each car along its length and fix them with rubber bands (Fig. 13.13). In car A, keep the south pole of the magnet towards its front. Place the magnet in opposite direction in car B. Now, place the two cars close to one another (Fig. 13.13). What do you observe? Do the cars remain at their places? Do the cars run away from each other? Do they move towards each other and collide? Record your observations in a table as shown in Table 13.3. Now, place the toy cars close to each other such that the rear side of car A faces the front side of car B (Fig 13.14). Do they move as before? Note the direction in which the cars move now. Next, place the car A behind car B and note the direction in which they move in each case. Repeat the activity by placing cars with their rear sides facing each other. Record your observations in each case.
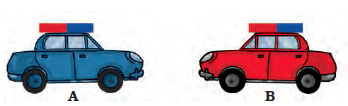
Fig. 13.13 Do opposite poles attract each other?
Table 13.3
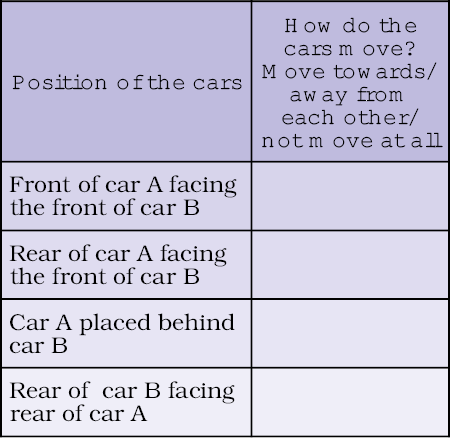
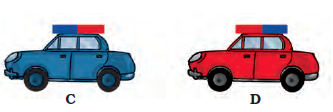
Fig. 13.14 Repulsion between similar poles?
What do we find from this activity? Do two similar poles attract or repel each other? What about opposite poles — do they attract or repel each other?
This property of the magnets can also be observed by suspending a magnet and bringing one by one the poles of another magnet near it.
A Few Cautions
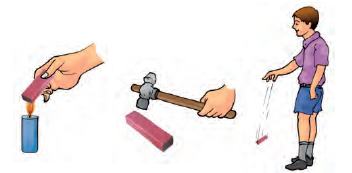
Magnets loose their properties if they are heated, hammered or dropped from some height (Fig. 13.15). Also, magnets become weak if they are not stored properly. To keep them safe, bar magnets should be kept in pairs with their unlike poles on the same side. They must be separated by a piece of wood while two pieces of soft iron should be placed across their ends (Fig. 13.16). For horse-shoe magnet, one should keep a piece of iron across the poles.
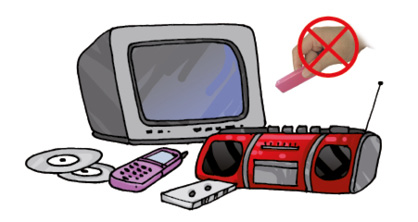
Keep magnets away from cassettes, mobiles, television, music system, compact disks (CDs) and the computer.
KeyWords
Compass

Magnet
Magnetite
North pole
South pole
Summary
- Magnetite is a natural magnet.
- Magnet attracts materials like iron, nickel, cobalt. These are called magnetic materials.
- Materials that are not attracted towards magnet are called non-magnetic.
- Each magnet has two magnetic poles—North and South.
- A freely suspend ed magnet always aligns in N-S direction
- Opposite poles of two magnets attract each other whereas similar poles repel one another.
Exercises
1. Fill in the blanks in the following
(i) Artificial magnets are made in different shapes such as __________, __________ and ____________.
(ii) The Materials which are attracted towards a magnet are called________.
(iii) Paper is not a ______ material.
(iv) In olden days, sailors used to find direction by suspending a piece of ___________.
(v) A magnet always has __________ poles.
2. State whether the following statements are true or false:
(i) A cylindrical magnet has only one pole.
(ii) Artificial magnets were discovered in Greece.
(iii) Similar poles of a magnet repel each other.
(iv) Maximum iron filings stick in the middle of a bar magnet when it is brought near them.
(v) Bar magnets always point towards North-South direction.
(vi) A compass can be used to find East-West direction at any place.
(vii) Rubber is a magnetic material.
3. It was observed that a pencil sharpener gets attracted by both the poles of a magnet although its body is made of plastic. Name a material that might have been used to make some part of it.
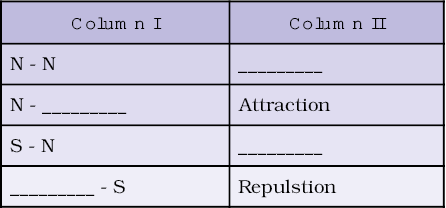
4. Column I shows different positions in which one pole of a magnet is placed near that of the other. Column II indicates the resulting action between them for each situation. Fill in the blanks.
5. Write any two properties of a magnet.
6. Where are poles of a bar magnet located?
7. A bar magnet has no markings to indicate its poles. How would you find out near which end is its north pole located?
8. You are given an iron strip. How will you make it into a magnet?
9. How is a compass used to find directions?
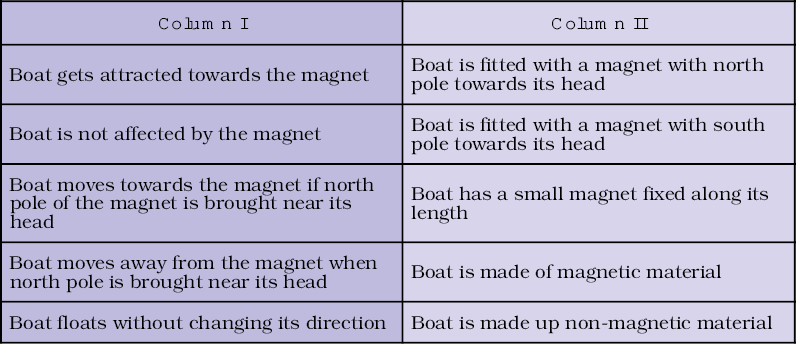
10. A magnet was brought from different directions towards a toy boat that has been floating in water in a tub. Affect observed in each case is stated in Column I. Possible reasons for the observed affects are mentioned in Column II. Match the statements given in Column I with those in Column II.
Some Suggested Activities
1. Using a compass, find the direction in which windows and entrance to your house or classroom open.
2. Try to place two equal sized bar magnets one above the other such that their north poles are on the same side. Note what happens and write your observations in your note book.
3. Few iron nails and screws got mixed with the wooden shavings while a carpenter was working with them. How can you help him in getting the nails and screws back from the scrap without wasting his time in searching with his hands?
4. You can make an intelligent doll, which picks up the things it likes (Fig. 13.17). Take a doll and attach a small magnet in one of its hands. Cover this hand with small gloves so that the magnet is not visible. Now, your intelligent doll is ready. Ask your friends to bring different objects near the doll’s hand. Knowing the material of the object you can tell in advance whether the doll would catch it or not.
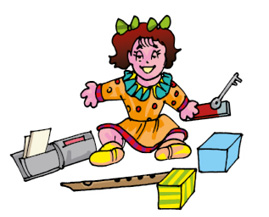
Fig. 13.17 An intelligent doll
Things to Read
‘Gulliver’s Travels’ which has this fantasy of the whole island of Laputa, floating in air. Could magnets be involved?