Table of Contents
3
Word Processing Tool
Objectives
After completing this Chapter, the student will be able to:
- work with any word processing program,
- create, save and open a document using a word processor,
- format a document inserting bullets/numbering, tables, pictures, etc.,
- set custom tabs and apply styles,
- prepare a document for printing,
- enhance the features of the document inserting graphics, tables, pictures, charts, etc., and using different formatting styles,
- modify document using various editing and formatting features within or across documents,
- produce documents for various purposes and
- apply mail merge facility to send a document to different members.
I like the computer because it keeps giving you options. What if I do this? You try it, and if you don’t like it you undo it. The original can always be resurrected. It raises the idea of working on one painting your whole life, saving it and working on it again and again.
Elliott Green
Research Associate and Tutorial Fellow, Oxford University
Introduction
We have to submit a project as part of our course evaluation. We will perhaps take a chart paper and design the project, write a report and submit it to our teacher. That’s the way we have done it all along? Have we ever thought of typing the entire project report using a computer and submitting it in a nicely designed printed form? Ever reflected on getting information from the Internet and presenting it neatly for the project? Now that’s the way things are being done! And if we are already thinking of it, it’s time to discover some document creation software, i.e., word processing tool to get the job done. Not only a project, we can get lots of other things done through it – writing letters and applications, making newsletters, designing posters, and the list goes on and on!
Computers are dominating our lives today in more ways than we know. The power of computers can however be seen in the word processing tools.
3.1 Word Processing
Word processing is the ability to create documents using a word processor. It can also refer to advanced shorthand techniques, sometimes used in specialised contexts with a specially modified typewriter. These were primarily aimed at typists, particularly in offices where other workers sent handwritten notes to be transcribed into documents for printing which were returned for reviewing. The word processing operators achieved considerable time saving largely due to:
- the faster typing speeds achieved as a result of electronic keyboards
- the assistance of the word processing software for functions like layout and spell check, etc.
Today, there are different word processors available; some are proprietary like Microsoft Word, WordPerfect Office, StarOffice Writer, etc., while others are open source like Kwrite, Openoffice.org Writer, etc. Basic functions in all remain more or less similar and do not require advanced computer or typing skills for use. However, a complete word processor is that which lets us work with text and other features, for example, pictures, tables, artistic texts, to create interesting and meaningful pages. We can make our own posters for bulletin board, type letters and attach them as documents to an e-mail, etc. Since MS Word, an integral component of MS-Office, is one of the programs which provides all these features and many more and is also being mostly used due to its ease of usage, we have taken it as a sample Word Processing Tool.
3.2 Starting the Word Processor
Most of the time, we will be able to start the word processor of our choice from the Program option under the Windows Start menu. Of course, we might also create a shortcut on the desktop to access our word processor.
For example, to start Microsoft Word, click on
 , then on
![Proglram.tif]() , and lastly on
, and lastly on![Image3392.TIF]()
 , and lastly on
as shown in figure 3.1.
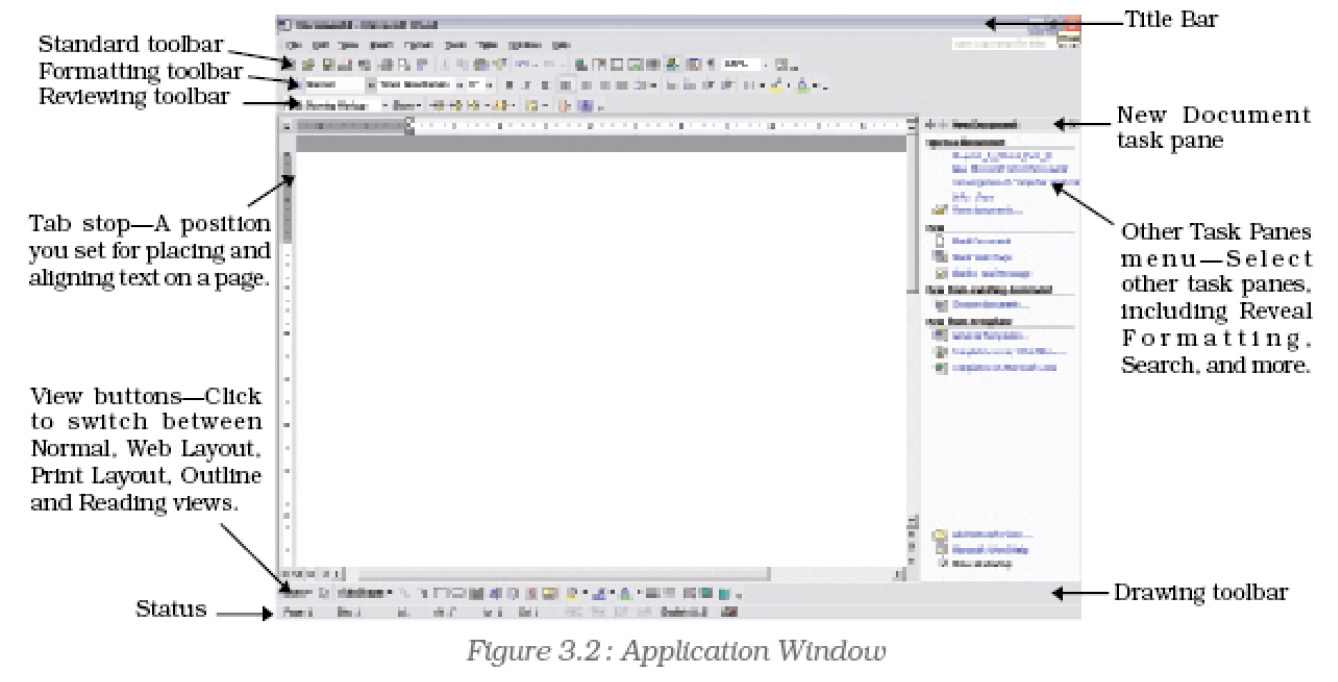
3.2.1 Anatomy of the Application Window
The first and foremost task is to get acquainted with the application window of the word processing package that we are planning to use. As already mentioned, most of the packages allow the user to perform identical tasks; their application windows too appear by and large comparable. The important components of this are:
- Menu Bar : Provides menu options like File, Edit, View, etc.
- Standard Toolbar : Contains tools for standard tasks, like saving, printing, cutting, copying, pasting, etc.

- Formatting Toolbar : Provides tools for formatting like bold, italic, underline, etc.
- View Buttons : Provides options to switch between Normal, Web Layout, Print Layout, Outline and Reading views.
- Tab stop: A position we set for placing and aligning text on a page.
- Drawing ToolBar : Provides tools for drawing basic shapes, inserting pictures, changing colors, etc.
- Status Bar : This provides information about the current document.
Other programs like WordPad, NotePad could also be used to create word documents, but these programs lack certain important features as compared to MS-Word. Therefore MS-Word is a more complete package for word processing.
When we start MS-Word, a blank document opens up. Word names the document as Document1 (Figure 3.2). We can also start a new document in any of the following ways:
- Click on New button (
![New%20Button.tif]() ) on the Standard toolbar, or
) on the Standard toolbar, or
 ) on the Standard toolbar, or
- Click on New option in the File menu (Figure 3.3).
After we have started a new document, type in some introductory text into the document. When we start a new document, the insertion point (the blinking vertical line, also called cursor) appears in the first column of the first line. We can just type the text, and it will appear where the insertion point is. But in a document where we already have the text, we can place the insertion point anywhere in the text by clicking the mouse pointing at the desired location.
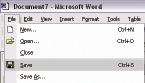
3.3 How to Save a Document?
- Click on Save button (
![Save%20Button.tif]() ) on the formatting toolbar, or
) on the formatting toolbar, or - Click on the Save option in the File menu (Figure 3.4).

The Save As dialog box appears (Figure 3.5). It’s a good idea to give the new document a name and save it as soon as we create it.
The steps we should follow to save our document are as follows:
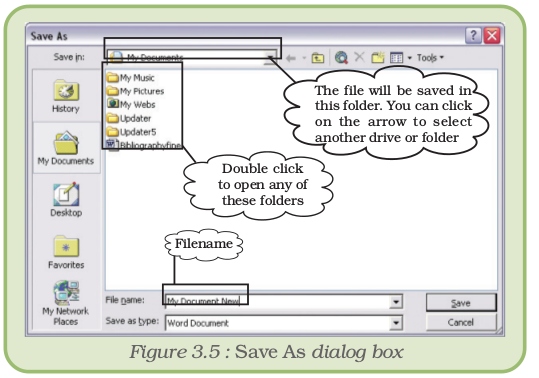
- Automatically, we will save our file in My Documents folder. If we need to save in some other location, navigate towards it by clicking on the arrow on the right, and selecting one of the available options. Select the location. Figure 3.5 shows the drive/folder/sub-folder where we want to save the document.
- Type the filename as Document New and Type of document as Word document.
- Click on the Save button.
We can cancel the process at any time by clicking on the Cancel button.
3.4 How to Open an Existing Document
- Click on Open under File menu, or click on
![Open%20Button.tif]() tool on the Standard toolbar.
tool on the Standard toolbar. - The Open dialog box is seen on the screen. This is similar to the Save As dialog box.
- Navigate to the folder where our file is located, select the filename.
- Click on Open.
 tool on the Standard toolbar.
3.5 Formatting Text
Formatting refers to the way our text will look like – the design of the characters, their size, the space between paragraphs, their alignment, etc.
First, selection of text.
- By using the mouse, position the insertion point (by clicking the mouse) at the beginning or end of the block to be selected and then click and drag to the end or beginning of the block.
- By using the shortcuts:
–Double-click on a word to select it.
–Triple-click on a paragraph to select it.
–Ctrl+click on a sentence to select it.
There are basically two types of formatting:
- Character formatting, and
- Paragraph formatting
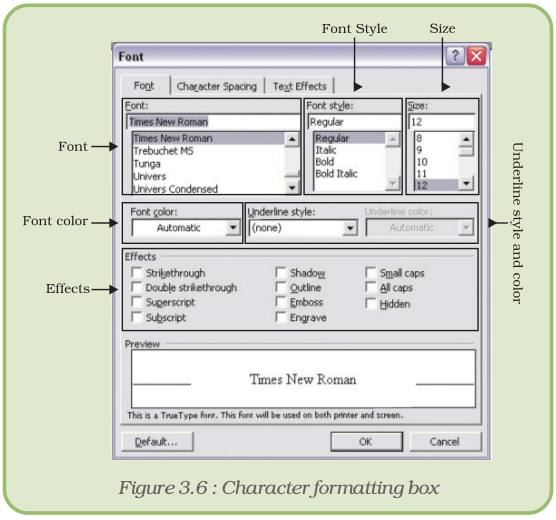
3.5.1 Character Formatting
Character formatting is the one which we can apply to any individual character or to a group of characters. It has the following options (Figure 3.6):
Font : This decides the appearance of our characters.
Font Style : We can make characters stand out by making them Bold, Italic or both.
Size : This increases/decreases the size of the characters – the size measured in points (72 points =1 inch)
Font Color : We can apply colours to the characters for printing the final document.
Underline : We can draw attention to some particular text by underlining it.
Effects : We can also apply effects to our text. Two most common ones are Superscript and Subscript. The 2 in 32 is a superscript. To make a character into superscript, we need to select only that character, and click the box against Superscript. Similarly, 1 in T1 is a subscript.
3.5.2 Paragraph Formatting
There are some formatting features that get applied to an entire paragraph or paragraphs, but not to any given character or a group thereof. Such formatting features are described as Paragraph formatting.
It provides the following options (Figure 3.7):
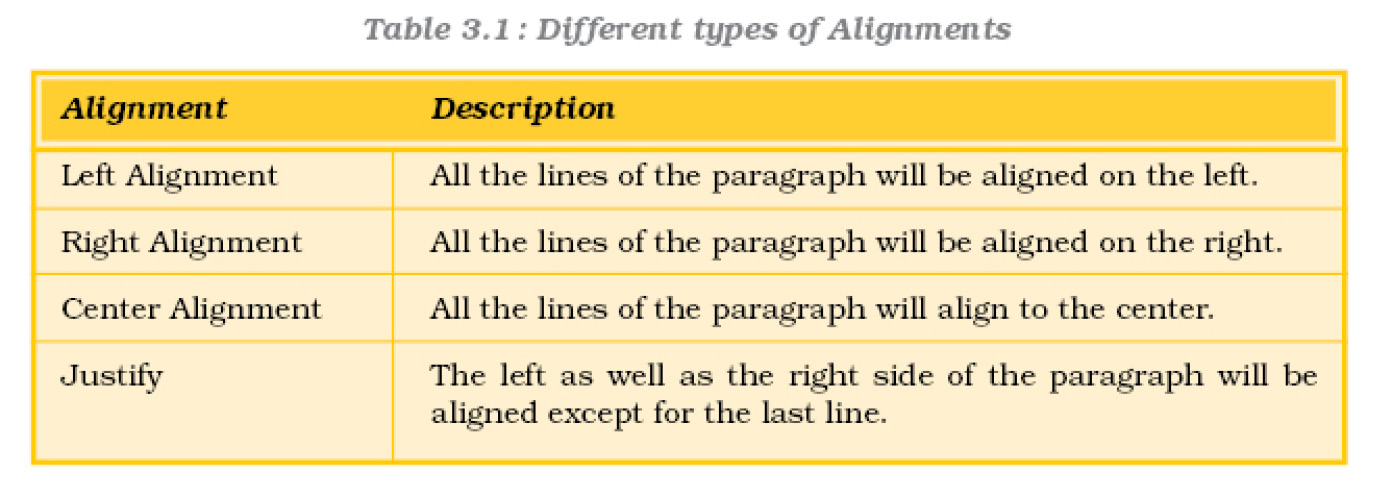
Alignment : The alignment of a paragraph may be left, center, right or justify as given in Table 3.1.
Indentation : Indents are the left and right boundaries of selected paragraphs within a document. This may be necessary when different paragraphs have different left and right boundaries. For example, we can see the indentation in poems. The indentation options available in most word processors are Left and Right. Apart from these, we can have special indentation in the form of First Line and Hanging.
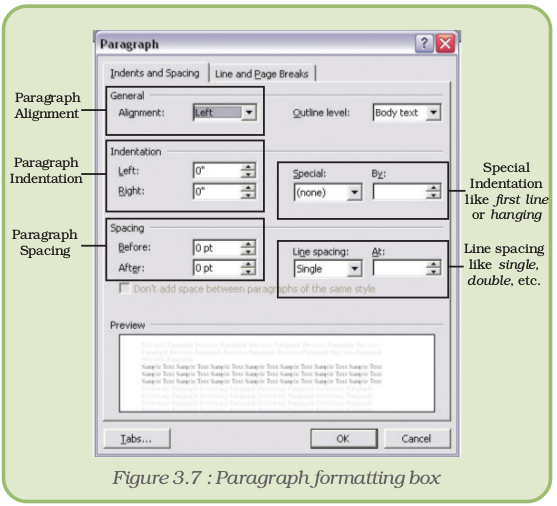
Spacing : This option allows us to have some space before and/or after a paragraph or a group of paragraphs. We can select the paragraph(s) and select or type in the desired value against the appropriate option – Before or After. These values are measured in points.
There is also a Line spacing option, which decides on the spacing between the lines of the paragraph. Normally we will type with the value Single for it. But if we want to have more space between the lines, we can select 1.5 lines or Double for it.
Activity 3.1
Type “We are changing the font”. Try the activity by using the following options:
- font Arial,
- font style Italic,
- size 10 point,
- font colour blue,
- underline style - a simple line,
- underline colour green, and
- effects Small Cap.
- right alignment,
- indentation 1 inch for left as well as right,
- first line indent 0.5 inch,
- spacing as 6 point both before and after the paragraph and
- line spacing 1.5 lines.
3.5.3 TO ADD BULLETS OR NUMBERING
Bullets are small dots, squares, dashes or graphics that are often seen before the text (word, line, sentence, paragraph or any other object). To add bullets,
- Select the object
- Click on Bullets and Numbering from Format menu to open the Bullets and Numbering dialog box (Figure 3.8)
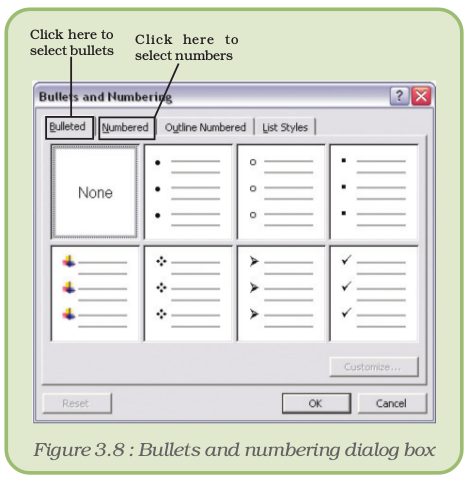
Click on the bullet of your choice, and click OK.
Instead of a bullet, a number may also precede a group of paragaphs. To do so, proceed as follows:
- Choose the numbered tab from Bullets and Numbering of Format menu to view the numbering options.
- Select the numbering option of choice, and click OK.
To remove bullet(s) or number(s) applied to paragraph(s), select the paragraph(s), open the Bullets and Numbering dialog box, and select None in Bulleted or Numbered tab. Click on OK.
Many of the formatting options discussed above can be applied through the Formatting Toolbar (Appendix 3.1 Tools in Formatting Toolbar).
The tools for Bold (  ), Italic (
  ), Underline (
  ), Shadow, Numbering, and Bullets act as toggles – that is, the desired formatting will be applied if it is not already applied to the selected text, else it will remove that formatting.
3.5.4 Using Tabs to Arrange Data
The tab setting allows us to align the text at a particular point, or to create a tabular layout. Try this out – open a new document and
- type 2 3 4 5 6, pressing the tab key after every digit. Press the Enter key.
- type 22 33 44 55 and 66, again pressing tab key after every number (type 22, press tab, type 33, press tab, and so on).
3.6 A Glance Into Views
Most word processors provide us multiple views: we can select the one that suits the work at hand. We can display our document in one of the five views: Normal layout, Web Layout, Print Layout, Reading Layout or Online Layout.
- Normal Layout
Normal layout view shows formatting such as line spacing, font, point size and italics.
- Web Layout
Web layout view enables us to view our document as it would appear in a web browser such as the Internet Explorer.
- Print Layout
The Print Layout view shows how the document will look when it is printed.
- Reading Layout
Reading Layout view formats our screen to make reading our document more comfortable.
- Outline Layout
Outline view displays the document in outline form. Only headings can be displayed hiding the text under them. We can just move a heading; the accompanying text will automatically move with it.
We can opt for any one of the available views by selecting it from the View menu, or clicking on the appropriate View Buttons – 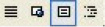 .
.
3.7 Create a Table
Tables provide a neat way to present complex information in vertical columns and horizontal rows of cells. Each cell can contain text – a single paragraph or multiple paragraphs – or graphics. To insert a table:
- click on Insert in the Table menu and select on Table from resulting menu. (Figure 3.9)
- This opens up the Insert Table dialog box (Figure 3.10). Type in some value for the number of columns and rows… let us type in the values 5 and 4 respectively.
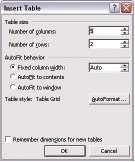
Figure 3.10 : Insert Table
dialog box
- We can now see this table (Figure 3.11) on the page – with 5 columns and 4 rows

Figure 3.11 : Blank table created
- Time to type in some text! We can move the insertion point from one cell to another by clicking the mouse at the desired cell. We can also press the Tab key to move to the next cell, or Shift+Tab keys to move to the previous one. !, !, ! and ! keys can also be used for this.
- When a table is inserted, all columns are of same width and all rows are of same height. To change their size, move the mouse pointer to the line separating the rows or columns. If the mouse is at column separator, it will change to
![3450.jpg]() ; if it is on the line bordering two rows, it changes to
; if it is on the line bordering two rows, it changes to ![3455.jpg]() . Now drag the mouse to change the size of the column or row. If the cell is selected, then only the size of the selected cell changes instead of the entire column or row.
. Now drag the mouse to change the size of the column or row. If the cell is selected, then only the size of the selected cell changes instead of the entire column or row.
 ; if it is on the line bordering two rows, it changes to
  . Now drag the mouse to change the size of the column or row. If the cell is selected, then only the size of the selected cell changes instead of the entire column or row.
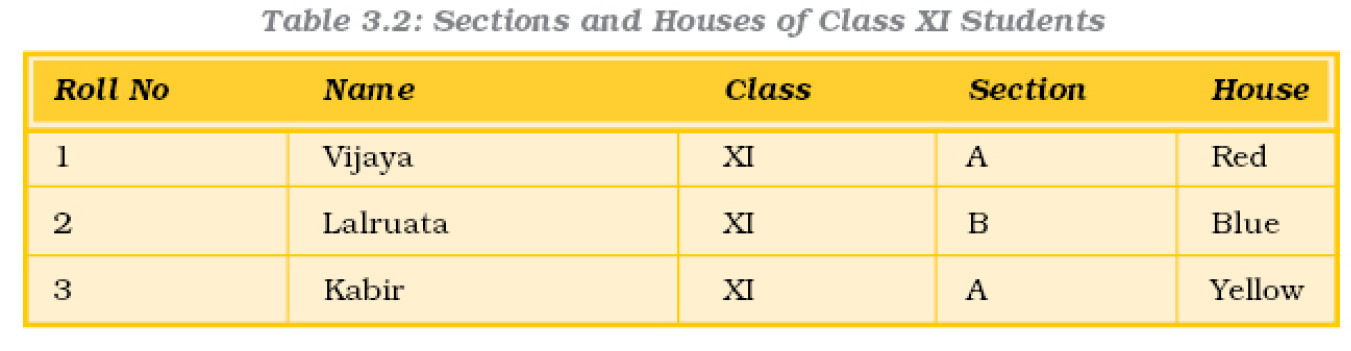
- Type in the text and adjust the column widths to make a table as shown in Table 3.2:
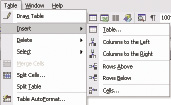
There are times when we need to change the number of rows/columns after we have inserted the table. There are two options each for rows and columns in the Table menu.
- To insert columns, use the options
![Columns%20to%20the%20left.tif]() Columns to the Left or
Columns to the Left or ![Columns%20to%20the%20Right.tif]() Columns to the Right under Insert option of Table menu. Put the insertion point in any cell at the column adjacent to the location where the new column is to be inserted, and select the appropriate option.
Columns to the Right under Insert option of Table menu. Put the insertion point in any cell at the column adjacent to the location where the new column is to be inserted, and select the appropriate option. - For rows, the options are
![Rows%20Above.tif]() Rows Above and
Rows Above and ![Rows%20Below.tif]() Rows Below. We can use these like we did for inserting columns.
Rows Below. We can use these like we did for inserting columns.
 Columns to the Left or
  Columns to the Right under Insert option of Table menu. Put the insertion point in any cell at the column adjacent to the location where the new column is to be inserted, and select the appropriate option.
 Rows Above and
  Rows Below. We can use these like we did for inserting columns.
To delete row(s) or column(s), we can utilise the Delete option under the Table menu. The various alternatives under this option are seen in figure 3.12.
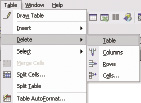
Figure 3.12 : Table menu for delete options
Select cell(s) in appropriate row(s) or column(s), and click on the choice to delete Rows or Columns as desired. To delete the entire table, put the insertion point somewhere in the table and click on Table under Delete option.
Two or more cells can be merged into a single cell. Alternatively, a single cell can be split into several new cells. These options are also available under the Table menu as seen in the figure above. To merge cells, select two or more cells and click on  Merge Cells. To split cell(s), select the cell(s) and click on
  Split Cells... . The Split Cells dialog box appears, soliciting the number of rows and columns into which we would like to split the cell(s).
The easiest and quickest way to decorate the table:
Click on  Table AutoFormat... under the Table menu. Table Autoformat dialog box appears.
Let us decorate the table we had created:
- Place the insertion point anywhere in the table.
- Open the table menu, and click on Table Autoformat.
- In the Table AutoFormat dialog box (Figure 3.13), select Contemporary. We can observe the preview portion of the dialog to see the effect.
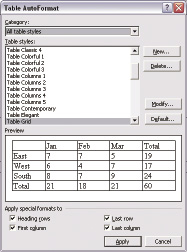
Figure 3.13: Table AutoFormat dialog box
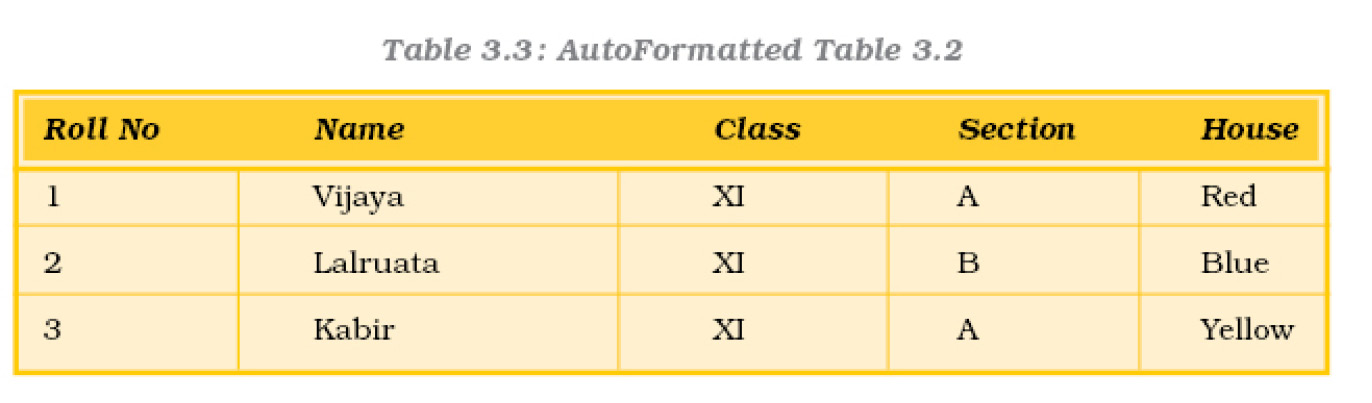
Click on Apply. Our simple table now looks very different (Table 3.3) from what it originally was.
3.8 Inserting Picture in a Document
Graphics can add interest and impact to the documents. Suppose we have completed a letter telling our friends about the great party we threw for a birthday. The words capture the festive mood of the event, but that page of text looks lifeless and dull. We need graphics to enliven our prose.
We can insert picture from a picture file or we can use any of the clip arts provided with MS-Word or any word processor of our choice.
3.8.1 Insert a Clip Art
Let us insert a clip art into our Document New file:
- Open the Document New file.
- On the Insert menu, select Picture, and then click Clip Art.
- The Clip Art task pane opens up. (Figure 3.14)
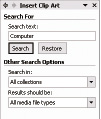
Figure 3.14 : Clip Art task pane
- In the Clip Art task pane, type the search term (for example, “computer”) in the Search for field, and click on the Search button. If we are not looking for anything in particular, don’t type in any text, just click.
- Select the insertion point in the document where we want to insert clip art (Figure 3.15 (a)), and then click the clip we want on the task pane (Figure 3.15 (b)).
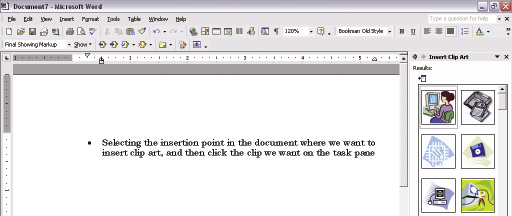
Figure 3.15 (a) : Selecting the insertion point , (b) Selecting the clip art
- The clip art will get placed where the insertion point was (Figure 3.15 (c)).
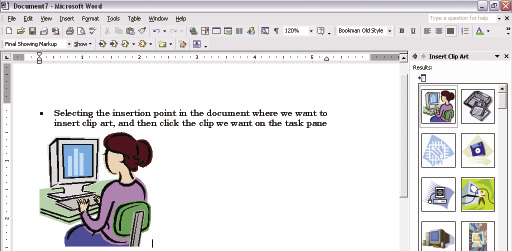
Figure 3.15 (c) : Inserting clip art in the document
3.8.2 To Insert a Graphic From a File
- On the Insert menu, select Picture, and then click from File.
- The Insert Picture dialog box opens up. Browse the graphic file.
- Click the file, and then click Insert.
- The picture gets inserted where the insertion point was located.
3.8.3 To Apply Wrapping Style
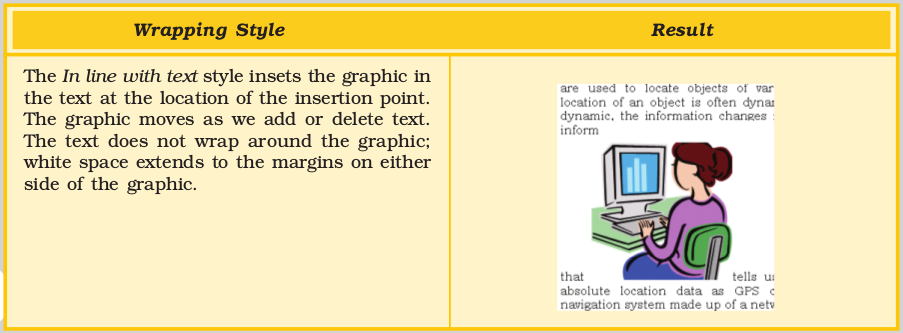
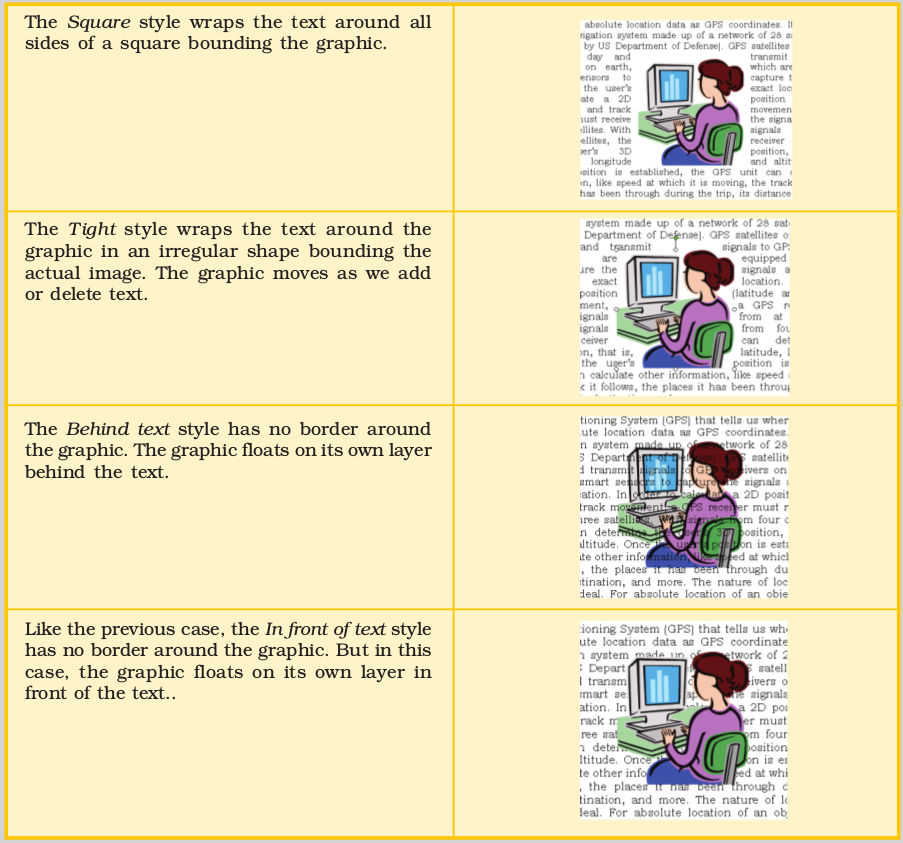
We have inserted a clip art or picture, but we do not want blank space to the right and left of the picture. No problem, we can further refine the layout of the graphic and text. Using the five wrapping styles, we can create documents with just the look we want.
To apply wrapping styles to a graphic,
- Click on the graphic to select it.
- On the Format menu, click Picture.
- In the Format Picture dialog box, click the Layout tab.
- Click the preferred wrapping style, and then click OK.
Different Wrapping styles are given in Appendix 3.3.
3.9 How to Copy, Move and Delete text
Any word processor will allow us to copy or move text/graphics from one part of the document to another or from one document to another. If the same text is appearing in more than one place, the copy option can save us from quite a lot of trouble. If we want to reorganise the document by changing the position of certain text, we need not delete the text from existing location and re-type at the new location – just move it from its current location to the desired location.
To copy or move, proceed as follows:
- Select the item to copy or move. This can be a character, a few words, some paragraphs or a graphic.
- If we want to copy, click on Copy from Edit menu. Alternatively,
- we can click on
![3524.jpg]() tool on the Standard toolbar.
tool on the Standard toolbar. - If we want to move, click on Cut from Edit menu. Alternatively, we can click on
![3530.jpg]() tool on the Standard toolbar.
tool on the Standard toolbar. - Place the insertion point at the destination location (this may be within the same document, or in another document), where we want the text or graphic to be copied or moved.
- Click on Paste from Edit menu. Alternatively, we can click on
![3535.jpg]() tool on the Standard toolbar.
tool on the Standard toolbar.
 tool on the Standard toolbar.
 tool on the Standard toolbar.
 tool on the Standard toolbar.
To delete some text or graphic, select the same and simply press the Delete key.
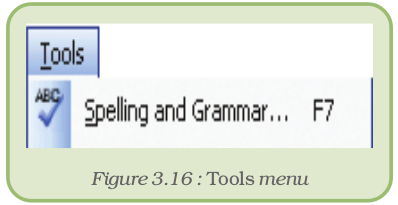
3.10 Checking Spelling and Grammar
Checking spelling and grammar in a document after we finish typing and editing the text is very useful. We can check for possible mistakes and then confirm each correction. In Microsoft Word, we can start the spell checker by clicking on Spelling and Grammar option under Tools menu (Figure 3.16).
When the spell checker finds a spelling mistake, a dialog box or task pane (Figure 3.17) is displayed and the first misspelt word found by the spelling checker is selected
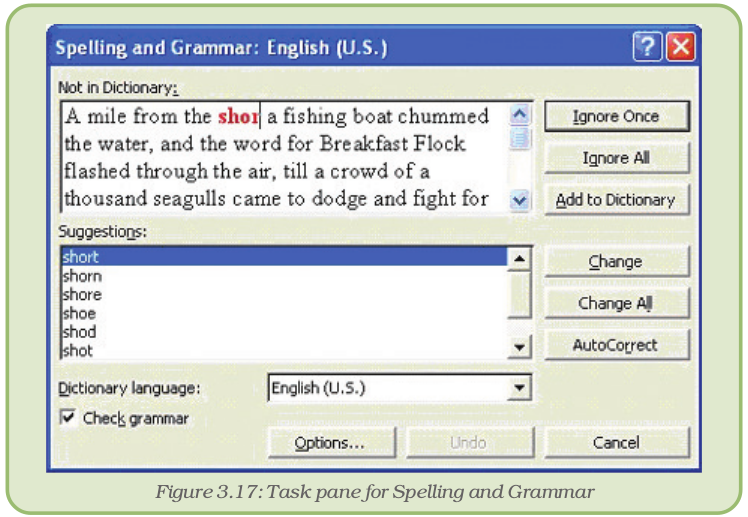
We can resolve each error that the program finds in different ways:
- We can use one of the words suggested by the word processor and click Change.
- We may want to change the word ourselves. Click the word on the document (not in the Spelling and Grammar dialog box) and edit it. After fixing the error, click on Resume.
- The indicated word may actually be the correct one, but not available in the Dictionary; for example, the name of the town Shillong. To include such word into the word processor’s dictionary, click Add to dictionary. If, we would like to ignore it, click Ignore once. If we want to ignore all instances of such cases in the document then click Ignore All.
After we resolve each misspelt word, the word processor flags the next misspelt word so that we can decide what we want to do.
After the program finishes flagging the spelling mistakes, it begins showing us the grammatical mistakes. We can proceed in a similar fashion to correct those also.
Alternatively, we can check spelling automatically while we type. In that case, we can be more confident that we won’t need to correct a lot of spelling mistakes when we are ready to deliver our document. Word flags misspelt words by underlining them with a wavy red line (Figure 3.18) so that we can easily spot them. We can right-click the misspelt word to see suggested corrections on the resulting shortcut menu.
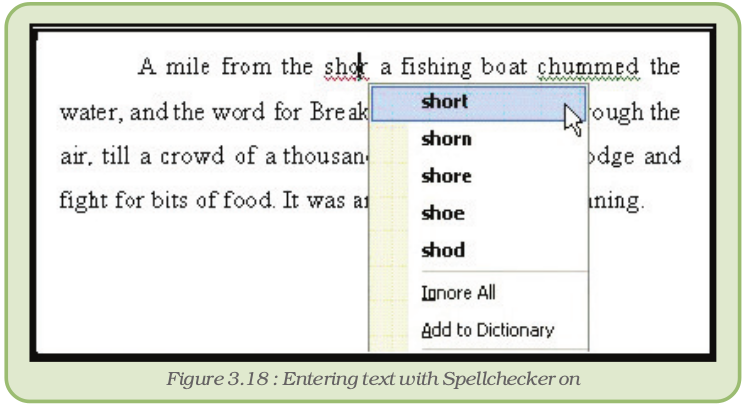
Similarly, the grammar mistakes are flagged by a wavy green underline – we can correct these just as we corrected the spellings.
However, don’t blindly accept the corrections suggested by the word processor. The word processor is not always accurate in detecting spelling and grammar errors!
3.11 Setting Page Layout
When a document is to be printed, the word processor has to be told as to how the document should appear on the page, i.e., its paper size, margins, layout of the paper, etc.
To alter the page setup, click on Page Setup under the File menu. In the resulting Page Setup dialog box (Figure 3.19), set the margins to the required values. Let us set the margins as Top – 1 inch, Bottom – 1 inch, Left – 1.25 inch and Right – 1.25 inch.
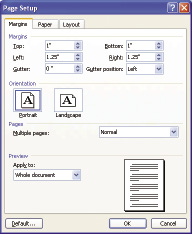
Figure 3.19 : Page set up dialog box
Apart from the four margins, we may set the following:
- Gutter is the space left on one side for stitching and binding – give an appropriate value, if required.
- The orientation decides whether the page will be printed lengthwise (portrait) or across its breadth (landscape). In other words, Portrait is taller than it is wide; Landscape is wider than it is tall. The orientation buttons themselves are quite self-explanatory.
In the Paper tab, select the paper size on which we are going to print the document. There are standard paper sizes like letter, A4, legal etc. Either we can select one from these or we can enter the width and height of the paper we are using.
Click OK once we have typed in the values for margins, chosen the orientation, and selected the paper size.
3.12 Mail to Many in Simple Steps – The Mail Merge
We use mail merge when we want to create a set of documents that are essentially the same except that each contains some unique elements. For example, in a letter to invite friends to a birthday party, the date of invitation and the text thereof will be same everywhere, but the address and greeting line will be different in each letter.
- A set of labels for envelopes : The return address is the same on all the labels or envelopes, but the destination address is unique on each one.
- A set of form letters, e-mail message or faxes : The basic content is the same in all the letters, messages or faxes, but each contains information that is specific to the individual recipient, such as name, address or some other piece of personal data.
Creating each letter, message, fax, label, envelope, etc. individually would take hours. That’s where mail merge comes in. Using mail merge, all we have to do is create one document that contains the information that is the same in each version. Then we just add some placeholders for the information that is unique to each version. The word processor will take care of the rest.
We can prepare mail-merged documents by using this facility as described in Appendix 3.2.
Summary
- A word processor is a software for typing, formatting and creating documents.
- There are two types of formatting that we can apply – character formatting and paragraph formatting.
- For character formatting, we must first select all the characters where we want to apply the formatting. For paragraph formatting, it is enough to have any part of the paragraph selected – for a single paragraph, it is sufficient to place the insertion point somewhere in that paragraph.
- Character formatting includes – font, font style, size, font colour, underline style, underline colour, and effects – for example subscript, superscript, emboss, etc.
- Paragraph formatting comprises of – alignment; indents – left, right, first line and hanging; space before and after paragraphs; and line spacing.
- To highlight the points, we can use bullets or numbering for the paragraphs.
- If we plan to put tabular data, we can either use tabs – left, right, center and decimal; or use table to type in the text within the cells.
- To enhance the appeal of the document, we can insert pictures – either from clip art, or from files. We might have to select appropriate wrapping options to have the text around the picture.
- We can move or duplicate text in a document or across documents using options like Cut, Copy and Paste.
- If we are likely to make mistakes (and all of us are!), we can utilise the word processor to check the spellings and grammar.
- Before we print the document, we must decide on margins, page size, gutter etc. through Page Setup.
- If we need to have many copies of documents which are same except for some parts, like invitation letters, we can use the mail merge facility to make the task simpler.
- We can allow others to review the documents by editing as well as by adding comments. These changes can be tracked. We can later decide as to whether to keep those changes or to revert back to the original text.
Exercises
Short Answer Type Questions
1. What is a cursor?
2. How many types of text alignments are there?
3. What are the methods of selecting a line in MS-Word?
4. How many types of page orientations are there in page setup?
5. What are the views used in word processors?
6. How can words be added in word processors, dictionary?
7. List the advantages of word processors.
Long Answer Type Questions
1. Give the steps to insert a clip art picture to your document.
2. What is formatting? Discuss the different types of formatting that you can have using a word processor.
3. Discuss the different types of indentation.
4. How is line spacing different from space before or after paragraphs?
5. What are the various facets of Paragraph Formatting? Explain each one clearly.
6. Explain the process of applying bullets to some paragraphs in a document.
7. What is tab? How do they assist in the process of formatting?
8. What is style? Discuss the steps involved in defining styles. What is the use of style for next paragraph?
9. How do you change the features of an existing style?
10. How do you insert table in your document? Discuss the steps involved in splitting and merging cells.
11. Discuss the various text wrapping options available when you insert a picture in your document.
12. Explain the utility of mail merge.
13. Define mail merging in word processor.
Multiple Choice Questions
Identify the most appropriate option for the following :
1. To increase the space on the left for just one paragraph in a page, you can adjust
(i) Left indent
(ii) Right indent
(iii) Alignment
(iv) Tabs
2. When you want to repeat the same formatting at different places in your document, you can take the help of
(i) Character formatting
(ii) Paragraph formatting
(iii) Style
(iv) Tabs
3. Which of the following is not character formatting?
(i) Text Colour
(ii) Alignment
(iii) Font
(iv) Subscript
4. Which of the following is not a paragraph formatting?
(i) Alignment
(ii) Indentation
(iii) Line Spacing
(iv) Underline style
5. Which of the following cannot be included in a style?
(i) Paragraph formatting
(ii) Character formatting
(iii) Table
(iv) Numbering
Activities
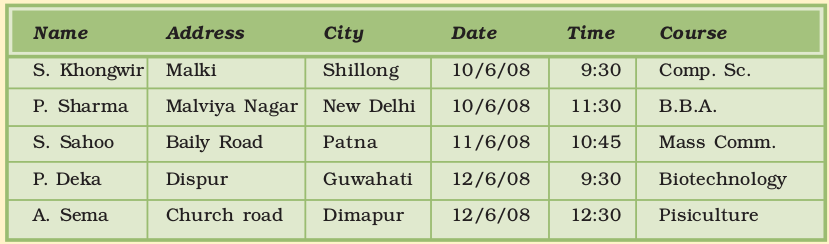
1 The following interview letter is to be sent to all the candidates who had applied for admission to XYZ College, informing them the respective date and time of interviews. The name, address, date and time of interview for each candidate is given. Use Mail Merge to perform this task. Save your work in the folder created in question number 1.
XYZ COLLEGE : PQRPUR
Dear......................... Date : ............................
Apropos your application for admission to the Degree course on ................... at this college, you are requested to attend the interview on ................... at ................... The interview will be held at the Principal’s office. You are to bring :
(i) The higher secondary marksheet.
(ii) Birth certificate
(iii) Character certificate from the last institution attended.
Please note the following :
- Attending the interview does not qualify you for admission.
- In case of any delay on your part, your candidature will stand cancelled.
Principal.
The data for the Merging are as follows:
2. Type the text given below, taking note of all the formatting.
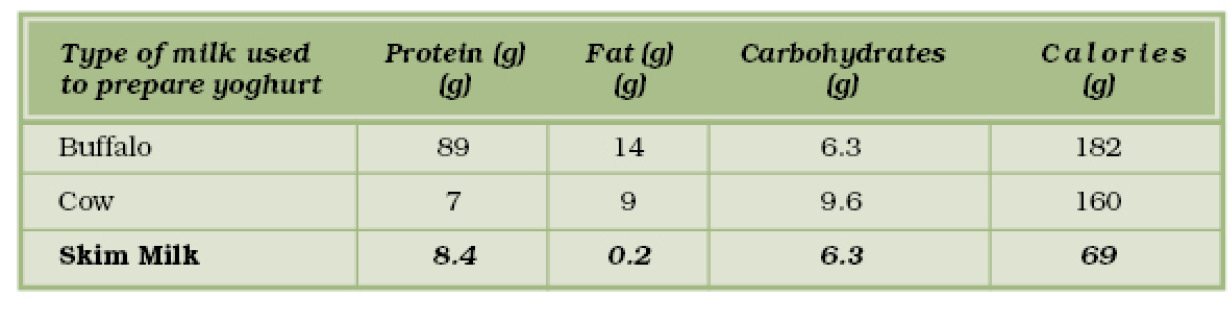
Don’t skim over this
Tibetan monks consumed a bowl of this wonder food a day, and lived to the ripe old age of 109. Ayurvedic practitioners have prescribed it for 5,000 years and health-food buffs swear by its magical properties.
Yet today the reports are conflicting. Because milk, the main ingredient in the preparation of yoghurt, is considered by many nutritionists to be highly mucous-forming and difficult to digest, yoghurt has received a step-motherly treatment from the medical community. Yet ounce for ounce, it packs more calcium, protein, riboflavin, phosphorous and vitamin B12 than milk.
3. Type the text given below, taking note of all the formatting.
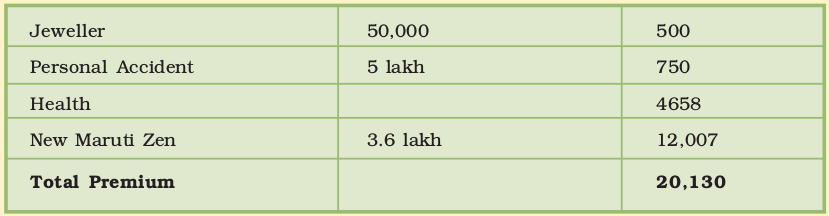
Covering All Bases
Dev Dasgupta, 35, is a middle-level manager in a private bank. He’s taken a householder’s policy to insure his house (valued at Rs 20 lakh), its contents (valued at Rs 3 lakh) and his wife’s jewellery (Rs 50,000). He also has a comprehensive cover for his pride and joy, a zippy, new Maruti Zen (cost: Rs 3.6 lakh). Additionally, he’s bought a personal accident cover for Rs 5 lakh, and a health cover of Rs 2 lakh each for himself and his wife. Here’s what he pays to secure everything he values. Well, almost everything...
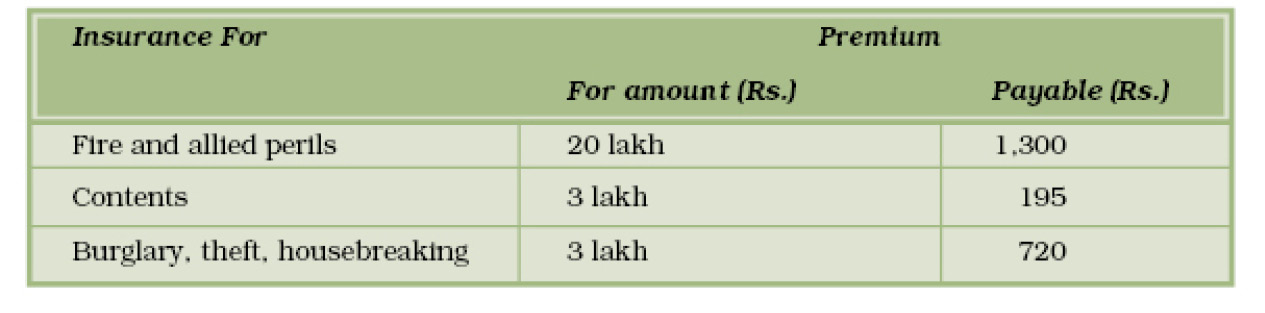
The data for the Merging are as follows:
4. Get some pictures of your school. Now design a calendar for the next year, with one picture for every month of the year.
Appendices
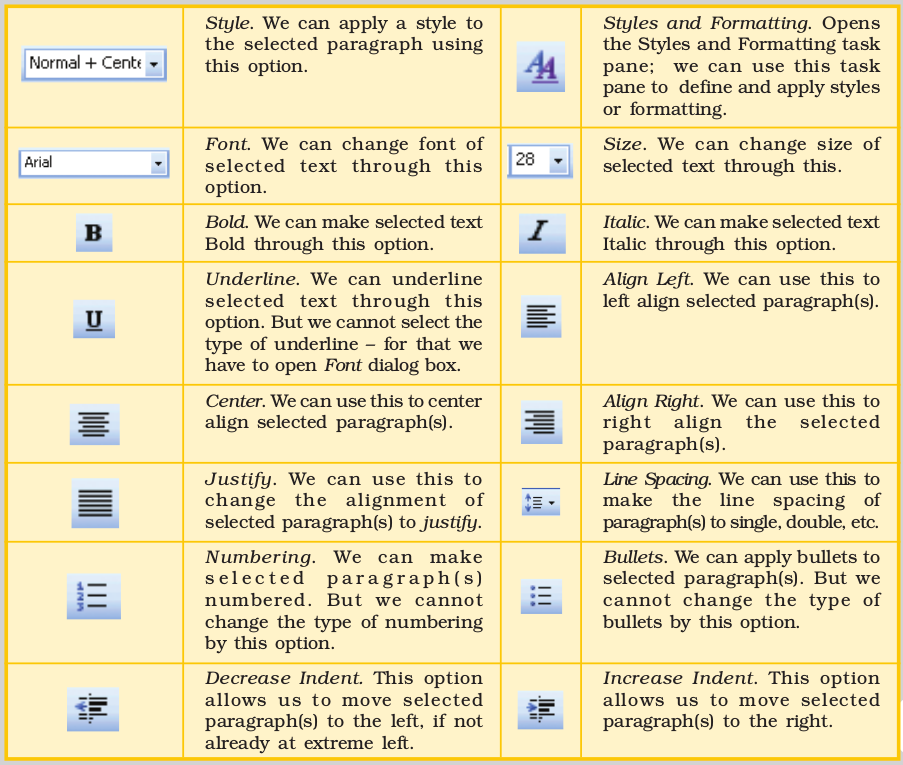
Appendix 3.1 : Tools in Formatting Toolbar
Appendix 3.2 : Mail Merge
Mail to Many in Simple Steps
In Word, we initiate the process of mail merging by starting the Mail Merge Wizard from the Tools menu.
- The Mail Merge Task Pane becomes visible in the task pane, asking us to select the type of document we want – letters, e-mail messages, envelopes, labels, etc. Since we want to invite your friends through a letter, select Letters, and click on Next at the bottom of the pane (not seen in the figure).

- Microsoft Word now prompts for Selecting starting document. The options provided are Use the current document, Start from a template, and Start from existing document. Select the first option. We can later try out the others on our own!
- We now have to provide the details or the receipients – like name, address, etc. which will be different for every letter. The options provided in the task pane are Use an existing list, Select from Outlook contacts and Type a new list. We have not yet made any list of friends we would invite, so select the last option to create a new one. Click on Create in the task pane.
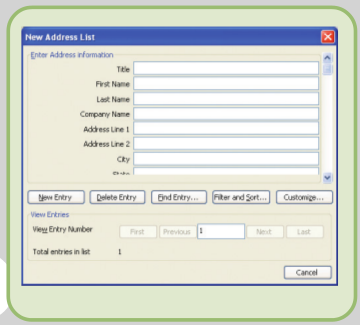
- The New Address List dialog box opens up for us to type in the details that will vary from one letter to another. This dialog box has various buttons that allow us to make New Entry, Delete Entry, Find Entry, view existing entries by moving to First, Previous, Next and Last entry.
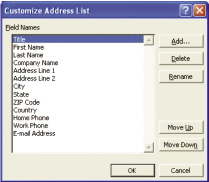
- However, it will be very rare that all the fields (like Title, First Name, etc.) in the New Address List dialog box will match your requirement. There will be some we don’t need, while there may be others which are not included. To modify the list of fields, click on Customise.
- The Customise Address List dialog box opens up. In this dialog box, we can add new fields, delete or rename existing fields, and also change the order in which the fields are arranged by using the Move Up or Move Down buttons.
- Since we want to send the letters to your friends, delete the unwanted fields – Title, Company Name, Address Line 2, ZIP Code (we don’t have ZIP code in India, instead there is PIN Code), Country (no one is going to be invited from abroad) and Work Phone by selecting them one at a time and clicking on Delete button.
- We might also want to invite few of your teachers, but at a different time. So include Time as a field by clicking on Add and typing in the field name.
- On the screen is the New Address list dialog box with the modified field list. Type in the details of your friends; clicking on New Entry button after completing each receipient’s details.
- Once we have completed entering the details of your invitee, click on Close button. We will be prompted to save the address list. Save it with an appropriate name – say FriendsList. The list is saved as a Microsoft Access database.
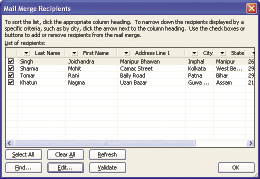
- We can now see the Mail Merge Recipients dialog box containing the details that we have just entered. If we don’t want to send the invitation to one or more names in the list, just uncheck the boxes in front by clicking on them. Click on OK, once done.
- Click on Next on the task pane to proceed with mail merge. (There are opions like Select a different list and Edit receipient list). Try them.
- In the document that is open, type in the part of the letter which is common to all, like the text of your letter. Don’t put in the name, address or time, since they will not be the same in every letter.
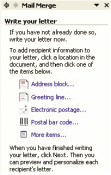
- The task pane provides assistance to include fields – the data which we had typed in earlier. We can put the insertion point in the beginning and click on Address Block to insert the formatted address. We can also click on More items to see all your fields, so that we can include the fields of your choice. The selected field will be inserted where the insertion point is placed.
- Put the insertion point at the beginning of the text. Click on More items… on the task pane, and enter the name and the various address fields. Then place the insertion point where we would like to put the time, and insert the Time field. If need be, we can format these fields.
- At this point, we will not see the data for the fields that we had typed in; instead we shall only see the field placeholders.
- Click on Next on the task pane to see what the actual letter would look like. In this view of the task pane, we have options to preview letter by clicking on
![A%203.2%20(1).tif]() or
or ![A%203.2%20(2).tif]() buttons. We can also exclude certain receipients from your list by clicking on
buttons. We can also exclude certain receipients from your list by clicking on ![A%203.2%20(3).tif]() button. Click on Next to complete the merge process.
button. Click on Next to complete the merge process.
 or
or  buttons. We can also exclude certain receipients from your list by clicking on
  button. Click on Next to complete the merge process.
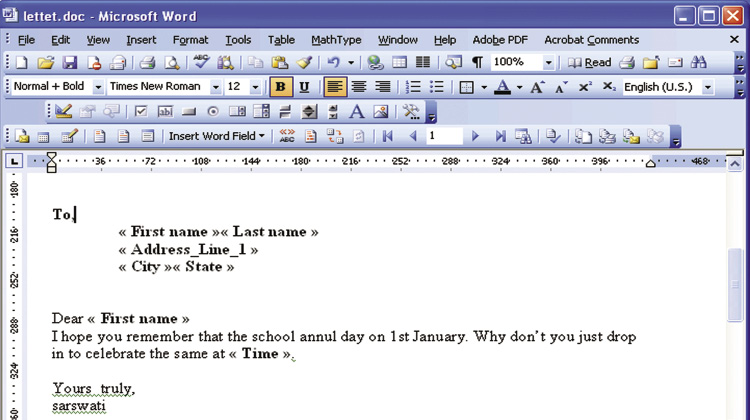
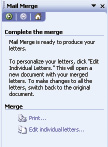
- In this task pane view, we can merge your document to the printer by clicking on Print – meaning that the letters will be printed one after another, containing the names, addresses, etc. that we had put in your address list. We can also merge to a new document by clicking on Edit individual letters. This will open a new document containing all your merged letters – if needed, we can then edit them one by one before printing.
In the above discussion, we learnt the Mail Merge utility using the task pane. However, when we proceed with mail merge, the Mail Merge Toolbar also appears with the required options.
Try different tools available on the toolbar.
Appendix 3.3 : Text Wrapping Styles