Table of Contents
9
WEB PAGE DESIGNING USING HTML
OBJECTIVES
After completing this Chapter, the student will be able to:
- recognise HTML tags and their attributes,
- use HTML tags and attributes to develop web pages,
- use HTML tags and attributes to format text and images, design layouts, present tables and lists and create hyperlinks,
- use HTML forms to add interactivity to web pages, and
- design a web site and construct it using HTML.
“Logic will get you from A to B. Imagination will take you everywhere.”
Albert Einstein
Introduction
As we have learnt earlier, the Internet is a very large network of computers spread across the world. The Internet allows for each of these computers to send and receive information from each other. One of the major applications of the Internet is the World Wide Web (WWW). The World Wide Web or the web in short, can be thought of as an interconnected set of documents, images, audio, video files or software files.
When you connect to the Internet and look around (we call it browsing), you are using a very interesting feature of the web, hyperlinks. Each time you click on a highlighted piece of text or image, you jump to another piece of text or image and this could be on the same page, another page on the same hard disk or on a page residing on another computer, half way across
the world.
How this works and how we could make it happen is what we will learn in this chapter. Web pages use a language called the Hyper Text Markup Language (HTML). The browser applications (Microsoft’s Internet Explorer, Mozilla’s Firefox, etc.) are designed to interpret HTML to display text, images and using hyperlinks, navigate the web.
9.1 INTRODUCTION TO HTML
Let us begin by looking at a web page (Figure 9.1) and analysing its features. This web page has the following major sections :
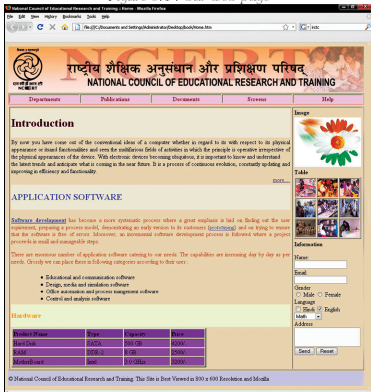
Figure 9.1 : Our web page
a header area : In our example, it consists of a mast head, which signifies the subject of the web page. It may also contain a picture, a logo, etc., depending on the purpose of the page.
a menu bar : This is a set of links, designed as buttons. Each link takes you to a separate section of the web page. In a way, this is like the chapter headings in a book.
body of the page : This part of the page contains all the content that you wish to present. The content could be of a variety of types – text, images, tables, forms, etc. We have organised the page in two columns. While the left column contains text, formatted in different ways, the right column contains some features unique to a web page – links, images which link to an image gallery, a comment form and a poll. It is such features which make a page interactive.
a footer area : This is at the bottom of the page and usually contains disclaimers, copyright information, etc. In our case, the footer text states, “All material on this site can be freely downloaded, distributed or reused”.
We will analyse the page and its sections further. We will also learn how to construct such web pages. In order to extend your knowledge, do look at a variety of web pages, each time noting down the layout and categorisation of content. Web page design has evolved into a very sophisticated activity, where artists and programmers work together to put together very elaborate features in order to make web pages interactive.
As we mentioned in the introduction, you need an application software called an Internet browser to view web pages. While all browsers are designed to interpret HTML and display web pages, they can be designed for different operating systems. You can have many browsers installed on your computer and use them simultaneously. Most browsers are free and can be downloaded from the web. Some popular browsers are listed below :
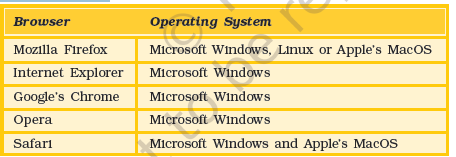
During the course of this chapter, you will encounter a number of browser commands. It would be unwieldy to refer to the commands in each kind of browser. Therefore, we will use Mozilla’s Firefox and refer to its commands. Every browser will have commands which will achieve similar purposes. They may however be placed in a different category, or called something else. So, when we mention a command, do check out how you will do a similar thing in Internet Explorer, Chrome or Opera.
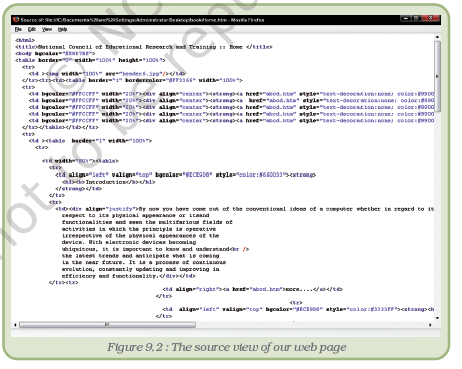
Every HTML file (also referred to as a web page) is a text file. It does not contain images, sound, or such information. The HTML file has references to such files. So when you see a photograph on the web page, the HTML file has called the image file and displayed it in the appropriate place on the web page. The fact that this is a text file, makes it platform independent – meaning that the same web page could be seen on a Windows, Unix, Linux or a MacOS computer. This is also the reason why the web is emerging as a universal medium of communication.
We mentioned that what traverses the web is the HTML code. It is this code that helps a browser construct the web page. But, how do you see the HTML code? Right-click on the page and from the options displayed, select view page source. You should now see the HTML code. This may look very threatening, but let us assure you that it is actually quite simple and you should be able to write it by the end of this chapter.
The basic element of the HTML code is a tag. Let us look at the code of our web page (Figure 9.2).
Web page designing using html
Notice the code <HTML> at the top of the page. If we scroll down to the bottom of the page, we will see the code </HTML>. We refer to such codes as tags. Learning to make web pages is all about learning to use these tags to present content the way you want. The general format for a HTML tag is :
<tag_name> affected text </tag_name>
The opening tag consists of just the tag name and it instructs the web browser to start tagging (formatting) the text. The ending tag includes a slash preceding the tag name. This “/” slash tells a web browser to stop tagging the text. Let us look at a few examples:
If you want your text to be highlighted, say using bold type face, you use
<b> HTML tags </b>
and what you get on the web page is HTML tags. Notice that the tag is not case sensitive, that is, <B> HTML tags </B> would have yielded the same result. An interesting aspect of a HTML tag is that if the browser does not know what to do with a given tag, it will simply ignore it!
There are two types of tags :
• Container tags : The HTML tags which require a closing tag are called container tags. These tags are also called paired or wrapper tags. The <b> text </b> is one such pair. If you do not close such tags, all the following text would be treated as if they are part of this tag.
• Non-container tags : The HTML tags which do not require a closing tag are called non-container tags. These tags are also called stand alone or empty tags. A typical example is that of <br>. This tag inserts a line break.
9.2.1 Attributes
Some tags are complete in themselves. In other words, they have only one option. For instance, when you want your text, say italicised, you use <i> text </i>. But if you wish to display text, say in some particular
font, how will the tag look then?
<font face=”Arial”> text</font>
Notice the tag in this example is <font> </font>. What about the remaining part, face= “Arial” We refer to this additional information as the tag’s attribute. So, in our example, the tag is font, its attribute is face and the value given to the attribute is Arial.
Attributes may have many different values you may like to use simultaneously. For instance, you may not only like a particular font, but also a particular size of letter and in a particular colour. How do you do this?
The tag would now be
<font face=”Arial”; size=14px; color=#ff0000">text </font>
Note the use of quotes to indicate values and semi-colons to separate attributes. The general form of the tag is :
<tag_name attribute-name = “attribute-value”>....</ tag_name> As a general rule, most attributes – that include only letters, digits, hyphens, or periods – work fine without quotes. Attributes that have other characters, such as spaces, % signs, or # signs, however, always require quotes. Nevertheless, it is a good habit to enclose all attribute values in quotes.
The purpose of the attribute is to extend the scope of a tag. It provides additional information about the tag, to the browser. How does the browser treat a tag, which requires an attribute, but no attribute is mentioned. For instance in our example if we had just used <font>text</font>, how would the browser show it. The best way to figure this out is to try it out yourself. Each browser has a default setting, which is the value it takes when no other value is defined. In Windows Internet Explorer, the default font setting is “font:Times New Roman; font-size:12pt and color:#000000. So if you only have the <font>text</font> tag without any attributes, then the text would be in 12 point, Times New Roman font and its colour would be black. You can of course change this default setting to whatever you wish. Go to Tools->Internet Options and click on the font button under the general tab. There are many other defaults and you can set any or all of them to customise your browser to your requirement.
9.3 STRUCTURE OF A HTML DOCUMENT
Summary
- One of the major applications of the Internet is the World Wide Web (www).
- The web can be thought of as an interconnected set of documents, images, audio, video or on software files.
- The web uses the Hyper Text Markup Language to request and serve web pages and programs. Browsers are designed to read and interpret HTML.
- HTML consists of tags; the general format for a HTML tag is <tag_name>affected text or image</tag_name>
- Tags have different attributes and attributes take different values. Together, they extend the scope and functionality of HTML tags.
- You will need a HTML editor to write your code and a browser to test your web page; browsers differ in the way they interpret specific tags; it is therefore advisable to test your web page on different popular browsers.
- The basic structure of a web page is
- The code that goes into the <head></head> tag pair is not displayed by the browser; the title tag is an exception; it is displayed in the title bar of the browser window.
- All references to scripts, fonts, meta data are made in the head section.
- All elements of the web page visible in the browser window go into the <body></body> tag.
- Tags associated with size, colour, font are used to highlight text elements on a web page You can also highlight text using bold, italic or underline.
- Text can be organised into paragraphs and paragraphs or lines of text can be separated from each other with the use of <p></p> and <br> tags.
- Lists can be prepared and presented using the ordered or unordered list tags; list items can be numbered in different ways using the type attribute.
- The <table></table> tags along with its associated tags and attributes is used in two ways; to separate different blocks of content and to present content in the form of tables.
- Tables consist of rows and cells; they can be structured and beautified using backgrounds, images, controlling their sizes and contents; tables can be nested within other tables.
- Images, audio and video files can be embedded in web pages. While browsers display images on their own, they require the support of media plugins to play back audio and video files.
- Hyperlinks are the most powerful feature of the web. Hyperlinks allow us to link two resources. The resources can be on the same or a different page, on the same storage or on a computer located half way across the world.
- Hyperlinks are achieved using the <a href=”source of resource”>link</a> tags. Forms can be used to submit information to, place a request on and retrieve informatio from the server. This extends the interactivity of web pages.
- Linking web pages to databases have enabled content on request, whereby servers respond to specific queries of users and dynamically generate web pages containing responses to the queries.
EXERCISES
Short Answer Type Questions
1. Identify and name the following:
(a) One physical tag and an equivalent logical tag used for making the text bold.
(b) One physical tag and an equivalent logical tag used for making the text appear in italics.
(c) A Windows accessory used as a text editor for creating HTML documents.
(d) Two possible extensions of an HTML file.
(e) A tag used for inserting section breaks.
(f) A tag used for displaying headings in a web page.
(g) Different tags necessary for creating tables.
(h) Tags used for creating framesets.
(i) Mandatory attribute of the <A> tag.
(j) An attribute of the <A> tag used to specify name of the frame in which the linked file is to open.
(k) Two attributes of the <FRAME> tag used to control the amount of white space between the frame borders and the contents of the frame.
2. Define the following terms:
(a) WWW
(b) Hypertext
(c) Markup
(d) Definition List
3. Differentiate between:
(a) Container and Non-container tags
(b) Text editors and WYSIWYG editors
(c) Logical and Physical tags
(d) <BR> and <P> tags
(e) Ordered List and Unordered List
(f) Internal and External Linking
(g) <A> as an anchor and <A> as a link
(h) Cellpadding and Cellspacing attribute of the Table tag
(i) Align and Valign attribute of <TD> tag
(j) <TD> and <TH> tag
(k) <TD> and <TR> tag
(l) <FRAMESET> and <FRAME> tags
(m) FRAMEBORDER and BORDER attribute of the <FRAMESET> tag
4. Correct the errors in the following HTML codes:
(a) <HTML>
<T> Term Test </T>
<BODY>
<FONT SIZE=6>My Shopping List</FONT>
<BREAK>
<OL Number=”A” START=D>
<LI>Shoes
<LI>Socks
</OL>
</BODY>
</HTML>
(b) <HTML>
<TITLE><HEAD>Using Link</TITLE></HEAD>
<BODY>
<A Name=”#top”>Links</A>
<P>This page is an example of using links
using the anchor tag. </P>
<A Href=”top”>Goto top</A>
</BODY>
</HTML>
5. Identify the tag and attribute(s) used:
(a) To mark up text to retain its formatting along with blank spaces, carriage returns etc.
(b) For creating a list which uses alphabets as the numbering style and starts with the alphabet D.
(c) To insert an image as a background of a web page.
(d) To insert a line along the width of the web page to break up long sections of text that is 10 pixels thick.
(e) For linking within a web page.
(f) Create named frames for linking.
(g) Creating a link to a specific point named MARKS in a web page named Result.html stored in the same directory as your web page.
(h) For displaying “Welcome” as a tool tip text for an image with a 7 pixels thick border.
Web Page Designing Using HTML
(i) For creating an e-mail link to send a message to [email protected].
(j) To display the cell contents at the bottom of the cell of a table.
(k) To give a colour to the background of the entire table.
(l) To specify the text in a cell of a table to appear in bold letters.
(m) To place the Caption of the table at the bottom of it.
LONG ANSWER TYPE QUESTIONS
1. Explain the role of HTML in creating web page.
2. Justify the statement: “HTML web pages are always saved as text files only”.
3. Explain the structure of a HTML document with an example.
4. What is a comment? How do you add comments in a HTML document? Explain
with the help of an example.
5. What are the usage of the <frameset> tag?
6. Explain the usage of the TARGET attribute of the <A> tag.
7. What is the significance of the SRC attribute of the <FRAME> tag?
8. Give the output of the following code:
a) <HTML>
<FRAMESET COLS=20%,*>
<FRAME NAME=”F1" SRC=”a.htm”>
<FRAMESET ROWS=50%,*>
<FRAME NAME=”F2" SRC=” b.htm”>
<FRAME NAME=”F3" SRC=” c.htm”>
</FRAMESET></FRAMESET>
</HTML>
b) <HTML>
<BODY>
<TABLE CELLSPACING=”4" CELLPADDING=”6" ALIGN=”CENTER” BORDER=”3">
<CAPTION ALIGN=”TOP”><CENTER><B>MARK LIST</B></CENTER></CAPTION>
<TR VALIGN=”MIDDLE”>
<TH>NAME</TH>
<TH>MARKS</TH>
<TH>PERCENTAGE</TH>
</TR>
<TR VALIGN=”MIDDLE”>
<TD>MEGHA</TD>
<TD>48/50</TD>
<TD VALIGN=”BOTTOM”>96%</TD>
</TR>
<TR ALIGN=”MIDDLE”>
<TD>TARUN</TD>
<TD>15/50</TD>
<TD>28%</TD>
</TR>
<TR ALIGN=”CENTER”>
<TD>VARUN</TD>
<TD ALIGN=”RIGHT” VALIGN=”TOP” BGCOLOR=”YELLOW”>42/50</TD>
<TD>84%</TD>
</TR>
</TABLE>
</BODY>
</HTML>
Activities
1. Write HTML code to display the names of any 5 subjects on different lines (use <BR> tags). Change the <BR> tags to <P> tags and notice the change. Next try to display the names with a number in front of them. Finally, change the numbers to bullets.
2. Write HTML code to illustrate the usage of nesting of tags. Change the nesting order and see if it makes any difference in the output.
3. Write the HTML code for the following web page:
(a) the age should be equal to or greater than 18 years and
(b) the nationality should be Indian.
Write a simple Quiz program that asks the user 5 questions. Alert about answers of the questions and give the user a score at the end of the Quiz.
Write an HTML document using JavaScript code to validate the form in your website.